background image

20

Rungon suojuksen asentaminen

Summary of Contents for G7 7790

Page 1: ...Dell G7 7790 Service Manual Regulatory Model P40E Regulatory Type P40E001 ...

Page 2: ...ja voidaan menettää Niissä kerrotaan myös miten nämä tilanteet voidaan välttää VAARA VAARAILMOITUKSET kertovat tilanteista joihin saattaa liittyä omaisuusvahinkojen loukkaantumisen tai kuoleman vaara 2019 2020 Dell Inc tai sen tytäryritykset Kaikki oikeudet pidätetään Dell EMC ja muut tavaramerkit ovat Dell Inc in tai sen tytäryritysten tavaramerkkejä Muut tavaramerkit voivat olla omistajiensa tav...

Page 3: ...sitoimenpiteet 21 Procedure for removing the battery for computers shipped without hard drive 21 Procedure for removing the battery for computers shipped with hard drive 22 9 Akun asentaminen 24 Procedure for replacing the battery for computers shipped without hard drive 24 Procedure for replacing the battery for computers shipped with hard drive 24 Jälkivaatimukset 25 10 Muistimoduulien irrottami...

Page 4: ...kivaatimukset 38 18 Kosketuslevyn irrottaminen 39 Esitoimenpiteet 39 Procedure 39 19 Kosketuslevyn asentaminen 41 Procedure 41 Jälkivaatimukset 42 20 SSD aseman Intel Optane muistin irrottaminen 43 Esitoimenpiteet 43 Procedure 43 21 SSD aseman Intel Optane muistin asentaminen 45 Procedure to move the screw mount 45 Procedure 47 Jälkivaatimukset 49 22 Langattoman kortin irrottaminen 50 Esitoimenpit...

Page 5: ...Procedure 61 Post requisites 61 30 I O kortin irrottaminen 62 Prerequisites 62 Procedure 62 31 I O kortin asentaminen 63 Procedure 63 Post requisites 63 32 Näyttökokoonpanon irrottaminen 64 Prerequisites 64 Procedure 64 33 Näyttökokoonpanon asentaminen 69 Procedure 69 Post requisites 72 34 Emolevyn irrottaminen 73 Prerequisites 73 Procedure 73 35 Emolevyn asentaminen 77 Procedure 77 Post requisite...

Page 6: ...oman verkkoyhteyden ja Bluetoothin ohjaimet 89 41 Järjestelmän asennusohjelma 90 Järjestelmäasetukset 90 BIOS asennusohjelmaan siirtyminen 90 Navigointinäppäimet 90 Käynnistysjärjestys 90 System setup options 91 Clearing CMOS settings 95 BIOS in järjestelmän asennus ja järjestelmän salasanan tyhjentäminen 96 42 Vianmääritys 97 ePSA Enhanced Pre boot System Assessment vianmääritys 97 ePSA diagnoosi...

Page 7: ...elluksista 2 Sammuta tietokone Napsauta Käynnistä Virta Sammuta HUOMAUTUS Jos käytät jotain toista käyttöjärjestelmää lue sammutusohjeet käyttöjärjestelmän ohjeista 3 Irrota tietokone ja kaikki kiinnitetyt laitteet sähköpistorasiasta 4 Irrota kaikki tietokoneeseen kytketyt verkkolaitteet ja lisävarusteet kuten näppäimistö hiiri ja näyttö 5 Poista tarvittaessa muistikortit ja optiset levyt tietokon...

Page 8: ...arkista ettei tietokoneen sisällä ole irrallisia ruuveja 2 Kytke ulkoiset laitteet oheislaitteet ja kaapelit jotka irrotit ennen tietokoneen käsittelyä 3 Asenna kaikki muistikortit levyt ja muut osat jotka irrotit ennen tietokoneen käsittelyä 4 Kiinnitä tietokone ja kaikki kiinnitetyt laitteet sähköpistorasiaan 5 Käynnistä tietokone 2 8 Tietokoneen käsittelemisen jälkeen ...

Page 9: ...a on lukituskieleke tai siipiruuvi joka on irrotettava ennen kaapelin irrottamista Kun irrotat kaapeleita pidä ne oikeassa asennossa jotta liitintapit eivät taitu Kun kytket kaapeleita varmista että portit ja liittimet ovat oikein päin ja oikeassa asennossa VAROITUS Jos muistikortinlukijassa on muistikortti ota se pois HUOMAUTUS Tietokoneen ja joidenkin komponenttien väri saattaa poiketa näissä oh...

Page 10: ...laitteen avulla jotta vahingossa tapahtuvat laitteiston ESD vauriot vältetään On suositeltavaa testata rannehihna ja yhdistämisvaijeri vähintään kerran viikossa ESD rannehihnan testauslaite ESD rannehihnan johdot vaurioituvat ajan mittaan Jos käytetään valvomatonta sarjaa hihna täytyy testata säännöllisesti ennen jokaisen huoltotyön aloittamista ja vähintään kerran viikossa On viisainta käyttää ra...

Page 11: ...ta 1 Varmista tasapainoinen asento Pidä jalkaterät toisistaan erillään vakalla alustalla siten että varpaat osoittavat ulospäin 2 Pidä vatsalihakset tiukkoina Ne tukevat selkärankaasi nostamisen aikana joten rasitus vähenee 3 Nosta jaloilla älä selällä 4 Pidä taakka lähellä vartaloasi Mitä lähempänä selkärankaasi se on sitä vähemmän nosto kuormittaa selkääsi 5 Kun nostat taakka tai lasket sen alas...

Page 12: ...Suositellut työkalut Tämän asiakirjan menetelmät voivat vaatia seuraavia työkaluja Phillips screwdriver 0 Phillips screwdriver 1 Flat head screwdriver Plastic scribe 4 12 Suositellut työkalut ...

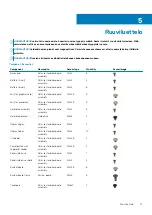
Page 13: ...attery 6 cell Palm rest and keyboard assembly M2x4 6 Fan for graphics card Palm rest and keyboard assembly M2x2 5 3 Fan for processor Palm rest and keyboard assembly M2x2 5 3 Hard drive assembly Palm rest and keyboard assembly M2x4 3 Hard drive bracket Hard drive M3x3 4 Display hinges Palm rest and keyboard assembly M2x4 4 Display hinges Palm rest and keyboard assembly M2x4 10 I O board Palm rest ...

Page 14: ...Component Secured to Screw type Quantity Screw image Touchpad bracket Palm rest and keyboard assembly M2x3 3 Wireless card bracket System board M2x4 1 14 Ruuviluettelo ...

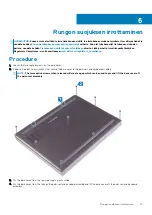
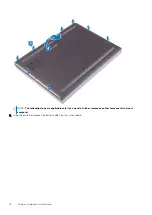
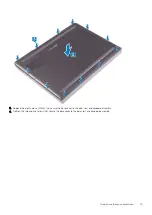
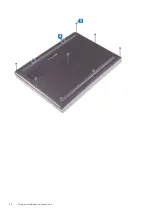
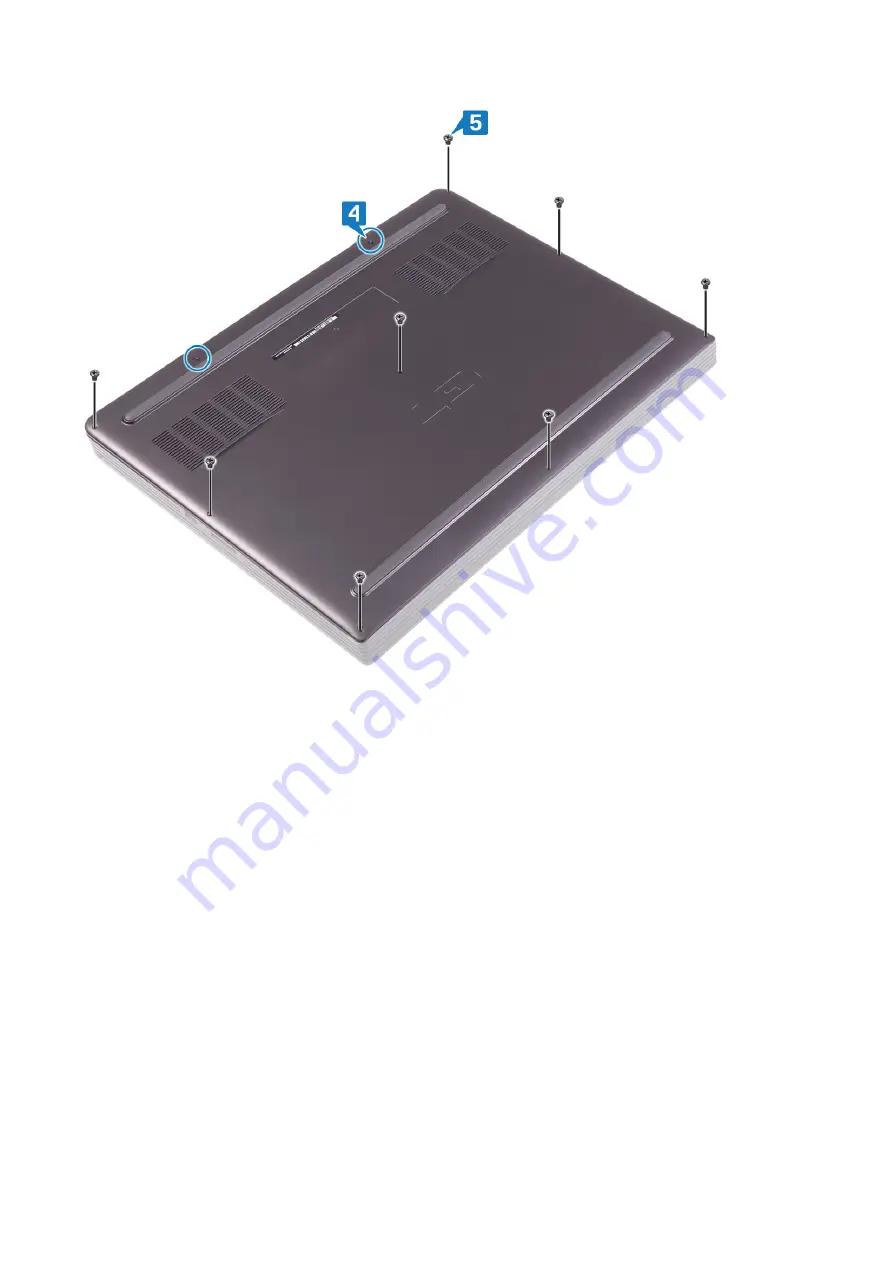
Page 15: ...iance sivulla osoitteessa www dell com regulatory_compliance Procedure 1 Loosen the two captive screws on the base cover 2 Remove the eight screws M2x4 that secure the base cover to the palm rest and keyboard assembly NOTE The two captive screws when released will create a gap which can be used to pry and lift the base cover off the palm rest assembly 3 Pry the base cover from the rear side using ...

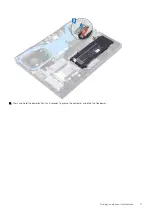
Page 16: ... following steps are applicable only if you want to further remove any other component from your computer 5 Using the pull tab disconnect the battery cable from the system board 16 Rungon suojuksen irrottaminen ...

Page 17: ...6 Press and hold the power button for 5 seconds to ground the computer and drain the flea power Rungon suojuksen irrottaminen 17 ...

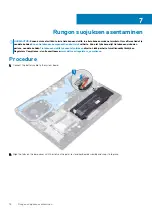
Page 18: ...skennellyt tietokoneen sisäosien parissa noudata kohdan Tietokoneen sisällä työskentelyn jälkeen ohjeita Lisää parhaita turvallisuuskäytäntöjä on Regulatory Compliance sivulla osoitteessa www dell com regulatory_compliance Procedure 1 Connect the battery cable to the system board 2 Align the tabs on the base cover with the slots on the palm rest and keyboard assembly and snap it into place 7 18 Ru...

Page 19: ... eight screws M2x4 that secure the base cover to the palm rest and keyboard assembly 4 Tighten the two captive screws that secure the base cover to the palm rest and keyboard assembly Rungon suojuksen asentaminen 19 ...

Page 20: ...20 Rungon suojuksen asentaminen ...

Page 21: ...a akun pintaan Älä taivuta akkua Älä käytä minkäänlaisia työkaluja akun kampeamiseen tai akkua vasten Pidä huoli ettet hukkaa tuotteen huollon aikana irrotettuja ruuveja sillä ne saattavat puhkaista akun tai vahingoittaa muita järjestelmän osia Jos akku juuttuu laitteeseen turpoamisen takia älä yritä irrottaa sitä koska litiumioniakun puhkaiseminen taivuttaminen tai murskaaminen voi olla vaarallis...

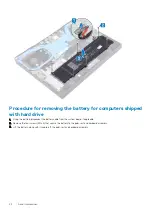
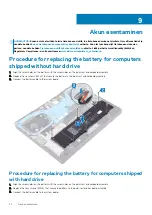
Page 22: ...Using the pull tab disconnect the battery cable from the system board if applicable 2 Remove the four screws M2x4 that secure the battery to the palm rest and keyboard assembly 3 Lift the battery along with its cable off the palm rest and keyboard assembly 22 Akun irrottaminen ...

Page 23: ...Akun irrottaminen 23 ...

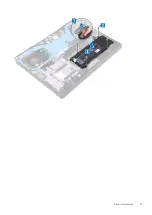
Page 24: ...e for replacing the battery for computers shipped without hard drive 1 Align the screw holes on the battery with the screw holes on the palm rest and keyboard assembly 2 Replace the six screws M2x4 that secure the battery to the palm rest and keyboard assembly 3 Connect the battery cable to the system board Procedure for replacing the battery for computers shipped with hard drive 1 Align the screw...

Page 25: ...Jälkivaatimukset Asenna rungon suojus Akun asentaminen 25 ...

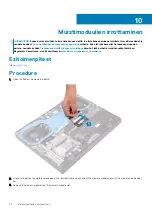
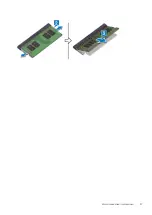
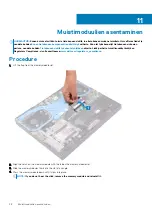
Page 26: ...n Tietokoneen sisällä työskentelyn jälkeen ohjeita Lisää parhaita turvallisuuskäytäntöjä on Regulatory Compliance sivulla osoitteessa www dell com regulatory_compliance Esitoimenpiteet Irrota rungon suojus Procedure 1 Open the flap on the memory module 2 Use your fingertips to carefully spread apart the securing clips on each end of the memory module slot until the memory module pops up 3 Remove t...

Page 27: ...Muistimoduulien irrottaminen 27 ...

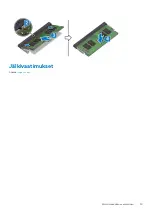
Page 28: ...skentelyn jälkeen ohjeita Lisää parhaita turvallisuuskäytäntöjä on Regulatory Compliance sivulla osoitteessa www dell com regulatory_compliance Procedure 1 Lift the flap from the memory module slot 2 Align the notch on the memory module with the tab on the memory module slot 3 Slide the memory modules firmly into the slot at an angle 4 Press the memory module down until it clicks into place NOTE I...

Page 29: ...Jälkivaatimukset Asenna rungon suojus Muistimoduulien asentaminen 29 ...

Page 30: ...työskentelyn jälkeen ohjeita Lisää parhaita turvallisuuskäytäntöjä on Regulatory Compliance sivulla osoitteessa www dell com regulatory_compliance VAROITUS Kiintolevyt ovat herkkiä Ole varovainen käsitellessäsi kiintolevyä VAROITUS Älä irrota kiintolevyä tietokoneen ollessa päällä tai lepotilassa jotta et menetä tietoja Prerequisites 1 Remove the base cover 2 Remove the battery Procedure Applicabl...

Page 31: ...nnect the interposer from the hard drive assembly 5 Remove the four screws M3x3 that secure the hard drive bracket to the hard drive 6 Lift the hard drive off the hard drive bracket Kiintolevyn irrottaminen 31 ...

Page 32: ...32 Kiintolevyn irrottaminen ...

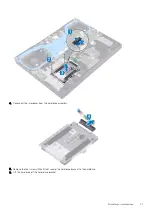
Page 33: ...etokoneen sisäosien parissa noudata kohdan Tietokoneen sisällä työskentelyn jälkeen ohjeita Lisää parhaita turvallisuuskäytäntöjä on Regulatory Compliance sivulla osoitteessa www dell com regulatory_compliance VAROITUS Kiintolevyt ovat herkkiä Ole varovainen käsitellessäsi kiintolevyä Procedure Applicable only on computers shipped with 4 cell battery 1 Align the screw holes on the hard drive brack...

Page 34: ... Replace the three screws M2x4 that secure the hard drive assembly to the palm rest and keyboard assembly 6 Slide the hard drive cable into the connector on the system board and close the latch to secure the hard drive cable Post requisites 1 Replace the battery 2 Replace the base cover 34 Kiintolevyn asentaminen ...

Page 35: ...itteessa www dell com regulatory_compliance VAROITUS Kun nappiparisto poistetaan BIOS asennusohjelman asetukset palautetaan oletusasetuksiin Suositellaan että BIOS asennusohjelman asetukset merkitään muistiin ennen nappipariston irrottamista Prerequisites CAUTION Removing the coin cell battery resets the BIOS setup program s settings to default It is recommended to note the BIOS setup program s se...

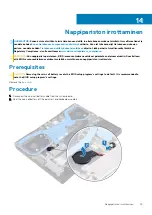
Page 36: ...nellyt tietokoneen sisäosien parissa noudata kohdan Tietokoneen sisällä työskentelyn jälkeen ohjeita Lisää parhaita turvallisuuskäytäntöjä on Regulatory Compliance sivulla osoitteessa www dell com regulatory_compliance Procedure 1 Adhere the coin cell battery to the palm rest and keyboard assembly 2 Connect the coin cell battery cable to the system board Post requisites Replace the base cover 15 3...

Page 37: ...koneen sisällä työskentelyn jälkeen ohjeita Lisää parhaita turvallisuuskäytäntöjä on Regulatory Compliance sivulla osoitteessa www dell com regulatory_compliance Esitoimenpiteet Irrota rungon suojus Procedure 1 Disconnect the speaker cable from the system board 2 Note the speaker cable routing and remove it from the routing guides on the palm rest and keyboard assembly 3 Lift the speakers along wi...

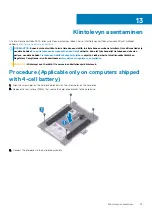
Page 38: ...öjä on Regulatory Compliance sivulla osoitteessa www dell com regulatory_compliance Procedure NOTE If the rubber grommets are pushed out of the speakers when removing the speakers push them back in place before replacing the speakers 1 Using the alignment posts and rubber grommets place the speakers in the slots on the palm rest and keyboard assembly 2 Route the speaker cable through the routing g...

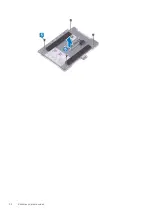
Page 39: ...tteessa www dell com regulatory_compliance Esitoimenpiteet 1 Irrota rungon suojus 2 Irrota akku Procedure 1 Open the latch and disconnect the touchpad cable from the system board and peel the touchpad cable off the touchpad 2 Remove the three screws M2x3 that secure the touchpad bracket to the palm rest and keyboard assembly 3 Lift the touchpad bracket off the palm rest and keyboard assembly 4 Rem...

Page 40: ...40 Kosketuslevyn irrottaminen ...

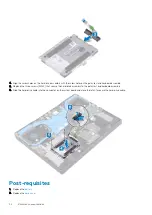
Page 41: ...t and keyboard assembly and the gap on either sides of the touchpad is equal 1 Slide and place the touchpad into the slot on the palm rest and keyboard assembly 2 Align the screw holes on the touchpad with the screw holes on the palm rest and keyboard assembly and replace the two screws M1 6x2 that secure the touchpad to the palm rest and keyboard assembly 3 Align the screw holes on the touchpad b...

Page 42: ...Jälkivaatimukset 1 Asenna akku 2 Asenna rungon suojus 42 Kosketuslevyn asentaminen ...

Page 43: ...tokoneen sisällä työskentelyn jälkeen ohjeita Lisää parhaita turvallisuuskäytäntöjä on Regulatory Compliance sivulla osoitteessa www dell com regulatory_compliance Esitoimenpiteet Irrota rungon suojus Procedure 1 Remove the two screws M2x4 that secure that solid state drive shield Intel Optane shield to the palm rest and keyboard assembly 2 Lift the solid state drive shield Intel Optane shield off...

Page 44: ...44 SSD aseman Intel Optane muistin irrottaminen ...

Page 45: ...parhaita turvallisuuskäytäntöjä on Regulatory Compliance sivulla osoitteessa www dell com regulatory_compliance VAROITUS SSD asemat ovat herkkiä Käsittele puolijohdeasemaa varovasti Procedure to move the screw mount This computer supports two solid state drive form factors M 2 2230 M 2 2280 If you are replacing the solid state drive of a different form factor other than the one removed see the fol...

Page 46: ... the solid state drive Intel Optane memory module firmly into the solid state drive slot at an angle 6 Press the other end of the solid state drive Intel Optane memory module and replace the screw M2x3 that secures the solid state drive to the palm rest and keyboard assembly 46 SSD aseman Intel Optane muistin asentaminen ...

Page 47: ...lid state drive Intel Optane firmly into the solid state drive slot at an angle NOTE Ensure that the solid state drive is firmly seated 3 Gently press the solid state drive down and replace the screw M2x3 that secures the solid state drive Intel Optane to the palm rest and keyboard assembly SSD aseman Intel Optane muistin asentaminen 47 ...

Page 48: ...el Optane shield with the screw holes on the palm rest and keyboard assembly 5 Replace the two screws M2x4 that secure that solid state drive shield Intel Optane shield to the palm rest and keyboard assembly 48 SSD aseman Intel Optane muistin asentaminen ...

Page 49: ...Jälkivaatimukset Asenna rungon suojus SSD aseman Intel Optane muistin asentaminen 49 ...

Page 50: ...lkeen ohjeita Lisää parhaita turvallisuuskäytäntöjä on Regulatory Compliance sivulla osoitteessa www dell com regulatory_compliance Esitoimenpiteet Irrota rungon suojus Procedure 1 Locate the wireless card on your computer 2 Remove the screw M2x4 that secures the wireless card bracket to the system board 3 Lift the wireless card bracket from the wireless card 4 Disconnect the antenna cables from t...

Page 51: ...Langattoman kortin irrottaminen 51 ...

Page 52: ...t place any cables under it 1 Connect the antenna cables to the wireless card The following table provides the antenna cable color scheme for the wireless card supported by your computer Table 2 Antenna cable color scheme Connectors on the wireless card Antenna cable color Main white triangle White Auxiliary black triangle Black 2 Align the notch on the wireless card with the tab on the wireless c...

Page 53: ...Jälkivaatimukset Asenna rungon suojus Langattoman kortin asentaminen 53 ...

Page 54: ...arissa noudata kohdan Tietokoneen sisällä työskentelyn jälkeen ohjeita Lisää parhaita turvallisuuskäytäntöjä on Regulatory Compliance sivulla osoitteessa www dell com regulatory_compliance Esitoimenpiteet Irrota rungon suojus Procedure 1 Remove the three screws M2x2 5 that secure the fan to the system board 2 Lift the fan at an angle 3 Disconnect the fan cable from the system board 4 Lift the fan ...

Page 55: ...Removing the graphics card fan 55 ...

Page 56: ...issa noudata kohdan Tietokoneen sisällä työskentelyn jälkeen ohjeita Lisää parhaita turvallisuuskäytäntöjä on Regulatory Compliance sivulla osoitteessa www dell com regulatory_compliance Procedure 1 Place the fan at an angle on the system board and connect the fan cable to the system board 2 Align the screw holes to the holes on the system board 3 Replace the three screws M2x2 5 that secure the fa...

Page 57: ...Jälkivaatimukset Asenna rungon suojus Replacing the graphics card fan 57 ...

Page 58: ... parissa noudata kohdan Tietokoneen sisällä työskentelyn jälkeen ohjeita Lisää parhaita turvallisuuskäytäntöjä on Regulatory Compliance sivulla osoitteessa www dell com regulatory_compliance Esitoimenpiteet Irrota rungon suojus Procedure 1 Remove the three screws M2x2 5 that secure the fan to the system board 2 Lift the fan at an angle 3 Disconnect the fan cable from the system board 4 Lift the fa...

Page 59: ...skentelyn jälkeen ohjeita Lisää parhaita turvallisuuskäytäntöjä on Regulatory Compliance sivulla osoitteessa www dell com regulatory_compliance Procedure 1 Connect the fan cable to the system board NOTE To avoid damaging the cables ensure to route the fan cable below the heat sink 2 Align the screw holes on the fan with the screw holes on the system board 3 Replace the three screws M2x2 5 that sec...

Page 60: ...dytyselementti voi kuumeta normaalikäytössä Anna jäähdytyselementin jäähtyä riittävän kauan ennen sen koskettamista VAROITUS Jotta suorittimen jäähdytys olisi mahdollisimman tehokasta älä kosketa jäähdytyselementin lämmönjohtoalueita Iholla oleva öljy voi heikentää piitahnan lämmönjohtotyynyn Prerequisites 1 Remove the base cover 2 Remove the graphics card fan 3 Remove the processor fan Procedure ...

Page 61: ...AROITUS Jäähdytyselementin virheellinen kohdistaminen voi vahingoittaa emolevyä tai suoritinta HUOMAUTUS Jos joko emolevy tai jäähdytyselementti vaihdetaan käytä pakkauksessa toimitettua lämmönjohtotyynyä tai tahnaa taataksesi lämmönjohtumisen Procedure 1 Align the screw holes on the heat sink with the screw holes on the system board and palm rest and keyboard assembly 2 In the sequential order 1 ...

Page 62: ...n ohjeita Lisää parhaita turvallisuuskäytäntöjä on Regulatory Compliance sivulla osoitteessa www dell com regulatory_compliance Prerequisites 1 Remove the base cover 2 Remove the graphics card fan 3 Remove the processor fan 4 Remove the heat sink Procedure 1 Open the latch and disconnect the I O board cable from the I O board 2 Remove the two screws M2x2 5 that secures the I O board to the palm re...

Page 63: ... parhaita turvallisuuskäytäntöjä on Regulatory Compliance sivulla osoitteessa www dell com regulatory_compliance Procedure 1 Align the ports on the I O board with the slots on the palm rest and keyboard assembly 2 Replace the two screws M2x2 5 that secure the I O board to the palm rest and keyboard assembly 3 Connect the I O board cable to the I O board and close the latch Post requisites 1 Replac...

Page 64: ...la osoitteessa www dell com regulatory_compliance Prerequisites 1 Remove the base cover 2 Replace the wireless card 3 Remove the graphics card fan 4 Remove the processor fan 5 Remove the heat sink Procedure 1 Remove the screw M2x2 5 that secures the display assembly cable to the system board 2 Peel the tape that secures the display cable to the system board 3 Open the latch and disconnect the disp...

Page 65: ...ercise care when flipping the computer 5 Flip the computer over 6 Pry the hinge cover from the palm rest and keyboard assembly and lift it off the palm rest and keyboard assembly Näyttökokoonpanon irrottaminen 65 ...

Page 66: ...opening between the hinges 8 Remove the antenna cables from the routing guides 9 Gently pull out the display cable from the palm rest and keyboard assembly 10 Gently pull the display cable from the palm rest and keyboard assembly 66 Näyttökokoonpanon irrottaminen ...

Page 67: ...11 Remove the ten screws M2x4 that secure the hinges to the palm rest and keyboard assembly 12 Lift the display assembly off the palm rest and keyboard assembly Näyttökokoonpanon irrottaminen 67 ...

Page 68: ...68 Näyttökokoonpanon irrottaminen ...

Page 69: ...äntöjä on Regulatory Compliance sivulla osoitteessa www dell com regulatory_compliance Procedure 1 Align the screw holes on the hinges with the screw holes on the palm rest and keyboard assembly 2 Replace the ten screws M2x4 that secure the hinges to the palm rest and keyboard assembly 3 Insert the display cable into the opening next to the hinge 4 Insert the display cable into the opening next to...

Page 70: ...7 Align the hinge cover with the slots on the palm rest and keyboard assembly and press to secure the hinge cover to the palm rest and keyboard assembly 70 Näyttökokoonpanon asentaminen ...

Page 71: ...y assembly to the palm rest and keyboard assembly 10 Connect the display cable and close the latch 11 Adhere the tape that secures the display cable to the system board 12 Replace the screw M2x2 5 that secures the display cable to the system board Näyttökokoonpanon asentaminen 71 ...

Page 72: ...Post requisites 1 Replace the heat sink 2 Replace the processor fan 3 Replace the graphics card fan 4 Replace the wireless card 5 Replace the base cover 72 Näyttökokoonpanon asentaminen ...

Page 73: ...a Sinun on tehtävä asianmukaiset muutokset uudelleen vaihdettuasi emolevyn HUOMAUTUS Ennen kuin irrotat kaapelit emolevyltä merkitse liitinten sijainnit muistiin jotta voit kytkeä kaapelit takaisin oikein asennettuasi emolevyn Prerequisites 1 Remove the base cover 2 Remove the battery 3 Remove the memory modules 4 Remove the solid state drive Intel Optane memory module 5 Remove the wireless card 6...

Page 74: ...e system board 10 Open the latch and disconnect the hard drive cable from the system board NOTE This step applies only to computers shipped with a hard drive 11 Open the latch and disconnect the fingerprint reader cable from the system board 12 Disconnect the coin cell battery cable from the system board 13 Open the latch and disconnect the I O board cable from the system board 14 Disconnect the p...

Page 75: ...15 Remove the three screws M2x5 that secure the system board frame to the system board 16 Lift the system board frame off the system board Emolevyn irrottaminen 75 ...

Page 76: ...17 Remove the six screws M2x2 5 that secure the system board to palm rest and keyboard assembly 18 Lift the system board off the palm rest and keyboard assembly 76 Emolevyn irrottaminen ...

Page 77: ...Huoltotunnus on syötettävä BIOS asennusohjelmaan sen jälkeen kun olet asentanut emolevyn paikalleen HUOMAUTUS Emolevyn vaihtaminen poistaa kaikki muutokset jotka olet tehnyt BIOSiin BIOS asennusohjelmalla Sinun on tehtävä asianmukaiset muutokset uudelleen vaihdettuasi emolevyn Procedure 1 Align the screw holes on the system board with the screw holes on the palm rest and keyboard assembly 2 Replac...

Page 78: ...he fingerprint reader cable and close the latch 9 Connect the hard drive cable and close the latch NOTE This step applies only to computers shipped with a hard drive 10 Connect the keyboard back light cable and close the latch 11 Connect the touchpad cable and close the latch 12 Connect the keyboard cable and close the latch 13 Connect the speaker cable 78 Emolevyn asentaminen ...

Page 79: ...crews M2x4 that secure the Type C USB port bracket to the system board 16 Connect the display assembly cable and close the latch 17 Adhere the tape that secures the display assembly cable to the system board 18 Replace the screw M2x2 5 that secures the display assembly cable to the system board Emolevyn asentaminen 79 ...

Page 80: ...ace the battery 8 Replace the base cover Huoltotunnuksen kirjoittaminen BIOS in asennusohjelmaan 1 Käynnistä tai käynnistä uudelleen tietokone 2 Siirry BIOS in asennusohjelmaan painamalla F2 kun näet Dell logon 3 Selaa Main Pää välilehteen ja syötä huoltotunnus kenttään Service Tag Input Anna huoltotunnus HUOMAUTUS Huoltotunnus on kirjaimista ja numeroista koostuva tunniste tietokoneen takaosassa ...

Page 81: ...ompliance HUOMAUTUS Koskee vain tietokoneita joissa on sormenjälkilukija Prerequisites 1 Remove the base cover 2 Remove the battery 3 Remove the memory modules 4 Remove the solid state drive Intel Optane 5 Remove the wireless card 6 Remove the graphics card fan 7 Remove the processor fan 8 Remove the heat sink 9 Remove the system board Procedure 1 Peel the fingerprint reader cable off the palm res...

Page 82: ...82 Sormenjälkilukijalla varustetun virtapainikkeen irrottaminen ...

Page 83: ...ä on Regulatory Compliance sivulla osoitteessa www dell com regulatory_compliance HUOMAUTUS Koskee vain tietokoneita joiden mukana toimitetaan sormenjälkilukija Procedure 1 Using the alignment posts align the power button on the palm rest and keyboard assembly 2 Replace the two screws M2x2 5 that secure the power button to the palm rest and keyboard assembly 3 Adhere the fingerprint reader cable o...

Page 84: ...raphics card fan 5 Replace the wireless card 6 Replace the solid state drive Intel Optane 7 Replace the memory modules 8 Replace the battery 9 Replace the base cover 84 Virtapainikkeen korvaaminen sormenjälkilukijalla ...

Page 85: ...compliance Prerequisites 1 Remove the base cover 2 Remove the battery 3 Remove the memory modules 4 Remove the speakers 5 Remove the solid state drive Intel Optane memory module 6 Remove the wireless card 7 Remove the graphics card fan 8 Remove the processor fan 9 Remove the heat sink 10 Remove the coin cell battery 11 Remove the touchpad 12 Remove the hard drive optional 13 Remove the I O board 1...

Page 86: ...86 Kämmentuki ja näppäimistökokoonpanon irrottaminen ...

Page 87: ...l com regulatory_compliance Procedure Place the palm rest and keyboard assembly on a flat surface Post requisites 1 Replace the power button with fingerprint reader 2 Replace the system board 3 Replace the display assembly 4 Replace the I O board 5 Replace the hard drive optional 6 Replace the touchpad 7 Replace the coin cell battery 8 Replace the heat sink 9 Replace the processor fan 10 Replace t...

Page 88: ...16 Replace the base cover 88 Kämmentuki ja näppäimistökokoonpanon asentaminen ...

Page 89: ...pport Intel Trusted Execution Engine käyttöliittymä Tarkista laitehallinnasta onko järjestelmään asennettu Intel Trusted Execution Engine Interface ohjain Asenna ohjainpäivitys osoitteesta www dell com support Intel Virtual Button ohjain Tarkista laitehallinnasta onko järjestelmään asennettu Intel Virtual Button ohjain Asenna ohjainpäivitykset osoitteesta www dell com support Langattoman verkkoyht...

Page 90: ...töön ja paina heti F2 Jos painat F2 näppäintä ennen F2 pyynnön ilmaantumista painallusta ei huomioida Jos odotat liian kauan ja käyttöjärjestelmän logo tulee näyttöön odota kunnes näyttöön tulee työpöytä Sammuta tämän jälkeen tietokone ja yritä uudelleen Navigointinäppäimet HUOMAUTUS Useimpien järjestelmän määritysohjelman asetusten muutokset astuvat voimaan kun käynnistät järjestelmän uudelleen N...

Page 91: ... Displays the manufacture date of the computer Ownership Date Displays the ownership date of the computer Express Service Code Displays the express service code of the computer Memory Information Memory Installed Displays the total computer memory installed Memory Available Displays the total computer memory available Memory Speed Displays the memory speed Memory Channel Mode Displays single or du...

Page 92: ...ROMs Enables or disables the Legacy Option ROMs Enable Attempt Legacy Boot Enables or disables Legacy Boot UEFI Boot Path Security Enables or disables the computer to prompt the user to enter the Admin password when booting a UEFI boot path from the F12 boot menu Date Time Displays the current date in MM DD YY format and current time in HH MM SS AM PM format Table 4 System setup options System Con...

Page 93: ...ssword Configuration Control the minimum and maximum number of characters that are allowed for Admin and System passwords Password Bypass Bypass the System Boot Password and the internal HDD password prompts during a computer restart Password Change Enable or disable changes to the System and Hard Disk passwords when an administrator password is set Non Admin Setup Changes Determines whether chang...

Page 94: ...a preselected date and time This option can be configured only if the Auto On Time is set to Everyday Weekdays or Selected Days Default Disabled USB Wake Support Enable the USB devices to wake the computer from Standby Advanced Battery Charge Configuration Enable Advanced Battery Charge Configuration from the beginning of the day to a specified work period Primary Battery Charge Configuration Set ...

Page 95: ...ata from all internal storage devices BIOS Recovery Enable the user to recover from certain corrupted BIOS conditions from a recovery file on the user primary hard drive or an external USB drive Table 12 System setup options System Logs menu System Logs BIOS Events Display BIOS events Thermal Events Display Thermal events Power Events Display Power events Table 13 System setup options SupportAssis...

Page 96: ... järjestelmän tai BIOS in salasanan ota yhteyttä Dellin tekniseen tukeen Yhteystiedot ovat saatavilla osoitteesta www dell com contactdell HUOMAUTUS Jos haluat nollata Windowsin tai sovellusten salasanan katso ohjeet Windowsin tai kyseisen sovelluksen ohjeista 96 Järjestelmän asennusohjelma ...

Page 97: ...olta Havaitut tuotteet tulevat luetteloon 6 Jos haluat suorittaa tietyn laitteen diagnoositestin paina Esc ja klikkaa Yes Kyllä pysäyttääksesi diagnoositestin 7 Valitse vasemmasta ruudusta laite ja klikkaa Run Tests Suorita testit 8 Jos löytyy ongelmia virhekoodit esitetään Merkitse virhekoodi ja validointinumero muistiin ja ota yhteyttä Delliin System diagnostic lights Battery status light hard d...

Page 98: ...oja on tietokannan artikkelissa SLN143196 osoitteessa www dell com support 3 Kopioi BIOS määritysohjelma USB käynnistysasemalle 4 Liitä USB käynnistysasema tietokoneeseen jonka BIOS in haluat päivittää 5 Käynnistä tietokone uudelleen ja paina F12 kun näet Dell logon näytöllä 6 Valitse USB käynnistyslaite kertakäynnistysvalikosta 7 Kirjoita BIOS määritysohjelman tiedostonimi ja paina Enter 8 BIOS p...

Page 99: ...käytöstä ennen kuin irrotat tietokoneesta Intel Optane muistimoduulin kiihdyttämän SATA tallennuslaitteen 1 Napsauta tehtäväpalkkia napsauta hakuruutua ja kirjoita Intel Rapid Storage Technology 2 Valitse Intel Rapid Storage Technology Intel Rapid Storage Technology ikkuna tulee näkyviin 3 Valitse Intel Optane Intel Optane muisti välilehdellä Poista käytöstä jos haluat poistaa Intel Optane muistin...

Page 100: ...2 Irrota verkkolaite tietokoneesta 3 Pidä virtapainiketta painettuna 15 sekuntia jäännösvirran purkamiseksi 4 Kytke verkkolaite tietokoneeseen 5 Käynnistä tietokone 100 Vianmääritys ...

Page 101: ...napsauttamalla Haku Tutustu tuotteesi seuraaviin tietoihin Laitteen tiedot Käyttöjärjestelmä Tietokoneen asentaminen ja käyttö Tietojen varmuuskopiointi Ongelmanratkaisu ja diagnostiikka Tehdas ja järjestelmäasetusten palauttaminen BIOS tiedot Katso Minä ja Dell tietokoneeni osoitteessa www dell com support manuals Paikanna tuotteesi Minä ja Dell tietokoneeni kohta tunnistamalla tuotteesi jollain ...

Reviews: