


Replacing the control-buttons
board
WARNING: Before working inside your computer, read the safety
information that shipped with your computer and follow the steps in
Before working inside your computer
. After working inside your
computer, follow the instructions in
After working inside your
computer
. For more safety best practices, see the Regulatory
Compliance home page at dell.com/regulatory_compliance.
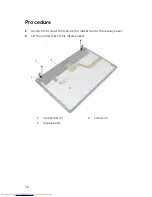
Procedure
1
Slide the control-buttons board cable into the connector on the control-
buttons board and press down on the latch to secure the cable.
2
Replace the control-buttons board into the slot on the display bezel.
3
Route the control-buttons board cable through the routing guides and
adhere the control-buttons board cable to the display-assembly base.
4
Slide the control-buttons board cable into the connector on the systems
board and press down on the latch to secure the cable.
Post-requisites
1
Replace the
VESA-mount bracket
.
2
Replace the
back cover
.
3
Replace the
stand assembly
.
67
Summary of Contents for Inspiron 24 3000 series
Page 15: ...4 Lift the stand off the back cover 1 stand 2 stand bracket 3 screws 2 4 back cover 15 ...
Page 18: ...2 Lift the back cover off the computer 1 display bezel 2 back cover 3 plastic scribe 18 ...
Page 72: ...1 display assembly 72 ...
Page 78: ...15 Replace the optical drive 16 Replace the back cover 17 Replace the stand assembly 78 ...


