background image

NOTE: This process may take up to an hour to complete and your computer 
will restart during the recovery process.

Connect the USB recovery drive to your computer.

Restart your computer.

Press F12 after the Dell logo is displayed on the screen to access the boot menu.

Preparing one-time boot menu

 message appears.

After the boot menu loads, select the USB recovery device under 

UEFI BOOT

.

The system reboots and a screen to 

Choose the keyboard layout

 is displayed.

Choose your keyboard layout.

In the 

Choose an option

 screen, click 

Troubleshoot

.

Click 

Recover from a drive

.

Choose one of the following options:

Just remove my files

 to do a quick format.

Fully clean the drive

 to do a complete format.

Click 

Recover

 to start the recovery process.

12

Summary of Contents for Inspiron 24 3000 series

Page 1: ...Inspiron 24 3000 All in One Setup and Specifications Computer Model Inspiron 24 3477 Regulatory Model W21C Regulatory Type W21C001 ...

Page 2: ...amage to hardware or loss of data and tells you how to avoid the problem WARNING A WARNING indicates a potential for property damage personal injury or death 2018 Dell Inc or its subsidiaries All rights reserved Dell EMC and other trademarks are trademarks of Dell Inc or its subsidiaries Other trademarks may be trademarks of their respective owners 2018 01 Rev A00 ...

Page 3: ...ive for Windows 11 Reinstall Windows using a USB recovery drive 11 Views 13 Front 13 Left 14 Back 15 Back panel 16 Bottom 17 Tilt 17 Retractable camera 20 Specifications 21 Computer model 21 System information 21 Dimensions and weight 21 Operating system 22 Memory 22 Ports and connectors 22 Communications 23 3 ...

Page 4: ...ireless 23 Audio 24 Storage 24 Media card reader 24 Camera 25 Power adapter 25 Display 25 Video 26 Computer environment 26 Getting help and contacting Dell 28 Self help resources 28 Contacting Dell 29 4 ...

Page 5: ...Set up your computer 1 Set up the easel stand or pedestal stand 2 Connect the keyboard and mouse NOTE For setup instructions see the documentation shipped with the keyboard and mouse 5 ...

Page 6: ...oute the power adapter cable through the routing guide on the stand to avoid potential damage to the power adapter and to avoid the unexpected system power off when the stand is moved to a different orientation Easel stand Pedestal stand 6 ...

Page 7: ...ndows Follow the on screen instructions to complete the setup When setting up Dell recommends that you Connect to a network for Windows updates NOTE If connecting to a secured wireless network enter the password for the wireless network access when prompted If connected to the internet sign in with or create a Microsoft account If not connected to the internet create an offline account On the Supp...

Page 8: ...portAssist documentation at www dell com support NOTE Renew or upgrade your warranty by clicking the warranty expiry date in SupportAssist Dell Update Updates your computer with critical fixes and latest device drivers as they become available Dell Digital Delivery Download software applications which are purchased but not pre installed on your computer 7 Create recovery drive for Windows NOTE It ...

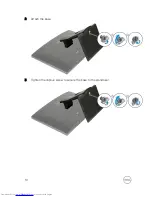
Page 9: ...Set up the pedestal stand 1 Lift the stand riser 9 ...

Page 10: ...2 Attach the base 3 Tighten the captive screw to secure the base to the stand riser 10 ...

Page 11: ... the search results click Create a recovery drive The User Account Control window is displayed 4 Click Yes to continue The Recovery Drive window is displayed 5 Select Back up system files to the recovery drive and click Next 6 Select the USB flash drive and click Next A message appears indicating that all data in the USB flash drive will be deleted 7 Click Create 8 Click Finish Reinstall Windows u...

Page 12: ...aring one time boot menu message appears 4 After the boot menu loads select the USB recovery device under UEFI BOOT The system reboots and a screen to Choose the keyboard layout is displayed 5 Choose your keyboard layout 6 In the Choose an option screen click Troubleshoot 7 Click Recover from a drive 8 Choose one of the following options Just remove my files to do a quick format Fully clean the dr...

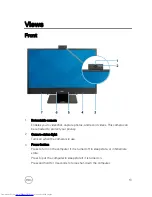
Page 13: ...tracted to protect your privacy 2 Camera status light Turns on when the camera is in use 3 Power button Press to turn on the computer if it is turned off in sleep state or in hibernate state Press to put the computer in sleep state if it is turned on Press and hold for 4 seconds to force shut down the computer 13 ...

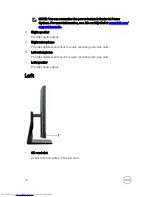
Page 14: ...om support manuals 4 Right speaker Provides audio output 5 Right microphone Provides digital sound input for audio recording and voice calls 6 Left microphone Provides digital sound input for audio recording and voice calls 7 Left speaker Provides audio output Left 1 SD card slot Reads from and writes to the SD card 14 ...

Page 15: ...latory label Contains the regulatory information of the wireless components for your computer 2 Back panel Connect power USB audio and other devices 3 Regulatory label Contains regulatory information of your computer 15 ...

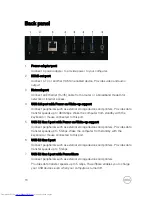
Page 16: ... from standby with the keyboard or mouse connected to this port 5 USB 3 1 Gen 1 port with Power on Wake up support Connect peripherals such as external storage devices and printers Provides data transfer speeds up to 5 Gbps Wake the computer from standby with the keyboard or mouse connected to this port 6 USB 3 1 Gen 1 port Connect peripherals such as external storage devices and printers Provides...

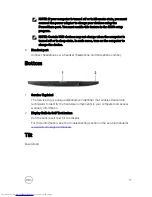
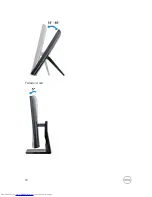
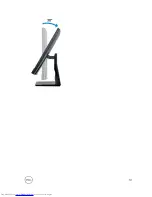
Page 17: ...computer to charge the device 8 Headset port Connect headphones or a headset headphone and microphone combo Bottom 1 Service Tag label The Service Tag is a unique alphanumeric identifier that enables Dell service technicians to identify the hardware components in your computer and access warranty information 2 Display Built in Self Test button Run the built in self test for the display For more in...

Page 18: ...Pedestal stand 18 ...

Page 19: ...19 ...

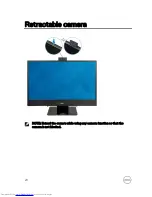
Page 20: ...Retractable camera NOTE Extend the camera while using any camera function so that the camera is not blocked 20 ...

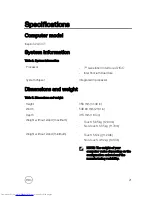
Page 21: ...sor Dimensions and weight Table 3 Dimensions and weight Height 358 mm 14 49 in Width 548 80 mm 21 61 in Depth 41 5 mm 1 63 in Weight without stand maximum Touch 5 85 kg 12 89 lb Non touch 5 35 kg 11 79 lb Weight without stand minimum Touch 5 12 kg 11 29 lb Non touch 4 62 kg 10 19 lb NOTE The weight of your computer varies depending on the configuration ordered and the manufacturing variability 21 ...

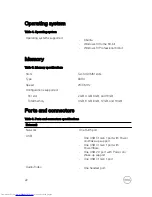
Page 22: ...d 2133 MHz Configurations supported Per slot 2 GB 4 GB 8 GB and 16 GB Total memory 4 GB 6 GB 8 GB 12 GB and 16 GB Ports and connectors Table 6 Ports and connectors specifications External Network One RJ45 port USB One USB 3 1 Gen 1 port with Power on Wake up support One USB 3 1 Gen 1 port with PowerShare One USB 2 0 port with Power on Wake up support One USB 3 1 Gen 1 port Audio Video One headset ...

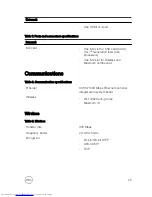
Page 23: ...cessors One M 2 slot for Wireless and Bluetooth combo card Communications Table 8 Communication specifications Ethernet 10 100 1000 Mbps Ethernet controller integrated on system board Wireless Wi Fi 802 11a b g n ac Bluetooth 4 1 Wireless Table 9 Wireless Transfer rate 433 Mbps Frequency bands 2 4 GHz 5 GHz Encryption 64 bit 128 bit WEP AES CCMP TKIP 23 ...

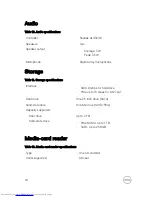
Page 24: ...rage specifications Interface SATA 6 Gbps for hard drive PCIe up to 16 Gbps for M 2 card Hard drive One 2 5 inch drive SATA Solid state drive One M 2 drive SATA PCIe Capacity supported Hard drive Up to 2 TB Solid state drive PCIe NVMe Up to 1 TB SATA Up to 256 GB Media card reader Table 12 Media card reader specifications Type One SD card slot Cards supported SD card 24 ...

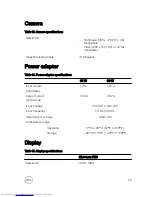
Page 25: ...le 14 Power adapter specifications 65 W 90 W Input current maximum 1 70 A 1 50 A Output current continuous 3 34 A 4 62 A Input Voltage 100 VAC to 240 VAC Input frequency 50 Hz to 60 Hz Rated output voltage 19 50 VDC Temperature range Operating 0 C to 40 C 32 F to 104 F Storage 40 C to 70 C 40 F to 158 F Display Table 15 Display specifications 23 8 inch FHD Resolution 1920 x 1080 25 ...

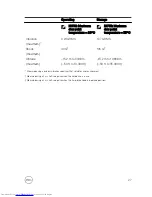
Page 26: ... Integrated Discrete Controller Intel HD Graphics 610 Intel HD Graphics 620 NVIDIA GeForce MX110 Memory Shared system memory 2 GB GDDR5 Computer environment Airborne contaminant level G1 as defined by ISA S71 04 1985 Table 17 Computer environment Operating Storage Temperature range 10 C to 35 C 50 F to 95 F 40 C to 65 C 40 F to 149 F Relative humidity maximum 20 to 80 non condensing 5 to 95 non co...

Page 27: ...k maximum 40 G 105 G Altitude maximum 15 2 m to 3048 m 50 ft to 10 000 ft 15 2 m to 10 668 m 50 ft to 35 000 ft Measured using a random vibration spectrum that simulates user environment Measured using a 2 ms half sine pulse when the hard drive is in use Measured using a 2 ms half sine pulse when the hard drive head is in parked position 27 ...

Page 28: ...stem www dell com support windows www dell com support linux Troubleshooting information user manuals setup instructions product specifications technical help blogs drivers software updates and so on www dell com support Dell knowledge base articles for a variety of computer concerns 1 Go to www dell com support 2 Type the subject or keyword in the Search box 3 Click Search to retrieve the related...

Page 29: ...h the drop down menu under View Products Enter the Service Tag number or Product ID in the search bar Contacting Dell To contact Dell for sales technical support or customer service issues see www dell com contactdell NOTE Availability varies by country and product and some services may not be available in your country NOTE If you do not have an active internet connection you can find contact info...

Reviews: