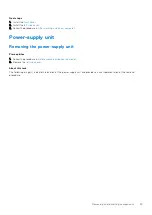
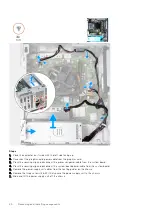
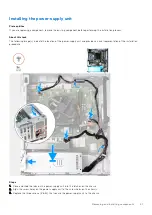
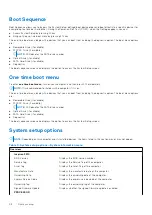
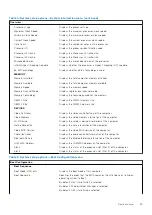
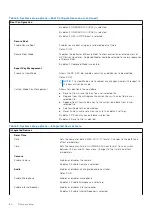
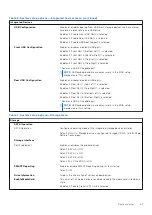
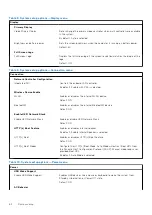
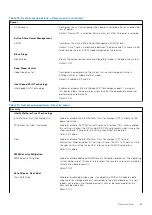
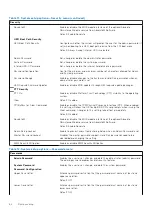
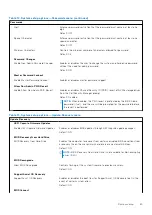
background image

The following image(s) indicate the location of the system board and provides a visual representation of the installation
procedure.

Removing and installing components

53

Summary of Contents for Inspiron 3910

Page 1: ...Inspiron 3910 Service Manual Regulatory Model D32M Regulatory Type D32M002 December 2021 Rev A00 ...

Page 2: ...ential damage to hardware or loss of data and tells you how to avoid the problem WARNING A WARNING indicates a potential for property damage personal injury or death 2021 Dell Inc or its subsidiaries All rights reserved Dell EMC and other trademarks are trademarks of Dell Inc or its subsidiaries Other trademarks may be trademarks of their respective owners ...

Page 3: ...over 15 Optical drive 16 Removing the optical drive 16 Installing the optical drive 17 Optical drive bezel 19 Removing the optical drive bezel 19 Installing the optical drive bezel 20 Hard drive 20 Removing the hard drive 20 Installing the hard drive 21 Power button 23 Removing the power button 23 Installing the power button 23 Graphics card 24 Removing the graphics card 24 Installing the graphics...

Page 4: ... the system board 51 Chapter 3 Drivers and downloads 56 Chapter 4 System setup 57 BIOS overview 57 Entering BIOS setup program 57 Navigation keys 57 Boot Sequence 58 One time boot menu 58 System setup options 58 System and setup password 68 Assigning a system setup password 68 Deleting or changing an existing system setup password 69 Real Time Clock RTC reset 69 Clearing BIOS System Setup and Syst...

Page 5: ...Chapter 6 Getting help and contacting Dell 75 Contents 5 ...

Page 6: ...r computer For more safety best practices see the Regulatory Compliance home page at www dell com regulatory_compliance WARNING Disconnect your computer from all power sources before opening the computer cover or panels After you finish working inside the computer replace all covers panels and screws before connecting your computer to an electrical outlet CAUTION To avoid damaging the computer ens...

Page 7: ...may cause degradation of memory integrity intermittent memory errors etc The more difficult type of damage to recognize and troubleshoot is the intermittent also called latent or walking wounded failure Perform the following steps to prevent ESD damage Use a wired ESD wrist strap that is properly grounded The use of wireless anti static straps is no longer allowed they do not provide adequate prot...

Page 8: ...n static safe packaging Metal static shielded bags are preferred However you should always return the damaged part using the same ESD bag and packaging that the new part arrived in The ESD bag should be folded over and taped shut and all the same foam packing material should be used in the original box that the new part arrived in ESD sensitive devices should be removed from packaging only at an E...

Page 9: ...re that no stray screws remain inside your computer 2 Connect any external devices peripherals or cables you removed before working on your computer 3 Replace any media cards discs or any other parts that you removed before working on your computer 4 Connect your computer and all attached devices to their electrical outlets 5 Turn on your computer Working inside your computer 9 ...

Page 10: ...screw type is restored when the component is replaced NOTE Some computers have magnetic surfaces Ensure that the screws are not left attached to such surfaces when replacing a component NOTE Screw color may vary with the configuration ordered Table 1 Screw list Component Secured to Screw type Quantity Screw image Left side cover Chassis 6 32 2 Solid state drive System board M2x3 5 1 Wireless card ...

Page 11: ...ia card reader Chassis 6 32 pan head 1 Front I O bracket Chassis 6 32 pan head 2 Processor fan and heat sink assembly System board Captive M3 4 System board Chassis 6 32 hex head 8 Major components of Inspiron 3910 The following image shows the major components of Inspiron 3910 Removing and installing components 11 ...

Page 12: ...lid state drive 5 2230 solid state drive 6 media card reader 7 system board 8 power supply unit 9 chassis 10 graphics card 11 hard drive 12 fan and heat sink assembly 13 fan shroud 14 wireless card 15 processor 16 memory module 12 Removing and installing components ...

Page 13: ... Removing the left side cover Prerequisites 1 Follow the procedure in Before working inside your computer About this task The following image s indicate the location of the left side cover and provides a visual representation of the removal procedure Steps 1 Remove the two screws 6 32 that secure the left side cover to the chassis 2 Holding the tab on the left side cover firmly slide and remove th...

Page 14: ...presentation of the installation procedure Steps 1 Holding the left side cover firmly on both sides slide it into the chassis towards the front of the computer 2 Replace the two screws 6 32 that secure the left side cover to the chassis Next steps 1 Follow the procedure in After working inside your computer Front cover Removing the front cover Prerequisites 1 Follow the procedure in Before working...

Page 15: ...re the front cover to the chassis 2 Open the front cover and lift it away from the chassis Installing the front cover Prerequisites If you are replacing a component remove the existing component before performing the installation process About this task The following image s indicate the location of the front cover and provides a visual representation of the installation procedure Removing and ins...

Page 16: ...computer Optical drive Removing the optical drive Prerequisites 1 Follow the procedure in Before working inside your computer 2 Remove the left side cover 3 Remove the front cover About this task NOTE Depending on the configuration ordered your computer may not have an optical drive installed The following image s indicate the location of the optical drive and provides a visual representation of t...

Page 17: ...cage 4 Pull to slide out the optical drive through the front of the computer Installing the optical drive Prerequisites If you are replacing a component remove the existing component before performing the installation process About this task The following image s indicate the location of the optical drive and provides a visual representation of the installation procedure Removing and installing co...

Page 18: ...2 that secure the optical drive to the optical drive cage 3 Connect the power and data cables to the optical drive 4 Place the computer in an upright position Next steps 1 Install the front cover 2 Install the left side cover 3 Follow the procedure in After working inside your computer 18 Removing and installing components ...

Page 19: ...uration ordered your computer may not have an optical drive installed The following image s indicate the location of the optical drive bezel and provides a visual representation of the removal procedure Steps 1 Insert an unfolded paperclip into the emergency eject pinhole of the optical drive to open the drive tray 2 Using a plastic scribe press down the tab that secures the optical drive bezel to...

Page 20: ...on of the installation procedure Steps 1 Align the tabs on the optical drive bezel with slots on the optical drive and snap it in place 2 Slide the optical drive tray into the optical drive and close it Next steps 1 Install the optical drive 2 Install the front cover 3 Install the left side cover 4 Follow the procedure in After working inside your computer Hard drive Removing the hard drive Prereq...

Page 21: ...th the left side facing up 2 Holding the hard drive in place remove the four screws 6 32 that secure the hard drive to the chasis 3 Disconnect the data and power cables from the hard drive 4 Lift the hard drive off the chassis Installing the hard drive Prerequisites If you are replacing a component remove the existing component before performing the installation process About this task NOTE You ma...

Page 22: ...ard drive 2 Place the hard drive onto the chassis and align the screw holes of the hard drive with the screw holes of the chassis 3 Replace the four screws 6 32 that secure the hard drive to the chassis 4 Place the computer in an upright position Next steps 1 Install the left side cover 2 Follow the procedure in After working inside your computer 22 Removing and installing components ...

Page 23: ... 1 Place the computer on its side with the left side facing up 2 Disconnect the power button cable from the system board 3 Press the release tabs on the power button to release it from the slot on the chassis 4 Route the power button along with its cable through the slot on the chassis 5 Remove the power button and its cable from the front of the chassis Installing the power button Prerequisites I...

Page 24: ...mputer in an upright position Next steps 1 Install the hard drive 2 Install the front cover 3 Install the left side cover 4 Follow the procedure in After working inside your computer Graphics card Removing the graphics card Prerequisites 1 Follow the procedure in Before working inside your computer 2 Remove the left side cover About this task NOTE Depending on the configuration ordered your comput...

Page 25: ...card power cable from the graphics card 4 Push the securing tab on the PCIe x16 slot away from the graphics card 5 Lift the graphics card off the system board Installing the graphics card Prerequisites If you are replacing a component remove the existing component before performing the installation process Removing and installing components 25 ...

Page 26: ...d 2 Place the card into the slot and press down firmly until the graphics card snaps into place 3 Connect the graphics card power cable to the graphics card 4 Rotate the card retention bracket towards the chassis until it snaps into place 5 Place the computer in an upright position Next steps 1 Install the left side cover 2 Follow the procedure in After working inside your computer 26 Removing and...

Page 27: ...s on each end of the memory module slot 3 Grasp the memory module near the securing clip and then gently ease the memory module out of the memory module slot CAUTION To prevent damage to the memory module hold the memory module by the edges Do not touch the components on the memory module NOTE Repeat step 2 to step 3 to remove any other memory modules installed in your computer NOTE Note the slot ...

Page 28: ...e slot 3 Press down on the memory module until the memory module snaps into position and the securing clip locks in place CAUTION To prevent damage to the memory module hold the memory module by the edges Do not touch the components on the memory module NOTE The securing clips return to the locked position If you do not hear the click remove the memory module and reinstall it NOTE If the memory mo...

Page 29: ...n the configuration ordered your computer may have a M 2 2230 or 2280 solid state drive installed in the M 2 solid state drive slot on the system board The following image s indicate the location of the solid state drive and provides a visual representation of the removal procedure Steps 1 Place the computer on its side with the left side facing up Removing and installing components 29 ...

Page 30: ... the installation process About this task NOTE You may install either a M 2 2230 or 2280 solid state drive into the M 2 solid state drive slot on the system board The following image s indicate the location of the solid state drive and provides a visual representation of the installation procedure Steps 1 Align the notch on the solid state drive with the tab on the M 2 card slot 2 Slide the solid ...

Page 31: ...the procedure in After working inside your computer Wireless card Removing the wireless card Prerequisites 1 Follow the procedure in Before working inside your computer 2 Remove the left side cover About this task The following image s indicate the location of the wireless card and provides a visual representation of the removal procedure Removing and installing components 31 ...

Page 32: ... Slide and remove the wireless card at an angle from the wireless card slot Installing the wireless card Prerequisites If you are replacing a component remove the existing component before performing the installation process About this task The following image s indicate the location of the wireless card and provides a visual representation of the installation procedure Steps 1 Connect the antenna...

Page 33: ... card slot 5 Replace the screw M2x4 that secures the wireless card to the system board 6 Place the computer in an upright position Next steps 1 Install the left side cover 2 Follow the procedure in After working inside your computer Coin cell battery Removing the coin cell battery Prerequisites 1 Follow the procedure in Before working inside your computer 2 Remove the left side cover About this ta...

Page 34: ...ion process About this task The following image s indicate the location of the coin cell battery and provides a visual representation of the installation procedure Steps 1 Insert the coin cell battery into the socket with the positive side label facing up and snap the battery in the socket 2 Place the computer in an upright position Next steps 1 Install the left side cover 2 Follow the procedure i...

Page 35: ...ides a visual representation of the removal procedure Steps 1 Loosen the two captive screws M3 that secure the antenna modules to the chassis 2 Remove the antenna cables through the routing guide on the chassis and route the antenna cables through the slot on the chassis 3 Lift the antenna modules along with its cables off the chassis Removing and installing components 35 ...

Page 36: ...ides a visual representation of the installation procedure Steps 1 Place the antenna modules on the chassis 2 Align the captive screws on the antenna modules with the screw holes on the chassis 3 Tighten the two captive screws M3 that secure the antenna modules to the chassis 4 Route the antenna cables through the slot on the chassis and route the antenna cables through the routing guides on the c...

Page 37: ...ia card reader Removing the media card reader Prerequisites 1 Follow the procedure in Before working inside your computer 2 Remove the left side cover 3 Remove the front cover About this task The following image s indicate the location of the media card reader and provides a visual representation of the removal procedure Removing and installing components 37 ...

Page 38: ...cing a component remove the existing component before performing the installation process About this task The following image s indicate the location of the media card reader and provides a visual representation of the installation procedure Steps 1 Place and slide the media card reader onto its slot on the system board 2 Align the screw hole on the media card reader bracket with the screw hole on...

Page 39: ...r supply unit Removing the power supply unit Prerequisites 1 Follow the procedure in Before working inside your computer 2 Remove the left side cover About this task The following image s indicate the location of the power supply unit and provides a visual representation of the removal procedure Removing and installing components 39 ...

Page 40: ...ocessor power cable from the system board 4 Press the securing clip and disconnect the system board power cable from the system board 5 Remove the power supply unit cables from the routing guides on the chassis 6 Remove the three screws 6 32 that secure the power supply unit to the chassis 7 Slide and lift the power supply unit off the chassis 40 Removing and installing components ...

Page 41: ...te the location of the power supply unit and provides a visual representation of the installation procedure Steps 1 Place and slide the tabs on the power supply unit into the latches on the chassis 2 Align the screw holes on the power supply unit to the screw holes on the chassis 3 Replace the three screws 6 32 that secure the power supply unit to the chassis Removing and installing components 41 ...

Page 42: ...lace the computer in an upright position Next steps 1 Install the left side cover 2 Follow the procedure in After working inside your computer Fan shroud Removing the fan shroud Prerequisites 1 Follow the procedure in Before working inside your computer 2 Remove the left side cover About this task The following image s indicate the location of the fan shroud and provides a visual representation of...

Page 43: ...an shroud off the fan and heat sink assembly Installing the fan shroud Prerequisites If you are replacing a component remove the existing component before performing the installation process About this task The following image s indicate the location of the fan shroud and provides a visual representation of the installation procedure Removing and installing components 43 ...

Page 44: ...the computer in an upright position Next steps 1 Install the left side cover 2 Follow the procedure in After working inside your computer Processor fan and heat sink assembly Removing the processor fan and heat sink assembly Prerequisites 1 Follow the procedure in Before working inside your computer 2 Remove the left side cover 44 Removing and installing components ...

Page 45: ...e removal procedure Steps 1 Disconnect the fan cable from the system board 2 In a reverse sequential order 4 3 2 1 loosen the four captive screws M3 that secure the processor fan and heat sink assembly to the system board 3 Lift the processor fan and heat sink assembly from the system board Installing the processor fan and heat sink assembly Prerequisites If you are replacing a component remove th...

Page 46: ...sequential order 1 2 3 4 tighten the four captive screws that secure the processor fan and heat sink assembly to the system board 4 Connect the fan cable to the system board Next steps 1 Install the fan shroud 2 Install the left side cover 3 Follow the procedure in After working inside your computer Processor Removing the processor Prerequisites 1 Follow the procedure in Before working inside your...

Page 47: ...se lever down and then push it away from the processor to release it from the securing tab 2 Extend the release lever completely and open the processor cover CAUTION When removing the processor do not touch any of the pins inside the socket or allow any objects to fall on the pins in the socket 3 Gently lift the processor from the processor socket Installing the processor Prerequisites If you are ...

Page 48: ... processor cover are placed under the notch of the release lever 3 Close the processor cover pivot the release lever down and place it under the tab on the processor socket Next steps 1 Install the processor fan and heat sink assembly 2 Install the fan shroud 3 Install the left side cover 4 Follow the procedure in After working inside your computer System board Removing the system board Prerequisi...

Page 49: ...rd reader cable connector 3 system board power cable connector 4 optical drive data cable connector SATA 3 5 hard drive power cable connector 6 hard drive data cable connector SATA 1 7 M 2 2230 wireless card slot 8 hard drive data cable connector SATA 0 boot drive 9 memory module slot DIMM 3 10 memory module slot DIMM 1 11 M 2 2230 2280 solid state drive slot Removing and installing components 49 ...

Page 50: ... 14 processor power cable connector 15 processor socket 16 coin cell battery socket The following image s indicate the location of the system board and provides a visual representation of the removal procedure 50 Removing and installing components ...

Page 51: ... drive data cable optical drive power cable 4 Remove the eight screws 6 32 that secure the system board to the chassis 5 Lift the system board at an angle and remove it from the chassis Installing the system board Prerequisites If you are replacing a component remove the existing component before performing the installation process About this task The following image indicates the slots and connec...

Page 52: ... hard drive data cable connector SATA 1 7 M 2 2230 wireless card slot 8 hard drive data cable connector SATA 0 boot drive 9 memory module slot DIMM 3 10 memory module slot DIMM 1 11 M 2 2230 2280 solid state drive slot 12 PCIe x16 slot SLOT 3 13 PCIe x1 slot SLOT 2 14 processor power cable connector 15 processor socket 16 coin cell battery socket 52 Removing and installing components ...

Page 53: ...The following image s indicate the location of the system board and provides a visual representation of the installation procedure Removing and installing components 53 ...

Page 54: ... from the system board processer power cable system board power cable optical drive data cable optical drive power cable 4 Place and align the front I O bracket with I O slot on the chassis 5 Replace the two screws 6 32 that secure the front I O bracket to the chassis Next steps 1 Install the processor 2 Install the processor fan and heat sink assembly 3 Install the fan shroud 4 Install the media ...

Page 55: ...nstall the hard drive 9 Install the solid state drive 10 Install the memory 11 Install the front cover 12 Install the left side cover 13 Follow the procedure in After working inside your computer Removing and installing components 55 ...

Page 56: ...rivers and downloads When troubleshooting downloading or installing drivers it is recommended that you read the Dell Knowledge Based article Drivers and Downloads FAQ 000123347 3 56 Drivers and downloads ...

Page 57: ...ing base devices BIOS overview The BIOS manages data flow between the computer s operating system and attached devices such as hard disk video adapter keyboard mouse and printer Entering BIOS setup program About this task Turn on or restart your computer and press F2 immediately Navigation keys NOTE For most of the System Setup options changes that you make are recorded but do not take effect unti...

Page 58: ...ime boot menu displays the devices that you can boot from including the diagnostic option The boot menu options are Removable Drive if available STXXXX Drive if available NOTE XXX denotes the SATA drive number Optical Drive if available SATA Hard Drive if available Diagnostics The boot sequence screen also displays the option to access the System Setup screen System setup options NOTE Depending on...

Page 59: ...ology used for the memory DIMM 1 Size Displays the DIMM 1 memory size DIMM 2 Size Displays the DIMM 2 memory size DEVICES Video Controller Displays the video controller type of the computer Video Memory Displays the video memory information of the computer Wi Fi Device Displays the wireless device information of the computer Native Resolution Displays the native resolution of the computer Video BI...

Page 60: ...file Replace from File will replace the current key with a key from a user selected file Append from File will add a key to the current database from a user selected file Delete will delete the selected key Reset All Keys will reset all four keys to their default settings By default PK security key database is selected By default Save to File is selected Table 6 System setup options Integrated Dev...

Page 61: ...t 1 Top Left is selected By default Rear Port 2 Top Right is selected By default Rear Port 3 Bottom Left is selected By default Rear Port 5 Bottom Right is selected Denotes a USB 3 0 capable port NOTE USB keyboard and mouse always work in the BIOS setup irrespective of this setting Table 7 System setup options Storage menu Storage SATA Operation SATA Operation Configures operating mode of the inte...

Page 62: ...e Enable WLAN Enables or disables the internal WLAN device Default ON Bluetooth Enables or disables the internal Bluetooth device Default ON Enable UEFI Network Stack Enable UEFI Network Stack Enable or disable UEFI Network Stack Default ON HTTP s Boot Feature Enables or disables internal speaker By default Enable Internal Speaker is selected HTTP s Boot Enables or disables HTTP s Boot Feature Def...

Page 63: ... Security Intel Platform Trust Technology Intel Platform Trust Technology On Enable or disable the Intel Platform Trust Technology PPT visibility to the operating system PPI ByPass for Clear Commands Enable or disable the TPM Physical Presence Interface PPI When enabled this setting will allow the OS to skip BIOS PPI user prompts when issuing the Clear command Changes to this setting take effect i...

Page 64: ... system Clear Default Disabled PPI ByPass for Clear Commands Enable or disable the TPM Physical Presence Interface PPI When enabled this setting will allow the OS to skip BIOS PPI user prompts when issuing the Clear command Changes to this setting take effect immediately Default Disabled Absolute Enable or disable the BIOS module interface of the optional Absolute Persistence Module service from A...

Page 65: ...anager prompt Default Disabled NOTE When disabled the PSID revert is protected by the BIOS Admin password if set and the user will be prompted for the password before the revert is performed Table 13 System setup options Update Recovery menu Update Recovery UEFI Capsule Firmware Updates Enable UEFI Capsule Firmware Updates Enables or disables BIOS updates through UEFI capsule update packages Defau...

Page 66: ...m Asset Tag that can be used by an IT administrator to uniquely identify a particular system Once set in BIOS the Asset Tag cannot be changed Wake on LAN WLAN Wake on LAN WLAN Enables the computer to be powered on by special LAN signals Default Disabled Auto On Time Auto On Time Controls automatic powering up of system for defined days and times Default Disabled SERR Messages Enable SERR Messages ...

Page 67: ... O Enable Intel VT for Direct I O Enables the computer to perform Virtualization Technology for Direct I O VT d VT d is an Intel method that provides virtualization for memory map I O Default ON Table 18 System setup options Performance menu Performance Multi Core Support Active Cores CPU core disabling is not supported with current BIOS version Changes the number of CPU cores available to the ope...

Page 68: ...ur computer You can create a system password and a setup password to secure your computer CAUTION The password features provide a basic level of security for the data on your computer CAUTION Anyone can access the data stored on your computer if it is not locked and left unattended NOTE System and setup password feature is disabled Assigning a system setup password Prerequisites You can assign a n...

Page 69: ...up The computer restarts Real Time Clock RTC reset The Real Time Clock RTC reset function allows you or the service technician to recover the recently launched model Dell computers from No POST No Boot No Power situations You can initiate the RTC reset on the computer from a power off state only if it is connected to AC power Press and hold the power button for 30 seconds The computer RTC reset oc...

Page 70: ... SupportAssist feature to automatically identify your computer You can also use the product ID or manually browse for your computer model 3 Click Drivers Downloads Expand Find drivers 4 Select the operating system installed on your computer 5 In the Category drop down list select BIOS 6 Select the latest version of BIOS and click Download to download the BIOS file for your computer 7 After the dow...

Page 71: ... One Time boot menu you need the following USB drive formatted to the FAT32 file system key does not have to be bootable BIOS executable file that you downloaded from the Dell Support website and copied to the root of the USB drive AC power adapter that is connected to the computer Functional computer battery to flash the BIOS Perform the following steps to perform the BIOS update flash process fr...

Page 72: ... mode Repeat tests Display or save test results Run thorough tests to introduce additional test options and provide extra information about the failed device s View status messages that indicate if the tests are completed successfully View error messages that indicate if problems were encountered during the test NOTE Some tests are meant for specific devices and require user interaction Ensure tha...

Page 73: ...ng system It enables you to diagnose hardware issues repair your computer back up your files or restore your computer to its factory state You can also download it from the Dell Support website to troubleshoot and fix your computer when it fails to boot into their primary operating system due to software or hardware failures For more information about the Dell SupportAssist OS Recovery see Dell Su...

Page 74: ...r Draining residual flea power also known as a performing a hard reset is also a common troubleshooting step if your computer does not power on or boot into the operating system To drain residual flea power perform a hard reset Steps 1 Turn off your computer 2 Disconnect the power adapter from your computer 3 Press and hold the power button for 20 seconds to drain the flea power 4 Connect the powe...

Page 75: ...r Express Service Code at www dell com support For more information on how to find the Service Tag for your computer see Locate the Service Tag on your computer Dell knowledge base articles for a variety of computer concerns 1 Go to www dell com support 2 On the menu bar at the top of the Support page select Support Knowledge Base 3 In the Search field on the Knowledge Base page type the keyword t...

Reviews: