background image

Insulator Elements 

– It is critical to keep ESD sensitive devices, such as plastic heat sink casings, away from internal parts that are

insulators and often highly charged.

Working Environment 

– Before deploying the ESD Field Service kit, assess the situation at the customer location. For example,

deploying the kit for a server environment is different than for a desktop or portable environment. Servers are typically installed in a
rack within a data center; desktops or portables are typically placed on office desks or cubicles. Always look for a large open flat work
area that is free of clutter and large enough to deploy the ESD kit with additional space to accommodate the type of system that is
being repaired. The workspace should also be free of insulators that can cause an ESD event. On the work area, insulators such as
Styrofoam and other plastics should always be moved at least 12 inches or 30 centimeters away from sensitive parts before physically
handling any hardware components

ESD Packaging 

– All ESD-sensitive devices must be shipped and received in static-safe packaging. Metal, static-shielded bags are

preferred. However, you should always return the damaged part using the same ESD bag and packaging that the new part arrived in.
The ESD bag should be folded over and taped shut and all the same foam packing material should be used in the original box that the
new part arrived in. ESD-sensitive devices should be removed from packaging only at an ESD-protected work surface, and parts
should never be placed on top of the ESD bag because only the inside of the bag is shielded. Always place parts in your hand, on the
ESD mat, in the system, or inside an anti-static bag.

Transporting Sensitive Components

 – When transporting ESD sensitive components such as replacement parts or parts to be

returned to Dell, it is critical to place these parts in anti-static bags for safe transport.

ESD protection summary

It is recommended that all field service technicians use the traditional wired ESD grounding wrist strap and protective anti-static mat at all
times when servicing Dell products. In addition, it is critical that technicians keep sensitive parts separate from all insulator parts while
performing service and that they use anti-static bags for transporting sensitive components.

Transporting sensitive components

When transporting ESD sensitive components such as replacement parts or parts to be returned to Dell, it is critical to place these parts in
anti-static bags for safe transport.

Lifting equipment

Adhere to the following guidelines when lifting heavy weight equipment:

CAUTION:

 Do not lift greater than 50 pounds. Always obtain additional resources or use a mechanical lifting device.

1. Get a firm balanced footing. Keep your feet apart for a stable base, and point your toes out.
2. Tighten stomach muscles. Abdominal muscles support your spine when you lift, offsetting the force of the load.
3. Lift with your legs, not your back.
4. Keep the load close. The closer it is to your spine, the less force it exerts on your back.
5. Keep your back upright, whether lifting or setting down the load. Do not add the weight of your body to the load. Avoid twisting your

body and back.

6. Follow the same techniques in reverse to set the load down.

After working inside your computer

About this task

CAUTION:

 Leaving stray or loose screws inside your computer may severely damage your computer.

Steps

1. Replace all screws and ensure that no stray screws remain inside your computer.
2. Connect any external devices, peripherals, or cables you removed before working on your computer.
3. Replace any media cards, discs, or any other parts that you removed before working on your computer.
4. Connect your computer and all attached devices to their electrical outlets.
5. Turn on your computer.

8

Working inside your computer

Summary of Contents for Inspiron 5505

Page 1: ...Inspiron 5505 Service Manual Regulatory Model P102F Regulatory Type P102F004 June 2020 Rev A00 ...

Page 2: ...ential damage to hardware or loss of data and tells you how to avoid the problem WARNING A WARNING indicates a potential for property damage personal injury or death 2020 Dell Inc or its subsidiaries All rights reserved Dell EMC and other trademarks are trademarks of Dell Inc or its subsidiaries Other trademarks may be trademarks of their respective owners ...

Page 3: ...ng the M 2 2230 solid state drive from M 2 slot one 23 Installing the M 2 2230 solid state drive in M 2 slot one 23 Removing the M 2 2280 solid state drive from M 2 slot one 24 Installing the M 2 2280 solid state drive in M 2 slot one 25 Installing the solid state drive mounting bracket on M 2 slot one 26 Solid state drive M 2 slot two 27 Removing the M 2 2230 solid state drive from M 2 slot two 2...

Page 4: ...board 53 Installing the system board 55 Palm rest and keyboard assembly 58 Removing the palm rest and keyboard assembly 58 Installing the palm rest and keyboard assembly 59 Chapter 3 Drivers and downloads 61 Chapter 4 System setup 62 Entering BIOS setup program 62 Navigation keys 62 One time boot menu 62 System setup options 63 Updating the BIOS in Windows 67 Updating BIOS on systems with BitLocke...

Page 5: ...LCD BIST 75 Outcome 75 System diagnostic lights 76 Flashing BIOS USB key 77 Recovering the operating system 77 Flea power release 77 Flashing the BIOS 77 Backup media and recovery options 78 WiFi power cycle 78 Flea power release 78 Chapter 6 Getting help and contacting Dell 79 Contents 5 ...

Page 6: ...com regulatory_compliance NOTE Disconnect your computer from all power sources before opening the computer cover or panels After you finish working inside the computer replace all covers panels and screws before connecting your computer to an electrical outlet CAUTION To avoid damaging the computer ensure that the work surface is flat dry and clean CAUTION To avoid damaging the components and card...

Page 7: ...workbench pads When unpacking a static sensitive component from its shipping carton do not remove the component from the anti static packing material until you are ready to install the component Before unwrapping the anti static packaging ensure that you discharge static electricity from your body Before transporting a static sensitive component place it in an anti static container or packaging ES...

Page 8: ...turned to Dell it is critical to place these parts in anti static bags for safe transport ESD protection summary It is recommended that all field service technicians use the traditional wired ESD grounding wrist strap and protective anti static mat at all times when servicing Dell products In addition it is critical that technicians keep sensitive parts separate from all insulator parts while perf...

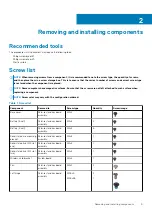
Page 9: ...ttached to such surface when replacing a component NOTE Screw color may vary with the configuration ordered Table 1 Screw list Component Secured to Screw type Quantity Screw image Base cover Palm rest and keyboard assembly M2x4 7 Battery 3 cell Palm rest and keyboard assembly M2x3 4 Battery 4 cell Palm rest and keyboard assembly M2x3 5 Solid state drive mounting bracket Palm rest and keyboard asse...

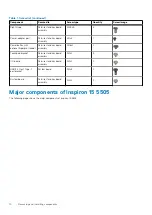
Page 10: ...onal fingerprint reader Palm rest and keyboard assembly M1 6x2 2 Touchpad bracket Palm rest and keyboard assembly M2x2 5 I O board Palm rest and keyboard assembly M2x2 2 USB 3 2 Gen 1 Type C port bracket System board M2x5 2 System board Palm rest and keyboard assembly M2x2 2 Major components of Inspiron 15 5505 The following image shows the major components of Inspiron 15 5505 10 Removing and inst...

Page 11: ...et 7 M 2 2230 solid state drive 8 speakers 9 system board 10 touchpad 11 palm rest and keyboard assembly 12 display assembly 13 power button with optional fingerprint reader 14 coin cell battery 15 I O board 16 fan 17 wireless card 18 M 2 2280 solid state drive Removing and installing components 11 ...

Page 12: ...erequisites Follow the procedure in Before working inside your computer About this task The figure indicates the location of the base cover and provides a visual representation of the removal procedure 12 Removing and installing components ...

Page 13: ... two captive screws that secure the base cover to the palm rest and keyboard assembly 2 Remove the seven screws M2x4 that secure the base cover to the palm rest and keyboard assembly Removing and installing components 13 ...

Page 14: ...ttery cable only when you are continuing to remove other components from your computer 6 Press and hold the power button for five seconds to ground the computer and drain the flea power Installing the base cover Prerequisites If you are replacing a component remove the existing component before performing the installation procedure About this task The figure indicates the location of the base cove...

Page 15: ...Removing and installing components 15 ...

Page 16: ...Steps 1 Adhere the tape and connect the battery cable to the system board if applicable 2 Place the base cover over the palm rest and keyboard assembly 16 Removing and installing components ...

Page 17: ...ing inside your computer Battery Removing the 3 cell battery Prerequisites 1 Follow the procedure in Before working inside your computer 2 Remove the base cover About this task The figure indicates the location of the 3 cell battery and provides a visual representation of the removal procedure Steps 1 Peel off the tape and disconnect the battery cable if applicable 2 Remove the four screws M2x3 th...

Page 18: ...the screw holes on the battery with the screw holes on the palm rest and keyboard assembly 3 Install the four screws M2x3 that secure the battery to the palm rest and keyboard assembly 4 Connect the battery cable to the system board and adhere the tape that secures the battery cable to the system board Next steps 1 Install the base cover 2 Follow the procedure in After working inside your computer...

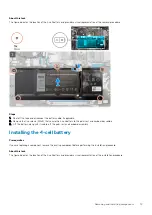
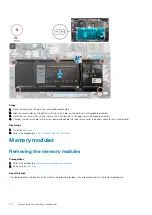
Page 19: ...ll battery to the palm rest and keyboard assembly 3 Lift the battery along with its cable off the palm rest and keyboard assembly Installing the 4 cell battery Prerequisites If you are replacing a component remove the existing component before performing the installation procedure About this task The figure indicates the location of the 4 cell battery and provides a visual representation of the in...

Page 20: ...the system board and adhere the tape that secures the battery cable to the system board Next steps 1 Install the base cover 2 Follow the procedure in After working inside your computer Memory modules Removing the memory modules Prerequisites 1 Follow the procedure in Before working inside your computer 2 Remove the base cover About this task The figure indicates the location of the memory module a...
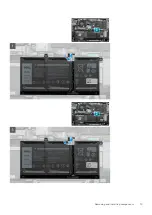
Page 21: ...y module slot NOTE Repeat step 1 to step 3 to remove any other memory modules installed in your computer Installing the memory modules Prerequisites If you are replacing a component remove the existing component before performing the installation procedure About this task The figure indicates the location of the memory module and provides a visual representation of the installation procedure Remov...

Page 22: ...t an angle 3 Press the memory module down until it clicks into place NOTE If you do not hear the click remove the memory module and reinstall it NOTE Repeat step 1 to step 3 to if you are installing other memory module Next steps 1 Install the base cover 2 Follow the procedure in After working inside your computer 22 Removing and installing components ...

Page 23: ...led in M 2 slot one and provides a visual representation of the removal procedure Steps 1 Remove the screw M2x3 that secures the 2230 solid state drive to the solid state drive mounting bracket 2 Slide and lift the 2230 solid state drive off M 2 slot one on the system board Installing the M 2 2230 solid state drive in M 2 slot one Prerequisites If you are replacing a component remove the existing ...

Page 24: ...30 solid state drive to the solid state drive mounting bracket Next steps 1 Install the base cover 2 Follow the procedure in After working inside your computer Removing the M 2 2280 solid state drive from M 2 slot one Prerequisites 1 Follow the procedure in Before working inside your computer 2 Remove the base cover About this task NOTE Depending on the configuration ordered your computer may supp...
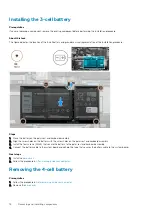
Page 25: ...on ordered The computer one may support a 2230 solid state drive or a 2280 solid state drive in M 2 slot one NOTE This procedure is applicable if you are installing a 2280 solid state drive in M 2 slot one NOTE Before installing your 2230 or 2280 solid state drive ensure that the mounting bracket is in the correct location For more information see installing the solid state drive mounting bracket ...

Page 26: ...nside your computer Installing the solid state drive mounting bracket on M 2 slot one About this task The following image provides a visual representation of the procedure to install the solid state drive mounting bracket when replacing M 2 2230 solid state drive with M 2 2280 solid state drive in M 2 slot one The following image provides a visual representation of the procedure to install the sol...

Page 27: ...he M 2 2230 solid state drive from M 2 slot two Prerequisites 1 Follow the procedure in Before working inside your computer 2 Remove the base cover About this task NOTE Depending on the configuration ordered your computer may support a 2230 solid state drive or a 2280 solid state drive in M 2 slot two NOTE This procedure applies only to computers shipped with a 2230 solid state drive installed in ...
Page 28: ...on ordered your computer may support a 2230 solid state drive or a 2280 solid state drive in M 2 slot two NOTE This procedure applies only if you are installing a 2230 solid state drive in M 2 slot two NOTE Before installing your 2230 or 2280 solid state drive ensure that the mounting bracket is in the correct location For more information see installing the solid state drive mounting bracket The ...

Page 29: ...er working inside your computer Removing the M 2 2280 solid state drive from M 2 slot two Prerequisites 1 Follow the procedure in Before working inside your computer 2 Remove the base cover About this task NOTE Depending on the configuration ordered your computer may support a 2230 solid state drive or a 2280 solid state drive in M 2 slot two NOTE This procedure applies only to computers shipped w...
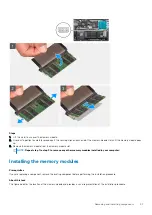
Page 30: ...tion ordered your computer may support a 2230 solid state drive or a 2280 solid state drive in M 2 slot two NOTE This procedure applies only if you are installing a 2280 solid state drive in M 2 slot two NOTE Before installing your 2230 or 2280 solid state drive ensure that the mounting bracket is in the correct location For more information see installing the solid state drive mounting bracket Th...

Page 31: ...secures the solid state drive to the palm rest and keyboard assembly Next steps 1 Install the base cover 2 Follow the procedure in After working inside your computer Installing the solid state drive mounting bracket on M 2 slot two About this task The figure provides a visual representation of the procedure to move the solid state drive mounting bracket on M 2 slot two Removing and installing comp...
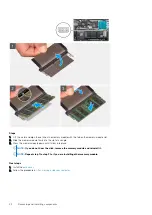
Page 32: ... keyboard assembly 4 Replace the screw M1 6x2 5 that secures the solid state drive mounting bracket to 2230 2280 bracket slot on the palm rest and keyboard assembly 5 Install the M 2 2230 solid state drive or the M 2 2280 solid state drive whichever applicable Wireless card Removing the wireless card Prerequisites 1 Follow the procedure in Before working inside your computer 2 Remove the base cove...

Page 33: ...e the existing component before performing the installation procedure About this task The figure indicates the location of the wireless card and provides a visual representation of the installation procedure Steps 1 Align the notch on the wireless card with the tab on the wireless card slot and insert the wireless card at an angle into the wireless card slot 2 Connect the antenna cables to the wir...

Page 34: ...n the system board 5 Replace the screw M2x3 that secures the wireless card to the system board Next steps 1 Install the base cover 2 Follow the procedure in After working inside your computer Fan Removing the fan Prerequisites 1 Follow the procedure in Before working inside your computer 2 Remove the base cover About this task The figure indicates the location of the fan and provides a visual repr...

Page 35: ... board 5 Remove the two screws M2x2 that secure the fan to the palm rest and keyboard assembly 6 Lift the fan off the palm rest and keyboard assembly Installing the fan Prerequisites If you are replacing a component remove the existing component before performing the installation procedure About this task The figure indicates the location of the fan and provides a visual representation of the inst...

Page 36: ...ssembly 4 Route the I O board cable through the routing guides on the fan 5 Connect the fan cable to the system board 6 Connect the I O board cable to the system board and close the latch 7 Adhere the tape that secures the I O board cable to the system board 8 Adhere the mylar that covers the fan cable Next steps 1 Install the base cover 2 Follow the procedure in After working inside your computer...

Page 37: ...es the location of the coin cell battery and provides a visual representation of the removal procedure Steps 1 Disconnect the coin cell battery cable from the I O board 2 Peel the coin cell battery from the palm rest and keyboard assembly Installing the coin cell battery Prerequisites If you are replacing a component remove the existing component before performing the installation procedure About ...

Page 38: ...on the configuration ordered CAUTION For maximum cooling of the processor do not touch the heat transfer areas on the heat sink The oils in your skin can reduce the heat transfer capability of the thermal grease CAUTION The heat sink may become hot during normal operation Allow sufficient time for the heat sink to cool before you touch it 1 Follow the procedure in Before working inside your comput...

Page 39: ...move the heat sink off the palm rest and keyboard assembly Installing the heat sink Prerequisites If you are replacing a component remove the existing component before performing the installation procedure About this task The figure indicates the location of the heat sink and provides a visual representation of the installation procedure Removing and installing components 39 ...

Page 40: ...ure the heat sink to the system board Next steps 1 Install the base cover 2 Follow the procedure in After working inside your computer Display assembly Removing the display assembly Prerequisites 1 Follow the procedure in Before working inside your computer 2 Remove the base cover About this task The figure indicates the location of the display assembly and provides a visual representation of the ...

Page 41: ...t display hinge to the system board 4 Remove the three screws M2 5x5 that secure the left display hinge to the system board 5 Lift the palm rest and keyboard assembly up to raise the display hinges 6 Slide the palm rest and keyboard assembly carefully off the display assembly NOTE To avoid damaging the display do not slide the palm rest and keyboard assembly over the display assembly Removing and ...

Page 42: ...llation procedure About this task The figure indicates the location of the display assembly and provides a visual representation of the installation procedure Steps 1 Place the display assembly on a clean and flat surface 2 Align and slide the palm rest and keyboard assembly under the display hinges 42 Removing and installing components ...

Page 43: ...ure the left display hinge to the system board 6 Connect the display cable to the system board close the latch and adhere the tape that secures the display cable to the system board Next steps 1 Install the base cover 2 Follow the procedure in After working inside your computer Power adapter port Removing the power adapter port Prerequisites 1 Follow the procedure in Before working inside your com...

Page 44: ...r on the system board 5 Remove the power adapter port cable from the routing guides on the system board 6 Remove the screw M2x3 and lift the power adapter port off the palm rest and keyboard assembly Installing the power adapter port Prerequisites If you are replacing a component remove the existing component before performing the installation procedure About this task The figure indicates the loc...

Page 45: ...ecure the power adapter port cable to the system board 6 Lower the right display hinge plate and ensure that the screw holes are aligned with the screw holes on the system board 7 Replace the screw M2 5x3 5 and the two screws M2 5x5 that secure the right display hinge to the system board Next steps 1 Install the base cover 2 Follow the procedure in After working inside your computer Speakers Remov...

Page 46: ...ack tapes that secure the speaker cable to the touchpad bracket 4 Remove the speaker cable from the routing guides on the palm rest and keyboard assembly NOTE Note the position of the rubber grommets before lifting the speakers 5 Lift the speakers along with the cables off the palm rest and keyboard assembly Installing the speakers Prerequisites If you are replacing a component remove the existing...

Page 47: ...the speakers when the speakers were removed push the grommets back in place before replacing the speakers 2 Route the speaker cable through the routing guides on the palm rest and keyboard assembly 3 Adhere the black tapes that secure the speaker cable to the touchpad bracket 4 Connect the speaker cable to the system board Next steps 1 Install the 3 cell battery or 4 cell battery 2 Install the bas...

Page 48: ...bracket to the palm rest and keyboard assembly 2 Lift the power button bracket off the power button with optional fingerprint reader 3 Remove the screw M1 6x2 that secures the power button to the palm rest and keyboard assembly 4 Lift the latch and disconnect the power button cable or the optional fingerprint reader cable from the connector on the palm rest and keyboard assembly 5 Lift the power b...

Page 49: ...ure the cable to the palm rest and keyboard assembly 4 Align the screw hole on the power button bracket with the screw hole on the palm rest and keyboard assembly 5 Replace the screw M1 6x2 that secures the power button bracket to the palm rest and keyboard assembly Next steps 1 Install the I O board 2 Install the display assembly 3 Install the base cover 4 Follow the procedure in After working in...

Page 50: ...6 Peel the tapes that secure the touchpad to the palm rest and keyboard assembly 7 Remove the two screws M2x2 that secure the touchpad to the palm rest and keyboard assembly 8 Lift the touchpad along with the cable off the palm rest and keyboard assembly Installing the touchpad Prerequisites If you are replacing a component remove the existing component before performing the installation procedure...

Page 51: ...system board and close the latch to secure the touchpad cable 5 Adhere the tapes that secure the touchpad to the palm rest and keyboard assembly 6 Align the screw holes on the touchpad bracket with the screw holes on the palm rest and keyboard assembly 7 Replace the three screws M2x2 that secure the touchpad bracket to the palm rest and keyboard assembly 8 Route the speaker cable along the routing...

Page 52: ...atch and disconnect the I O board cable from the I O board 3 Open the latch and disconnect the fingerprint reader cable from the I O board 4 Remove the two screws M2x2 that secure the I O board to the palm rest and keyboard assembly 5 Lift the I O board off the palm rest and keyboard assembly Installing the I O board Prerequisites If you are replacing a component remove the existing component befo...

Page 53: ...board Next steps 1 Install the display assembly 2 Install the coin cell battery 3 Install the base cover 4 Follow the procedure in After working inside your computer System board Removing the system board Prerequisites 1 Follow the procedure in Before working inside your computer 2 Remove the base cover 3 Remove the 3 cell battery or 4 cell battery 4 Remove the memory modules 5 Remove the M 2 2230...

Page 54: ...About this task The figure indicates the location of the system board and provides a visual representation of the removal procedure 54 Removing and installing components ...

Page 55: ...port bracket to the system board 10 Lift the USB Type C port bracket off the palm rest and keyboard assembly 11 Disconnect the speaker cable from the system board 12 Open the latch and disconnect the touchpad cable from the system board 13 Open the latch and disconnect the keyboard cable from the system board 14 Open the latch and disconnect the keyboard backlght cable from the system board if app...

Page 56: ...56 Removing and installing components ...

Page 57: ... the power adapter port cable to the system board 9 Adhere the black tape that secures the power adapter port cable to the system board 10 Place the USB Type C port bracket in its slot on the palm rest and keyboard assembly 11 Replace the two screws M2x5 that secure the USB Type C port bracket to the system board 12 Connect the speaker cable to the system board 13 Connect the touchpad cable to the...

Page 58: ... or 4 cell battery 4 Remove the memory modules 5 Remove the M 2 2230 solid state drive or the M 2 2280 solid state drive from M 2 slot one 6 Remove the M 2 2230 solid state drive or the M 2 2280 solid state drive from M 2 slot two 7 Remove the wireless card 8 Remove the fan 9 Remove the coin cell battery 10 Remove the heat sink 11 Remove the display assembly 12 Remove the power adapter port 13 Rem...

Page 59: ...nd keyboard assembly Prerequisites If you are replacing a component remove the existing component before performing the installation procedure About this task The figure indicates the location of the palm rest and keyboard assembly and provides a visual representation of the installation procedure Removing and installing components 59 ...

Page 60: ...bly 8 Install the heat sink 9 Install the coin cell battery 10 Install the fan 11 Install the wireless card 12 Install the M 2 2230 solid state drive or the M 2 2280 solid state drive in M 2 slot two 13 Install the M 2 2230 solid state drive or the M 2 2280 solid state drive in M 2 slot one 14 Install the memory modules 15 Install the 3 cell battery or 4 cell battery 16 Install the base cover 17 F...

Page 61: ...rivers and downloads When troubleshooting downloading or installing drivers it is recommended that you read the Dell Knowledge Based article Drivers and Downloads FAQ SLN128938 3 Drivers and downloads 61 ...

Page 62: ...s 1 Turn on your computer 2 Press F2 immediately to enter the BIOS setup program NOTE If you wait too long and the operating system logo appears continue to wait until you see the desktop Then turn off your computer and try again Navigation keys NOTE For most of the System Setup options changes that you make are recorded but do not take effect until you restart the system Table 3 Navigation keys K...

Page 63: ...roduct Name Displays the model number of your computer Service Tag Displays the service tag of your computer Asset Tag Displays the asset tag of your computer CPU Type Displays the processor type CPU Speed Displays the processor speed CPU ID Displays the processor identification code CPU Cache L1 Cache Displays the processor L1 cache size L2 Cache Displays the processor L2 cache size L3 Cache Disp...

Page 64: ...e the steps in the knowledge base article SLN321473 Default Disabled SATA Operation Allows you to configure the operating mode of the integrated SATA hard drive controller Default AHCI Adapter Warnings Allows you to choose if the computer should display warning messages when you use AC adapters that are not supported by your computer Default Enabled Function Key Behavior Allows you to set function...

Page 65: ...ist System Resolution Console and for the Dell OS Recovery tool Default 2 SupportAssist OS Recovery Enables or disables the boot flow for the SupportAssist OS Recovery tool in the even of certain system errors Default Disabled Table 6 System setup options Security menu Security Admin Password Status Displays if the administrator password is clear or set System Password Status Displays if the syste...

Page 66: ...Capsule Updates Enables or disables BIOS updates through UEFI capsule update packages Default Enabled WINDOWS SMM SECURITY MITIGATIONS TABLE WSMT Enables or disables configuration of platform features on Dell Client Systems with WSMT enabled BIOS Default Enabled Table 7 System setup options Boot menu Boot Fast Boot Enables or disables the fast boot option Default Minimal Secure Boot Enables or dis...

Page 67: ...7 Click Find it myself 8 Click BIOS to view the BIOS versions 9 Identify the latest BIOS file and click Download 10 Select your preferred download method in the Please select your download method below window and then click Download File The File Download window appears 11 Click Save to save the file on your computer 12 Click Run to install the updated BIOS settings on your computer Follow the on ...

Page 68: ... can also update the BIOS from the F12 One Time boot menu on the system Most Dell systems built after 2012 have this capability and you can confirm by booting your system to the F12 One Time Boot Menu to see if BIOS FLASH UPDATE is listed as a boot option for your system If the option is listed then the BIOS supports this BIOS update option NOTE Only systems with BIOS Flash Update option in the F1...

Page 69: ... a USB port of the system 2 Power on the system and press the F12 key to access the One Time Boot Menu Highlight BIOS Update using the mouse or arrow keys then press Enter 3 The flash BIOS menu will open and then click the Flash from file 4 Select external USB device System setup 69 ...

Page 70: ...5 Once the file is selected Double click the flash target file then press submit 6 Click the Update BIOS then system will reboot to flash the BIOS 70 System setup ...

Page 71: ...vide a basic level of security for the data on your computer CAUTION Anyone can access the data that is stored on your computer if it is not locked and left unattended NOTE System and setup password feature is disabled Assigning a system setup password Prerequisites You can assign a new System or Admin Password only when the status is in Not Set About this task To enter the system setup press F12 ...

Page 72: ... Security screen is displayed 2 In the System Security screen verify that Password Status is Unlocked 3 Select System Password update or delete the existing system password and press Enter or Tab 4 Select Setup Password update or delete the existing setup password and press Enter or Tab NOTE If you change the System and or Setup password reenter the new password when prompted If you delete the Sys...

Page 73: ...rformance of display power rail and system board These tests are important to evaluate if an LCD or system board needs a replacement 1 M BIST M BIST is the system board built in self test diagnostics tool that improves the diagnostics accuracy of system board embedded controller EC failures M BIST must be manually initiated before POST and can also run on a dead system 2 L BIST L BIST is an enhanc...

Page 74: ... troubleshooting is required proceed with the applicable Guided Resolution for No Power No POST etc Display panel power rail built in self test L BIST About this task Next steps L BIST LCD Power Rail Test is an enhancement to the single LED error code diagnostics and is automatically initiated during POST L BIST isolates if the LCD is receiving power from the system board L BIST checks if the syst...

Page 75: ...eds to ensure that the colors are being displayed correctly without distortion or graphical anomalies 4 The computer reboots at the end of the last solid color Outcome About this task The following table shows the outcome of running different types of BIST Table 11 BIST outcome M BIST Off No fault detected with system board Solid amber Indicates a problem with the system board Table 11 BIST outcom...

Page 76: ...hree times followed by a pause This 2 3 pattern continues until the computer is turned off indicating no memory or RAM is detected The following table shows different power and battery status light patterns and associated problems Table 12 LED codes Diagnostic light codes Problem description 2 1 Processor failure 2 2 System board BIOS or ROM Read Only Memory failure 2 3 No memory or RAM Random Acc...

Page 77: ... It enables you to diagnose hardware issues repair your computer back up your files or restore your computer to its factory state You can also download it from the Dell Support website to troubleshoot and fix your computer when it fails to boot into their primary operating system due to software or hardware failures For more information about the Dell SupportAssist OS Recovery see Dell SupportAssi...

Page 78: ...task If your computer is unable to access the internet due to WiFi connectivity issues a WiFi power cycle procedure may be performed The following procedure provides the instructions on how to conduct a WiFi power cycle NOTE Some ISPs Internet Service Providers provide a modem router combo device Steps 1 Turn off your computer 2 Turn off the modem 3 Turn off the wireless router 4 Wait for 30 secon...

Page 79: ... topic or model number and then click or tap the search icon to view the related articles Learn and know the following information about your product Product specifications Operating system Setting up and using your product Data backup Troubleshooting and diagnostics Factory and system restore BIOS information See Me and My Dell at www dell com support manuals To locate the Me and My Dell relevant...

Reviews: