background image


Back to Contents Page


1  Pair A: matched pair of memory modules in 

connectors DIMM1 and DIMM3 

2  Pair B: matched pair of memory modules in 

connectors DIMM2 and DIMM4 

Summary of Contents for Inspiron 560s

Page 1: ...or other countries Other trademarks and trade names may be used in this document to refer to either the entities claiming the marks and names or their products Dell Inc disclaims any proprietary interest in trademarks and trade names other than its own Regulatory Model DCSLE November 2009 Rev A00 Before You Begin Technical Overview Computer Cover Support Bracket Front Bezel Memory Module s PCI and...

Page 2: ...Turning Off Your Computer 1 Save and close all open files and exit all open programs 2 Shut down your computer Windows Vista Click Start click the arrow and then click Shut Down Windows 7 Click Start and click Shut Down 3 The computer turns off after the operating system shutdown process is complete 4 Ensure that the computer is turned off If your computer did not automatically turn off when you s...

Page 3: ...s have connectors with locking tabs if you are disconnecting this type of cable press in on the locking tabs before you disconnect the cable As you pull connectors apart keep them evenly aligned to avoid bending any connector pins Also before you connect a cable ensure that both connectors are correctly oriented and aligned CAUTION To avoid damaging the computer perform the following steps before ...

Page 4: ...ont bezel grips snap into place 4 Replace the computer cover see Replacing the Computer Cover 5 Connect your computer and devices to electrical outlets and then turn them on WARNING Before working inside your computer read the safety information that shipped with your computer For additional safety best practices information see the Regulatory Compliance Homepage at www dell com regulatory_complia...

Page 5: ...Back to Contents Page ...
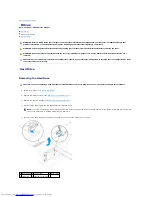
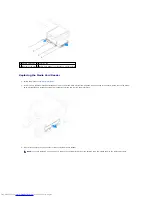
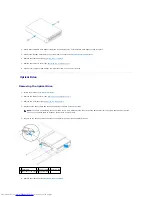
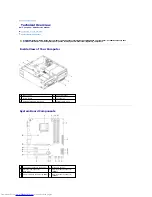
Page 6: ...to the hinge tab slots located along the edge of the computer 3 Pull back the support bracket release latch and pivot the support bracket downward until the support bracket release latch locks into place WARNING Before working inside your computer read the safety information that shipped with your computer For additional safety best practices information see the Regulatory Compliance Homepage at w...

Page 7: ...4 Replace the computer cover see Replacing the Computer Cover 5 Connect your computer and devices to electrical outlets and then turn them on Back to Contents Page ...

Page 8: ...puter and devices to electrical outlets and then turn them on 9 Remove the card s driver from the operating system 10 To complete the removal procedure see Configuring Your Computer After Removing or Installing a PCI or PCI Express Card Replacing PCI and PCI Express Cards WARNING Before working inside your computer read the safety information that shipped with your computer For additional safety b...

Page 9: ... fully seated in the slot 8 Replace the support bracket see Replacing the Support Bracket 9 Connect any cables that should be attached to the card See the documentation for the card for information about the card s cable connections 10 Replace the computer cover see Replacing the Computer Cover 11 Connect your computer and devices to electrical outlets and then turn them on 12 To complete the inst...

Page 10: ...led 3 Connect the external audio devices to the sound card s connectors 1 Enter system setup see Entering System Setup 2 Go to Onboard Audio Controller and then change the setting to Enabled 3 Connect the external audio devices to the computer s back panel connectors Network Card 1 Enter system setup see Entering System Setup 2 Go to Onboard LAN Controller and then change the setting to Disabled 3...

Page 11: ...ww dell com regulatory_compliance WARNING A new battery can explode if it is incorrectly installed Replace the battery only with the same or equivalent type recommended by the manufacturer Discard used batteries according to the manufacturer s instructions WARNING To guard against electrical shock always unplug your computer from the electrical outlet before removing the cover WARNING Do not opera...

Page 12: ... see Replacing the Computer Cover 4 Connect your computer and devices to electrical outlets and then turn them on 5 Enter System Setup see Entering System Setup and restore the settings you recorded in step 1 Back to Contents Page ...

Page 13: ...ion see the Regulatory Compliance Homepage at www dell com regulatory_compliance WARNING To guard against electrical shock always unplug your computer from the electrical outlet before removing the cover WARNING Do not operate your equipment with any cover s including computer covers bezels filler brackets front panel inserts etc removed CAUTION Only a certified service technician should perform r...

Page 14: ...uter cover with the slots located along the edge of the computer 5 Press the computer cover down and slide it towards the front of the computer until you feel a click or feel the computer cover securely installed 6 Ensure that the cover is seated correctly 7 Replace the two screws that secure the computer cover using a screwdriver 8 Open the chassis feet 9 Place the computer in an upright position...

Page 15: ...ys unplug your computer from the electrical outlet before removing the cover WARNING Do not operate your equipment with any cover s including computer covers bezels filler brackets front panel inserts etc removed CAUTION Only a certified service technician should perform repairs on your computer Damage due to servicing that is not authorized by Dell is not covered by your warranty CAUTION Do not p...

Page 16: ...the heat sink 10 Apply the new thermal grease to the top of the processor 11 Replace the processor fan and heat sink assembly see Replacing the Processor Fan and Heat Sink Assembly CAUTION Ground yourself by touching an unpainted metal surface on the back of the computer CAUTION When replacing the processor do not touch any of the pins inside the socket or allow any objects to fall on the pins in ...

Page 17: ...over see Replacing the Computer Cover 13 Connect your computer and devices to electrical outlets and turn them on Back to Contents Page CAUTION Ensure that the processor fan and heat sink assembly is correctly seated and secure ...

Page 18: ...ll com regulatory_compliance WARNING To guard against electrical shock always unplug your computer from the electrical outlet before removing the cover WARNING Do not operate your equipment with any cover s including computer covers bezels filler brackets front panel inserts etc removed CAUTION Only a certified service technician should perform repairs on your computer Damage due to servicing that...

Page 19: ...ing the Support Bracket 9 Replace the computer cover see Replacing the Computer Cover 10 Connect your computer and devices to electrical outlets and then turn them on 11 See the documentation that came with the hard drive for instructions on installing any software required for hard drive operation 12 Check the System Setup for hard drive configuration changes see Entering System Setup Media Card ...

Page 20: ... on the break away metal plate and rotate the screwdriver outwards to break and remove the metal plate 3 If not present attach the two shoulder screws to the Media Card Reader 1 FlexBay USB cable 2 securing tab 3 shoulder screws 2 4 Media Card Reader not present on all computers NOTE If you are replacing an existing drive remove the shoulder screws from the existing drive and attach them to the re...

Page 21: ...res in Before You Begin 2 Remove the computer cover see Removing the Computer Cover 3 Remove the front bezel see Removing the Front Bezel 4 Disconnect the power cable and the data cable from the back of the optical drive 5 Press in on the securing tab on the side of the optical drive and slide the optical drive out 6 Replace the front bezel see Replacing the Front Bezel NOTE If you are not replaci...

Page 22: ...le to the optical drive 5 If disconnected connect the data cable to the system board connector see System Board Components 6 Replace the front bezel see Replacing the Front Bezel 7 Replace the computer cover see Replacing the Computer Cover 8 Connect your computer and devices to electrical outlets and turn them on See the documentation that came with the optical drive for instructions on installin...

Page 23: ...NG To guard against likelihood of electric shock laceration by moving fan blades or other unexpected injuries always unplug your computer from the electrical outlet before removing the cover WARNING Do not operate your equipment with any cover s including computer covers bezels filler brackets front panel inserts etc removed CAUTION Only a certified service technician should perform repairs on you...

Page 24: ...utlets and turn them on Removing the Chassis Fan 1 Follow the procedures in Before You Begin 2 Remove the computer cover see Removing the Computer Cover 3 Disconnect the chassis fan cable from the system board connector see System Board Components 4 Remove the screw that secures the chassis fan to the chassis 5 Slide the chassis fan towards the front of the computer and lift it out CAUTION When re...

Page 25: ...ack of the computer 3 Replace the screw that secures the chassis fan to the chassis 4 Connect the chassis fan cable to the system board connector see System Board Components 5 Replace the computer cover see Replacing the Computer Cover 6 Connect your computer and devices to electrical outlets and turn them on Back to Contents Page 1 Chassis fan bottom tab 2 Chassis fan top tabs 2 3 screw ...

Page 26: ...anel towards the left and gently pull it out Replacing the Front I O Panel WARNING Before working inside your computer read the safety information that shipped with your computer For additional safety best practices information see the Regulatory Compliance Homepage at www dell com regulatory_compliance WARNING To guard against electrical shock always unplug your computer from the electrical outle...

Page 27: ...place the hard drive see Replacing the Hard Drive 6 Replace the support bracket see Replacing the Support Bracket 7 Replace the front bezel see Replacing the Front Bezel 8 Replace the computer cover see Replacing the Computer Cover 9 Connect your computer and devices to electrical outlets and turn them on Back to Contents Page CAUTION Take care not to damage the cable connectors and the cable rout...

Page 28: ... clip at each end of the memory module connector 3 Follow the memory installation guidelines see Recommended Memory Configuration 4 Align the notch on the bottom of the memory module with the tab in the memory module connector WARNING Before working inside your computer read the safety information that shipped with your computer For additional safety best practices information see the Regulatory C...

Page 29: ...ktop and click Properties 10 Click the General tab 11 To verify that the memory is installed correctly check the amount of memory RAM listed Recommended Memory Configuration While installing or replacing memory refer to the table below For the location of the memory module connectors see System Board Components Setting Up Dual Channel Memory Configuration 1 cutouts 2 2 tab 3 notch 4 memory module ...

Page 30: ...Back to Contents Page 1 Pair A matched pair of memory modules in connectors DIMM1 and DIMM3 2 Pair B matched pair of memory modules in connectors DIMM2 and DIMM4 ...

Page 31: ...ng down on the release latch slide out the power supply and then lift it out Replacing the Power Supply 1 Follow the procedures in Before You Begin 2 While pressing down on the release latch slide the replacement power supply towards the back of the computer WARNING Before working inside your computer read the safety information that shipped with your computer For additional safety best practices ...

Page 32: ...eplace the computer cover see Replacing the Computer Cover 8 Connect your computer and devices to electrical outlets and turn them on Back to Contents Page WARNING Failure to replace and tighten all screws may cause electrical shock as these screws are a key part of the system grounding NOTE Route the DC power cables under the chassis tabs The cables must be properly routed to prevent the cables f...

Page 33: ...ighlight an option Press Enter to make that selection active Help Field This field provides context sensitive help based on the options selected Key Functions This field appears below the Option Field and lists keys and their functions within the active system setup field System Setup Options CAUTION Only a certified service technician should perform repairs on your computer Damage due to servicin...

Page 34: ... Configuration Boot Settings Configuration l Fast Boot Enabled Disabled Enabled by default l Numlock Key On Off On by default l Keyboard Errors Report Do Not Report Report by default Removable Boot Priority Used to set the device priority of removable devices like USB floppy drives The items displayed are dynamically updated according to the removable devices connected Hard Disk Boot Priority Used...

Page 35: ...r Future Boots 1 Enter system setup see Entering System Setup 2 Use the arrow keys to highlight the Boot Device Configuration menu option and press Enter to access the menu 3 Press the up and down arrow keys to move through the list of devices 4 Press plus or minus to change the boot priority of device Clearing Forgotten Passwords 1 Follow the procedures in Before You Begin 2 Remove the computer c...

Page 36: ...tings 1 Follow the procedures in Before You Begin 2 Remove the computer cover see Removing the Computer Cover 3 Reset the current CMOS settings a Locate the 3 pin CMOS reset jumper on the system board see System Board Components b Remove the jumper plug from the CMOS reset jumper pins 2 and 3 c Place the jumper plug on the CMOS reset jumper pins 1 and 2 and wait for approximately five seconds d Re...

Page 37: ... brand in the Select Your Product Line list d Select the product model number in the Select Your Product Model list e Click Confirm 5 A list of results appear on the screen Click BIOS 6 Click Download Now to download the latest BIOS file The File Download window appears 7 Click Save to save the file on your desktop The file downloads to your desktop 8 Click Close if the Download Complete window ap...

Page 38: ...system board Note the routing of all cables as you remove them so that you can re route them correctly after installing the new system board 10 Remove the eight screws that secure the system board to the chassis 11 Lift the system board up and out of the chassis Replacing the System Board WARNING Before working inside your computer read the safety information that shipped with your computer For ad...

Page 39: ...ptical Drive 8 Replace the memory modules see Replacing the Memory Module s 9 Replace any PCI and PCI Express cards on the system board see Replacing PCI and PCI Express Cards 10 Replace the support bracket see Replacing the Support Bracket 11 Replace the computer cover see Replacing the Computer Cover 12 Connect your computer and devices to electrical outlets and turn them on 13 Flash the system ...

Page 40: ...n that shipped with your computer For additional safety best practices information see the Regulatory Compliance Homepage at www dell com regulatory_compliance 1 power supply 2 support bracket 3 system board 4 optical drive 5 Media Card Reader optional 6 primary hard drive 1 12 V power connector ATX12V1 2 processor socket 3 processor fan connector FAN_CPU 4 memory module connector DIMM1 5 memory m...

Page 41: ... SATA_3 14 front panel connector FRONTPANEL 15 front panel USB connector F_USB1 16 front panel USB connector F_USB2 17 front panel USB connector F_USB3 18 battery socket BATTERY 19 front panel audio connector FP_AUDIO 20 PCI card slot PCI_1 21 PCI Express x1 card slot PCIEX1_2 22 CMOS reset jumper CLR_CMOS 23 PCI Express x1 card slot PCIEX1_1 24 PCI Express x16 card slot PCIEX16 25 chassis fan con...

Page 42: ...ws are either trademarks or registered trademarks of Microsoft Corporation in the United States and or other countries Other trademarks and trade names may be used in this document to refer to either the entities claiming the marks and names or their products Dell Inc disclaims any proprietary interest in trademarks and trade names other than its own November 2009 Rev A00 Back to Contents Page NOT...

Reviews: