background image

Appendix

99

Using the System Setup Program

Overview


NOTE: 

Your operating system may automatically configure most of the options available in system setup, 

thus overriding options that you set through system setup. (An exception is the 

External Hot Key

 option, 

which you can disable or enable only through system setup.) For more information on configuring 
features for your operating system, see the Windows Help and Support Center. To access help, see 
"Finding Information" on page 9.

The system setup screens display the current setup information and settings for your computer, 
such as:

System configuration

Basic device-configuration settings

System security and hard-drive password settings

Power management settings

Boot (start-up) configuration and display settings

Docking-device settings

Wireless control settings


NOTICE: 

Unless you are an expert computer user or are directed to do so by Dell technical support, do 

not change the system setup settings. Certain changes might make your computer work incorrectly. 

Viewing the System Setup Screen

1

Turn on (or restart) your computer.

2

When the DELL™ logo appears, press <F2> immediately. If you wait too long and the 
Windows logo appears, continue to wait until you see the Windows desktop. Then shut down 
your computer and try again.

System Setup Screen

The system setup screen consists of three windows of information. The window on the left contains 
an expandable hierarchy of control categories. If you select (highlight) a category (such as 

System

Onboard Devices

, or 

Video

) and press <Enter>, you can show or hide the related subcategories. 

The window on the right contains information about the category or subcategory selected in the 
window on the left. 

The window at the bottom tells you how to control system setup with key functions. Use these keys 
to select a category, modify its settings, or exit system setup.

Summary of Contents for Inspiron 6000

Page 1: ...w w w d e l l c o m s u p p o r t d e l l c o m Dell Inspiron 6000 Owner s Manual Model PP12L ...

Page 2: ...hange without notice 2004 2005 Dell Inc All rights reserved Reproduction in any manner whatsoever without the written permission of Dell Inc is strictly forbidden Trademarksusedinthistext Dell theDELLlogo Inspiron DellPrecision Dimension DellNet OptiPlex Latitude PowerEdge PowerConnect PowerVault PowerApp and Dell OpenManage are trademarks of Dell Inc Intel Celeron and Pentium are registered trade...

Page 3: ...ternet 23 Setting Up Your Internet Connection 23 Setting Up a Printer 24 Printer Cable 24 Connecting a USB Printer 24 Power Protection Devices 25 Surge Protectors 25 Line Conditioners 26 Uninterruptible Power Supplies 26 3 Using a Battery Battery Performance 27 Checking the Battery Charge 28 Dell QuickSet Battery Meter 28 Microsoft Windows Power Meter 28 Charge Gauge 28 Low Battery Warning 28 ...

Page 4: ...g Your Computer to a TV or Audio Device 34 S Video Connection 34 Composite Video Connection 35 Enabling the Display Settings for a TV 37 5 Using the Keyboard and Touch Pad Numeric Keypad 39 Key Combinations 40 System Functions 40 Battery 40 CD or DVD Tray 40 Display Functions 40 Radios Including Wireless Networking and an Internal Card With Bluetooth Wireless Technology 40 Power Management 41 Spea...

Page 5: ...etwork Type 48 Connecting to a Wireless Network in Microsoft Windows XP 48 8 Solving Problems Dell Diagnostics 51 When to Use the Dell Diagnostics 51 Drive Problems 53 DVD drive problems 54 Hard drive problems 55 E Mail Modem and Internet Problems 55 Error Messages 56 IEEE 1394 Device Problems 58 Keyboard Problems 58 External keyboard problems 58 Unexpected characters 59 Lockups and Software Probl...

Page 6: ...6 No sound from headphones 67 Touch Pad or Mouse Problems 67 Video and Display Problems 68 If the display is blank 68 If the display is difficult to read 69 If only part of the display is readable 69 Drivers 69 What Is a Driver 69 Identifying Drivers 70 Reinstalling Drivers 70 Restoring Your Operating System 71 Using Microsoft Windows XP System Restore 71 Using Dell PC Restore by Symantec 73 Resol...

Page 7: ...pecifications 93 Using the System Setup Program 99 Overview 99 Viewing the System Setup Screen 99 System Setup Screen 99 Commonly Used Options 100 Dell Technical Support Policy U S Only 101 Definition of Dell Installed Software and Peripherals 101 Definition of Third Party Software and Peripherals 101 FCC Notices U S Only 102 Class A 102 Class B 102 FCC Identification Information 103 Macrovision P...

Page 8: ...8 Contents ...

Page 9: ... Safety instructions Regulatory information Ergonomics information End User License Agreement Dell Product Information Guide How to set up my computer Setup Diagram Tips on using Microsoft Windows How to play CDs and DVDs How to use standby mode and hibernate mode How to change my display resolution How to clean my computer Help File 1 Click the Start button and click Help and Support 2 Click User...

Page 10: ...e Label Service Tag and Microsoft Windows License These labels are located on the bottom of your computer Use the Service Tag to identify your computer when you use support dell com or contact technical support Enter the Express Service Code to direct your call when contacting technical support What Are You Looking For Find It Here ...

Page 11: ...s for your operating system and support for Dell 3 5 inch USB floppy drives Intel Pentium M processors optical drives and USB devices NSS is necessary for correct operation of your Dell computer The software automatically detects your computer and operating system and installs the updates appropriate for your configuration To download Notebook System Software 1 Go to support dell com and click Dow...

Page 12: ...ocumentation for devices such as a modem Windows Help and Support Center 1 Click the Start button and click Help and Support 2 Type a word or phrase that describes your problem and click the arrow icon 3 Click the topic that describes your problem 4 Follow the instructions on the screen What Are You Looking For Find It Here ...

Page 13: ...he display latches and open the display DISPLAY For more information about your display see the Dell Inspiron Help file To access the help file see Finding Information on page 9 display latch release keyboard display touch pad touch pad buttons power button speakers keyboard status lights device status lights media control buttons display latches 2 ...

Page 14: ...s follows Solid green The battery is charging Flashing green The battery is almost fully charged If the computer is running on a battery the light operates as follows Off The battery is adequately charged or the computer is turned off Flashing orange The battery charge is low Solid orange The battery charge is critically low Turns on when you turn on the computer and blinks when the computer is in...

Page 15: ...41 TOUCH PAD BUTTONS Touch pad buttons provide the functionality of a mouse KEYBOARD The keyboard includes a numeric keypad as well as the Microsoft Windows logo key For information on supported keyboard shortcuts see Key Combinations on page 40 Mutes the sound Turns the volume down Turns the volume up Play or pause This button also launches Dell Media Experience or Microsoft Windows Media Center ...

Page 16: ...s enabled To enable or disable wireless networking press Fn F2 Turns on when a card with Bluetooth wireless technology is enabled NOTE The card with Bluetooth wireless technology is an optional feature so the light turns on only if you ordered the card with your computer For more information see the documentation that came with your card To turn off only the Bluetooth wireless technology functiona...

Page 17: ... a low airflow environment such as a closed briefcase while it is running Restricting the airflow can damage the computer or cause a fire SECURITY CABLE SLOT Lets you attach a commercially available antitheft device to the computer For more information see the instructions included with the device NOTICE Before you buy an antitheft device ensure that it will work with the security cable slot optic...

Page 18: ...ge 31 Right Side View AUDIO CONNECTORS USB CONNECTORS Connect USB devices such as a mouse keyboard or printer You can also connect the optional floppy drive directly to a USB connector using the optional floppy drive cable IEEE 1394 CONNECTOR Connects devices supporting IEEE 1394 high speed transfer rates such as some digital video cameras Attach headphones or speakers to the connector Attach a mi...

Page 19: ...k connector is slightly larger than the modem connector To avoid damaging the computer do not plug a telephone line into the network connector MODEM CONNECTOR RJ 11 Connects the computer to a network The green and yellow lights next to the connector indicate activity for wired network communications For information on using the network adapter see the online network adapter documentation supplied ...

Page 20: ...C power required by the computer You can connect the AC adapter with your computer turned either on or off Connect USB devices such as a mouse keyboard or printer Connects your computer to a TV Also connects digital audio capable devices using the TV digital audio adapter cable Connects an external VGA compatible monitor For more information see the Dell Inspiron Help file To access the help file ...

Page 21: ...drive in the optical drive bay For more information see Optical Drive on page 88 BATTERY BAY LATCH RELEASE Releases the battery from the battery bay See Removing a Battery on page 30 BATTERY When a battery is installed you can use the computer without connecting the computer to an electrical outlet For more information see Using a Battery on page 27 HARD DRIVE Stores software and data For more inf...

Page 22: ...the vents which prevents the computer from overheating OPTICAL DRIVE BAY You can install devices such as a DVD drive or other optical drive in the optical drive bay For more information see Optical Drive on page 88 BATTERY CHARGE GAUGE Provides information on the battery charge For more information see Using a Battery on page 27 ...

Page 23: ...vide high speed Internet access through your local cable TV line If you are using a dial up connection connect a telephone line to the modem connector on your computer and to the telephone wall jack before you set up your Internet connection If you are using a DSL or cable modem connection contact your ISP for setup instructions Setting Up Your Internet Connection To set up an AOL or MSN connectio...

Page 24: ...ot connect to the Internet but have successfully connected in the past the ISP might have a service outage Contact your ISP to check the service status or try connecting again later Setting Up a Printer NOTICE Complete the operating system setup before you connect a printer to the computer See the documentation that came with the printer for setup information including how to Obtain and install up...

Page 25: ...tions The level of protection is usually commensurate with the cost of the surge protector Some surge protector manufacturers include warranty coverage for certain types of damage Carefully read the device warranty when choosing a surge protector A device with a higher joule rating offers more protection Compare joule ratings to determine the relative effectiveness of different devices NOTICE Most...

Page 26: ...airly constant level Uninterruptible Power Supplies NOTICE Loss of power while data is being saved to the hard drive may result in data loss or file damage NOTE To ensure maximum battery operating time connect only your computer to a UPS Connect other devices such as a printer to a separate power strip that provides surge protection A UPS protects against power fluctuations and interruptions UPS d...

Page 27: ...ng the computer in maximum performance mode For more information see the Dell Inspiron Help file To access the help file see Finding Information on page 9 NOTE It is recommended that you connect your computer to an electrical outlet when writing to a CD or DVD You can check the battery charge before you insert the battery into the computer You can also set power management options to alert you whe...

Page 28: ... charge To check the Power Meter double click the icon on the taskbar For more information about the Power Meter tab see Power Management in the Dell Inspiron Help file To access the help file see Finding Information on page 9 If the computer is connected to an electrical outlet a icon appears Charge Gauge Press the status button on the battery charge gauge to illuminate the charge level lights Ea...

Page 29: ...e computer to an electrical outlet or install a battery while the computer is connected to an electrical outlet the computer checks the battery charge and temperature If necessary the AC adapter then charges the battery and maintains the battery charge If the battery is hot from being used in your computer or being in a hot environment the battery may not charge when you connect the computer to an...

Page 30: ...he risk of fire or explosion Replace the battery only with a compatible battery purchased from Dell The lithium ion battery is designed to work with your Dell computer Do not use a battery from other computers with your computer 1 Slide the battery into the bay at a 45 degree angle 2 Press the other side down until the latch release clicks Storing a Battery Remove the battery when you store your c...

Page 31: ... the upper right corner of the window and then click RecordNow Help or RecordNow Tutorial How to Copy a CD or DVD NOTE If you have a DVD CD RW combo drive and you experience recording problems check for available software patches at the Sonic support website at support sonic com Currently five DVD writable disc formats are available DVD R DVD RW DVD R DVD RW and DVD RAM The DVD writable drives ins...

Page 32: ...documentation for more information Use blank CD RWs to write to CDs or to erase rewrite or update data on CDs Your DVD writable drive can write to four different types of recording media CD Rs CD RWs including high speed CD RWs DVD Rs and DVD RWs Blank DVD Rs can be used to permanently store large amounts of information After you create a DVD R disc you may not be able to write to that disc again ...

Page 33: ...ion about Dell QuickSet see the Dell Inspiron Help file To access the help file see Finding Information on page 9 If you have Microsoft Windows Media Center Edition or Dell Media Experience installed you can use Dell MediaDirect to launch your media application by pressing the play pause Dell MediaDirect button If you hold the media control play button for longer than two seconds while you are log...

Page 34: ... also use a composite TV out adapter cable which is available from Dell The audio connector on the side of the computer enables you to connect the computer to your TV or audio device using a commercially available audio cable NOTE See the diagrams at the beginning of each subsection to help you determine which method of connection you should use When you finish connecting the video and audio cable...

Page 35: ...tors on the other end of the audio cable in to the audio input connectors on your TV or other audio device 6 Turn on the TV turn on any audio device that you connected if applicable and then turn on the computer 7 See Enabling the Display Settings for a TV on page 37 to ensure that the computer recognizes and works properly with the TV Composite Video Connection ...

Page 36: ...TV out connector on the computer 3 Plug one end of the composite video cable in to the composite video input connector on the composite TV out adapter cable 4 Plug the other end of the composite video cable in to the composite video input connector on the TV composite TV out adapter cable composite video cable audio cable S video TV out connector S video connector composite TV out adapter cable co...

Page 37: ... system board known as an integrated video controller See the following subsection that corresponds to the video controller installed in your computer Video Controller Card NOTE Ensure that you properly connect the TV before you enable the display settings 1 Click the Start button and click Control Panel 2 Click Appearances and Themes 3 Under or pick a Control Panel icon click Display 4 Click the ...

Page 38: ...d check mark appears directly on top of the TV icon b Ensure that the settings are correct 8 If you want to use a TV and the computer display at the same time a In the new window click Intel R Dual Display Clone and ensure that one of the devices listed is a TV b Click Device Settings c In the new window ensure that the display resolution settings are correct 9 Click Apply to view the new settings...

Page 39: ...eyboard Each key on the keypad has multiple functions The keypad numbers and symbols are marked in blue on the right of the keypad keys To type a number or symbol press Fn and the desired key after enabling the keypad To enable the keypad press Num Lk The light indicates that the keypad is active To disable the keypad press Num Lk again numeric keypad 9 ...

Page 40: ...n on page 9 Fn F10 Ejects the tray out of the drive if Dell QuickSet is installed For more information about Dell QuickSet see the Dell Inspiron Help file To access the help file see Finding Information on page 9 Fn F8 Switches the video image to the next display option The options include the integrated display an external monitor and both displays simultaneously Fn and up arrow key Increases bri...

Page 41: ... the Dell Inspiron Help file To access the help file see Finding Information on page 9 Fn Page Up Increases the volume of the integrated speakers and external speakers if attached Fn Page Dn Decreases the volume of the integrated speakers and external speakers if attached Fn End Enables and disables the integrated speakers and external speakers if attached Windows logo key and m Minimizes all open...

Page 42: ... touch pad On the second down motion leave your finger on the touch pad and move the selected object by sliding your finger over the surface To double click an object position the cursor on the object and tap twice on the touch pad or use your thumb to press the left touch pad button twice Customizing the Touch Pad You can use the Mouse Properties window to disable the touch pad or adjust their se...

Page 43: ...nded PC Cards An extended PC Card for example a wireless network adapter is longer than a standard PC Card and extends outside the computer Follow these precautions when using extended PC Cards Protect the exposed end of an installed card Striking the end of the card can damage the system board Always remove an extended PC Card before you pack the computer in its carrying case Installing a PC Card...

Page 44: ...ells you to load the manufacturer s drivers use the floppy disk or CD that came with the PC Card Removing a PC Card or Blank NOTICE Use the PC Card configuration utility click the icon in the taskbar to select a card and stop it from functioning before you remove it from the computer If you do not stop the card in the configuration utility you could lose data Do not attempt to eject a card by pull...

Page 45: ...Using PC Cards 45 Save a blank to use when no PC Card is installed in a slot Blanks protect unused slots from dust and other particles ...

Page 46: ...46 Using PC Cards w w w d e l l c o m s u p p o r t d e l l c o m ...

Page 47: ...o place and then gently pull it to ensure that it is secure 2 Connect the other end of the network cable to a network connection device such as a network wall connector NOTE Do not use a network cable with a telephone wall connector Network Setup Wizard The Microsoft Windows XP operating system provides a Network Setup Wizard to guide you through the process of sharing files printers or an Interne...

Page 48: ...infrastructure type Wireless networks fall into two categories infrastructure networks and ad hoc networks An infrastructure network uses routers or access points to connect several computers An ad hoc network does not use routers or access points and consists of computers that broadcast to one another For additional assistance with setting up your wireless connection go to support dell com and se...

Page 49: ... the notification area whenever a network is detected in the area for which your computer is not configured 1 Click either the pop up or the network icon to configure your computer for one of the available wireless networks The Wireless Network Connections window lists the wireless networks available in your area ...

Page 50: ...TE Network security settings are unique to your network Dell cannot provide this information Your network is configured automatically NOTE Your computer can take up to 1 minute to connect to the network After your computer is configured for the wireless network you selected another pop up notifies you that your computer is connected to the network you selected Thereafter whenever you log on to you...

Page 51: ...diately If you wait too long and the operating system logo appears continue to wait until you see the Microsoft Windows desktop Then shut down your computer see Turning Off Your Computer on page 75 and try again 4 When the boot device list appears highlight Diagnostics and press Enter The computer runs the Pre boot System Assessment a series of initial tests of your system board keyboard hard driv...

Page 52: ...a test from the Custom Test or Symptom Tree option click the applicable tab described in the following table for more information Option Function Express Test Performs a quick test of devices This test typically takes 10 to 20 minutes and requires no interaction on your part Run Express Test first to increase the possibility of tracing the problem quickly Extended Test Performs a thorough check of...

Page 53: ...play the names of all the components installed on your computer or all devices attached to your computer Parameters Allows you to customize the test by changing the test settings ENSURE THAT MICROSOFT WINDOWS RECOGNIZES THE DRIVE Click the Start button and click My Computer If the floppy CD or DVD drive is not listed perform a full scan with your antivirus software to check for and remove viruses ...

Page 54: ...closing all programs before you write to the DVD RW TURN OFF STANDBY MODE IN WINDOWS BEFORE WRITING TO A DVD RW DISC See the Dell Inspiron Help file or search for the keyword standby in the Windows Help and Support Center for information on power management modes To access help see Finding Information on page 9 CHANGE THE WRITE SPEED TO A SLOWER RATE See the help files for your DVD creation softwa...

Page 55: ... or disc is inserted properly ALLOW THE COMPUTER TO COOL BEFORE TURNING IT ON A hot hard drive may prevent the operating system from starting Try allowing the computer to return to room temperature before turning it on RUN CHECK DISK 1 Click the Start button and click My Computer 2 Right click Local Disk C 3 Click Properties 4 Click the Tools tab 5 Under Error checking click Check Now 6 Click Scan...

Page 56: ...ow the instructions on the screen to identify and resolve modem problems Modem Helper may not be available on certain computers VERIFY THAT THE MODEM IS COMMUNICATING WITH WINDOWS 1 Click the Start button and click Control Panel 2 Click Printers and Other Hardware 3 Click Phone and Modem Options 4 Click the Modems tab 5 Click the COM port for your modem 6 Click Properties click the Diagnostics tab...

Page 57: ...ANY OF THE FOLLOWING CHARACTERS Do not use these characters in filenames INSERT BOOTABLE MEDIA The operating system is trying to boot to a nonbootable CD Insert a CD NOT ENOUGH MEMORY OR RESOURCES EXIT SOME PROGRAMS AND TRY AGAIN You have too many programs open Close all windows and open the program that you want to use OPERATING SYSTEM NOT FOUND Reinstall the hard drive See page 77 If the problem...

Page 58: ... you attach an external keyboard the integrated keyboard remains fully functional ENSURE THAT THE IEEE 1394 DEVICE IS PROPERLY INSERTED INTO THE CONNECTOR ENSURE THAT THE IEEE 1394 DEVICE IS RECOGNIZED BY WINDOWS 1 Click the Start button and click Control Panel 2 Click Printers and Other Hardware If your IEEE 1394 device is listed Windows recognizes the device IF YOU HAVE PROBLEMS WITH A DELL PROV...

Page 59: ...ify these steps you may have a defective external keyboard TO VERIFY THAT THE PROBLEM IS WITH THE EXTERNAL KEYBOARD CHECK THE INTEGRATED KEYBOARD 1 Shut down the computer 2 Disconnect the external keyboard 3 Turn on the computer 4 From the Windows desktop click the Start button point to All Programs Accessories and click Notepad 5 Type some characters on the external keyboard and verify that they ...

Page 60: ...n restart your computer END THE PROGRAM 1 Press Ctrl Shift Esc simultaneously 2 Click Applications 3 Click the program that is no longer responding 4 Click End Task CHECK THE SOFTWARE DOCUMENTATION If necessary uninstall and then reinstall the program RUN THE PROGRAM COMPATIBILITY WIZARD The Program Compatibility Wizard configures a program so that it runs in an environment similar to non Windows ...

Page 61: ...IMMEDIATELY USE A VIRUS SCANNING PROGRAM TO CHECK THE HARD DRIVE FLOPPY DISKS OR CDS SAVE AND CLOSE ANY OPEN FILES OR PROGRAMS AND SHUT DOWN YOUR COMPUTER THROUGH THE Start MENU SCAN THE COMPUTER FOR SPYWARE If you are experiencing slow computer performance you frequently receive pop up advertisements or you are having problems connecting to the Internet your computer might be infected with spywar...

Page 62: ...icating with the memory See page 79 Run the Dell Diagnostics See page 51 IF YOU EXPERIENCE OTHER MEMORY PROBLEMS Reseat the memory modules to ensure that your computer is successfully communicating with the memory See page 79 Ensure that you are following the memory installation guidelines See Memory on page 79 Run the Dell Diagnostics See Dell Diagnostics on page 51 CHECK THE NETWORK CABLE CONNEC...

Page 63: ... RECOGNIZED BY WINDOWS Double click the Safely Remove Hardware icon in the Windows taskbar Ensure that the card is listed IF YOU HAVE PROBLEMS WITH A DELL PROVIDED PC CARD Contact Dell See FCC Notices U S Only on page 102 IF YOU HAVE PROBLEMS WITH A PC CARD NOT PROVIDED BY DELL Contact the PC Card manufacturer CHECK THE POWER LIGHT When the power light is lit or blinking the computer has power If ...

Page 64: ...ge 102 CHECK THE BATTERY TEMPERATURE If the battery temperature is below 0 C 32 F the computer will not start up TEST THE ELECTRICAL OUTLET Ensure that the electrical outlet is working by testing it with another device such as a lamp CHECK THE AC ADAPTER Check the AC adapter cable connections If the AC adapter has a light ensure that the light is on CONNECT THE COMPUTER DIRECTLY TO AN ELECTRICAL O...

Page 65: ...ECOGNIZED BY WINDOWS 1 Click the Start button click Control Panel and then click Printers and Other Hardware 2 Click View installed printers or fax printers If the printer is listed right click the printer icon 3 Click Properties and click the Ports tab For a USB printer ensure that the Print to the following port s setting is USB REINSTALL THE PRINTER DRIVER See the printer documentation for inst...

Page 66: ...ADJUST THE WINDOWS VOLUME CONTROL Double click the speaker icon in the lower right corner of your screen Ensure that the volume is turned up and that the sound is not muted Adjust the volume bass or treble controls to eliminate distortion ADJUST THE VOLUME USING KEYBOARD SHORTCUTS Press Fn End to disable mute or reenable the integrated speakers REINSTALL THE SOUND AUDIO DRIVER See Reinstalling Dri...

Page 67: ...at the headphone cable is securely inserted into the headphone connector For more information see Audio Connectors on page 18 ADJUST THE WINDOWS VOLUME CONTROL Click or double click the speaker icon in the lower right corner of your screen Ensure that the volume is turned up and that the sound is not muted CHECK THE TOUCH PAD SETTINGS 1 Click the Start button click Control Panel and then click Pri...

Page 68: ... TOUCH PAD DRIVER See Reinstalling Drivers on page 70 CHECK THE BATTERY If you are using a battery to power your computer the battery charge may be depleted Connect the computer to an electrical outlet using the AC adapter and turn on the computer TEST THE ELECTRICAL OUTLET Ensure that the electrical outlet is working by testing it with another device such as a lamp CHECK THE AC ADAPTER Check the ...

Page 69: ...ernal monitor ELIMINATE POSSIBLE INTERFERENCE Turn off nearby fans fluorescent lights halogen lamps or other appliances ROTATE THE COMPUTER TO FACE A DIFFERENT DIRECTION Eliminate sunlight glare which can cause poor picture quality ADJUST THE WINDOWS DISPLAY SETTINGS 1 Click the Start button and then click Control Panel 2 Click Appearance and Themes 3 Click the area you want to change or click the...

Page 70: ...see if any device has an exclamation point a yellow circle with a on the device icon If an exclamation point is next to the device name you may need to reinstall the driver or install a new driver See the following subsection Reinstalling Drivers Reinstalling Drivers NOTICE The Dell Support website at support dell com provides approved drivers for Dell computers If you install drivers obtained fro...

Page 71: ...e your operating system in the following ways Microsoft Windows XP System Restore returns your computer to an earlier operating state without affecting data files Dell PC Restore by Symantec restores your hard drive to the operating state it was in when you purchased the computer Dell PC Restore permanently deletes all data on the hard drive and removes any applications installed after you receive...

Page 72: ...our computer The Select a Restore Point screen provides a calendar that allows you to see and select restore points All calendar dates with available restore points appear in boldface type 4 Select a restore point and click Next If a calendar date has only one restore point then that restore point is automatically selected If two or more restore points are available click the restore point that yo...

Page 73: ... files include documents spreadsheets e mail messages digital photos music files and so on If possible back up all data before using PC Restore NOTICE Using PC Restore permanently deletes all data on the hard drive and removes any applications or drivers installed after you received your computer If possible back up the data before using PC Restore To use PC Restore 1 Turn on the computer During t...

Page 74: ...ts click OK Resolving Software and Hardware Incompatibilities If a device is either not detected during the operating system setup or is detected but incorrectly configured you can use the Hardware Troubleshooter to resolve the incompatibility To resolve incompatibilities using the Hardware Troubleshooter 1 Click the Start button and click Help and Support 2 Type hardware troubleshooter in the Sea...

Page 75: ...ument may require the following tools Small flat blade screwdriver Phillips screwdriver Small plastic scribe Flash BIOS update see the Dell Support website at support dell com Turning Off Your Computer NOTICE To avoid losing data save and close any open files and exit any open programs before you turn off your computer 1 Shut down the operating system a Save and close any open files exit any open ...

Page 76: ...a cable pull on its connector or on its strain relief loop not on the cable itself Some cables have a connector with locking tabs if you are disconnecting this type of cable press in on the locking tabs before you disconnect the cable As you pull connectors apart keep them evenly aligned to avoid bending any connector pins Also before you connect a cable ensure that both connectors are correctly o...

Page 77: ...at work surface 9 Remove the hard drive See Hard Drive on page 77 Hard Drive CAUTION If you remove the hard drive from the computer when the drive is hot do not touch the metal housing of the hard drive CAUTION Before you begin any of the procedures in this section follow the safety instructions in the Product Information Guide NOTICE To prevent data loss turn off your computer see page 75 before ...

Page 78: ...tistatic packaging See Protecting Against Electrostatic Discharge in the Product Information Guide 3 Slide the hard drive out of the computer 4 Remove the new drive from its packaging Save the original packaging for storing or shipping the hard drive NOTICE Use firm and even pressure to slide the drive into place If you use excessive force you may damage the connector 5 Slide the hard drive into t...

Page 79: ... supported by your computer Install only memory modules that are intended for your computer NOTE Memory modules purchased from Dell are covered under your computer warranty CAUTION Before you begin any of the procedures in this section follow the safety instructions in the Product Information Guide 1 Follow the procedures in Before You Begin on page 75 2 Ground yourself by touching one of the meta...

Page 80: ...OTICE To prevent damage to the memory module connector do not use tools to spread the memory module securing clips 4 If you are replacing a memory module remove the existing module a Use your fingertips to carefully spread apart the securing clips on each end of the memory module connector until the module pops up b Remove the module from the connector memory module securing clips 2 per connector ...

Page 81: ... may not boot properly No error message indicates this failure 5 Ground yourself and install the new memory module a Align the notch in the module edge connector with the tab in the connector slot b Slide the module firmly into the slot at a 45 degree angle and rotate the module down until it clicks into place If you do not feel the click remove the module and reinstall it 6 Replace the memory mod...

Page 82: ...guration information To confirm the amount of memory installed in the computer click the Start button click Help and Support and then click Computer Information Modem If you ordered the optional modem at the same time that you ordered your computer the modem is already installed CAUTION Before you begin any of the procedures in this section follow the safety instructions in the Product Information...

Page 83: ...he modem cable 4 Install the replacement modem a Connect the modem cable to the modem NOTICE The connectors are keyed to ensure correct insertion If you feel resistance check the connectors and realign the card b Align the modem with the screw holes and press the modem into the connector on the system board c Replace the screw that secures the modem to the system board 5 Replace the modem cover mo...

Page 84: ...e the hinge cover See Hinge Cover on page 88 3 Remove the keyboard See Keyboard on page 89 4 If a Mini PCI card is not already installed go to step 5 If you are replacing a Mini PCI card remove the existing card a Disconnect the Mini PCI card from any attached cables b Release the Mini PCI card by spreading the metal securing tabs until the card pops up slightly c Lift the Mini PCI card out of its...

Page 85: ...rocedures in this section follow the safety instructions in the Product Information Guide NOTICE To avoid electrostatic discharge ground yourself by using a wrist grounding strap or by periodically touching an unpainted metal surface such as a connector on the back of the computer NOTICE To avoid damaging the system board you must remove the main battery before you begin working inside the compute...

Page 86: ...UTION Before you begin any of the procedures in this section follow the safety instructions in the Product Information Guide NOTICE To avoid electrostatic discharge ground yourself by using a wrist grounding strap or by periodically touching an unpainted metal surface such as a connector on the back of the computer NOTICE To avoid damaging the system board you must remove the main battery before y...

Page 87: ...e display up and away from the computer When you replace the display ensure that the display cable is lying flat in the display cable trough and securely tucked underneath the tabs Also ensure that the antenna cables are not twisted and that they are lying flat in the antenna cable clip screws 4 display cable pull tab display cable connector on system board grounding wire screw antenna cables disp...

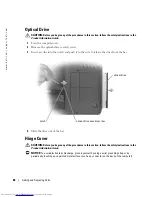
Page 88: ... a scribe into the notch and push it to the side to release the drive from the bay 4 Slide the drive out of the bay Hinge Cover CAUTION Before you begin any of the procedures in this section follow the safety instructions in the Product Information Guide NOTICE To avoid electrostatic discharge ground yourself by using a wrist grounding strap or by periodically touching an unpainted metal surface s...

Page 89: ...y b Insert a scribe in the indent to lift the hinge cover on the right side c Ease the hinge cover up moving from right to left and remove it NOTE When replacing the hinge cover first insert the left edge and then press from left to right until the cover snaps into place Keyboard CAUTION Before you begin any of the procedures in this section follow the safety instructions in the Product Informatio...

Page 90: ...CE The keycaps on the keyboard are fragile easily dislodged and time consuming to replace Be careful when removing and handling the keyboard b Lift up the keyboard and hold it up and slightly forward to allow access to the keyboard connector c Pull up on the keyboard connector pull tab to disconnect the keyboard connector from the system board NOTICE To avoid scratching the palm rest when replacin...

Page 91: ... with Bluetooth wireless technology with your computer it is already installed 1 Follow the procedures in Before You Begin on page 75 2 If you have not already removed the battery do so now Slide and hold the battery bay latch release on the bottom of the computer and then remove the battery from the bay 3 Open the card door and remove it from the computer 4 Pull the card out of the compartment so...

Page 92: ...92 Adding and Replacing Parts w w w d e l l c o m s u p p o r t d e l l c o m ...

Page 93: ...M bus width Dual channel 2 64 bit busses Processor address bus width 32 bits Flash EPROM 1 MB Graphics Bus PCI E X16 PCI bus 32 bits PC Card CardBus controller Ricoh R5C841 PC Card connector one supports one Type I or Type II card Cards supported 3 3 V and 5 V PC Card connector size 68 pins Data width maximum PCMCIA 16 bits CardBus 32 bits Memory Memory module connector two user accessible SODIMM ...

Page 94: ...pin mini DIN connector optional S video to composite video adapter cable USB four 4 pin USB 2 0 compliant connectors Video 15 hole connector SDI O one slot Communications Modem Type v 92 56K MDC Controller softmodem Interface internal AC 97 bus Network adapter 10 100 Ethernet LAN on system board Wireless internal Mini PCI Wi Fi and Bluetooth wireless technology support Video Video type integrated ...

Page 95: ...l microphone in connector stereo headphones speakers connector Speaker two 4 ohm speakers Internal speaker amplifier 1 W channel into 4 ohms Volume controls keyboard shortcuts program menus media control buttons Audio controller Sigmatel STAC9751 AC 97 Codec Display Type active matrix TFT 15 4 inch WXGA WSXGA and WUXGA Dimensions Height 222 5 mm 8 8 inches Width 344 5 mm 13 6 inches Diagonal 391 2...

Page 96: ...ght typical 6 0 W maximum Controls brightness can be controlled through keyboard shortcuts Keyboard Number of keys 87 U S and Canada 88 Europe 91 Japan Layout QWERTY AZERTY Kanji Touch Pad X Y position resolution graphics table mode 240 cpi Size Width 73 0 mm 2 9 inch sensor active area Height 42 9 mm 1 7 inch rectangle Battery Type 9 cell smart lithium ion 6 cell smart lithium ion Dimensions Dept...

Page 97: ...Life span approximate 500 discharge charge cycles Temperature range Operating 0 to 35 C 32 to 95 F Storage 40 to 65 C 40 to 149 F Coin cell battery CR 2032 AC Adapter Input voltage 90 264 VAC Input current maximum 1 7 A Input frequency 47 63 Hz Output current 4 5 A maximum at 4 second pulse 3 5 A continuous Output power 65 W Rated output voltage 19 5 VDC Dimensions Height 27 9 mm 1 1 inches Width ...

Page 98: ...to 104 F Storage 40 to 65 C 40 to 149 F Relative humidity maximum Operating 10 to 90 noncondensing Storage 5 to 95 noncondensing Maximum vibration using a random vibration spectrum that simulates user environment Operating 0 9 GRMS Storage 1 3 GRMS Maximum shock measured with hard drive in head parked position and a 2 ms half sine pulse Operating 122 G Storage 163 G Altitude maximum Operating 15 2...

Page 99: ...ss you are an expert computer user or are directed to do so by Dell technical support do not change the system setup settings Certain changes might make your computer work incorrectly Viewing the System Setup Screen 1 Turn on or restart your computer 2 When the DELL logo appears press F2 immediately If you wait too long and the Windows logo appears continue to wait until you see the Windows deskto...

Page 100: ...n the computer finds the files it stops searching and starts the operating system To control the boot devices select highlight a device by pressing the down arrow or up arrow key and then enable or disable the device or change its order in the list To enable or disable a device highlight the item and press the space bar Enabled items are preceded by a number disabled items are not preceded by a nu...

Page 101: ... are provided pursuant to the terms and conditions of your limited warranty and any optional support service contract purchased with the computer 2 All Dell standard components included in a Custom Factory Integration CFI project are covered by the stan dard Dell limited warranty for your computer However Dell also extends a parts replacement program to cover all nonstandard third party hardware c...

Page 102: ...ice pursuant to Part 15 of the FCC Rules These limits are designed to provide reasonable protection against harmful interference when the equipment is operated in a commercial environment This equipment generates uses and can radiate radio frequency energy and if not installed and used in accordance with the manufacturer s instruction manual may cause harmful interference with radio communications...

Page 103: ...y Macrovision and is intended for home and other limited viewing uses only unless otherwise authorized by Macrovision Reverse engineering or disassembly is prohibited Contacting Dell To contact Dell electronically you can access the following websites www dell com support dell com technical support premiersupport dell com technical support for educational government healthcare and medium large bus...

Page 104: ...ll com Customer Care toll free 0 800 444 0730 Tech Support toll free 0 800 444 0733 Tech Support Services toll free 0 800 444 0724 Sales 0 810 444 3355 Aruba General Support toll free 800 1578 Australia Sydney International Access Code 0011 Country Code 61 City Code 2 E mail Australia au_tech_support dell com E mail New Zealand nz_tech_support dell com Home and Small Business toll free 1 300 655 5...

Page 105: ...mers support euro dell com be fr emaildell Technical Support 02 481 92 88 Technical Support Fax 02 481 92 95 Customer Care 02 713 15 65 Corporate Sales 02 481 91 00 Fax 02 481 92 99 Switchboard 02 481 91 00 Bermuda General Support 1 800 342 0671 Bolivia General Support toll free 800 10 0238 Brazil International Access Code 00 Country Code 55 City Code 51 Website www dell com br Customer Support Te...

Page 106: ...iness toll free 1 800 847 4096 Technical Support med large bus government toll free 1 800 387 5757 Sales Home Sales Small Business toll free 1 800 387 5752 Sales med large bus government toll free 1 800 387 5755 Spare Parts Sales Extended Service Sales 1 866 440 3355 Cayman Islands General Support 1 800 805 7541 Chile Santiago Country Code 56 City Code 2 Sales Customer Support and Technical Suppor...

Page 107: ...Large Corporate Accounts GCP toll free 800 858 2055 Large Corporate Accounts Key Accounts toll free 800 858 2628 Large Corporate Accounts North toll free 800 858 2999 Large Corporate Accounts North Government and Education toll free 800 858 2955 Large Corporate Accounts East toll free 800 858 2020 Large Corporate Accounts East Government and Education toll free 800 858 2669 Large Corporate Account...

Page 108: ...port desktop computers den_support dell com E mail Support servers Nordic_server_support dell com Technical Support 7023 0182 Customer Care Relational 7023 0184 Home Small Business Customer Care 3287 5505 Switchboard Relational 3287 1200 Switchboard Fax Relational 3287 1201 Switchboard Home Small Business 3287 5000 Switchboard Fax Home Small Business 3287 5001 Dominica General Support toll free 1 ...

Page 109: ...ntry Code 33 City Codes 1 4 Website support euro dell com E mail support euro dell com fr fr emaildell Home and Small Business Technical Support 0825 387 270 Customer Care 0825 823 833 Switchboard 0825 004 700 Switchboard calls from outside of France 04 99 75 40 00 Sales 0825 004 700 Fax 0825 004 701 Fax calls from outside of France 04 99 75 40 01 Corporate Technical Support 0825 004 719 Customer ...

Page 110: ...are 06103 766 9555 Switchboard 06103 766 7000 Greece International Access Code 00 Country Code 30 Website support euro dell com E mail support euro dell com gr en emaildell Technical Support 00800 44 14 95 18 Gold Service Technical Support 00800 44 14 00 83 Switchboard 2108129810 Gold Service Switchboard 2108129811 Sales 2108129800 Fax 2108129812 Grenada General Support toll free 1 866 540 3355 Gu...

Page 111: ...ales Home and Small Business 1600 33 8046 Ireland Cherrywood International Access Code 16 Country Code 353 City Code 1 Website support euro dell com E mail dell_direct_support dell com Technical Support 1850 543 543 U K Technical Support dial within U K only 0870 908 0800 Home User Customer Care 01 204 4014 Small Business Customer Care 01 204 4014 U K Customer Care dial within U K only 0870 906 00...

Page 112: ...Support 02 577 826 90 Customer Care 02 696 821 14 Fax 02 696 821 13 Switchboard 02 696 821 12 Corporate Technical Support 02 577 826 90 Customer Care 02 577 825 55 Fax 02 575 035 30 Switchboard 02 577 821 Jamaica General Support dial from within Jamaica only 1 800 682 3639 Country City International Access Code Country Code City Code Department Name or Service Area Website and E Mail Address Area ...

Page 113: ...rinters routers toll free 0120 981 690 Technical Support outside of Japan PDAs projectors printers routers 81 44 556 3468 Faxbox Service 044 556 3490 24 Hour Automated Order Service 044 556 3801 Customer Care 044 556 4240 Business Sales Division up to 400 employees 044 556 1465 Preferred Accounts Division Sales over 400 employees 044 556 3433 Large Corporate Accounts Sales over 3500 employees 044 ...

Page 114: ...3883 Sales Austin Texas U S A 512 728 4397 SalesFax Austin Texas U S A 512 728 4600 or 512 728 3772 Luxembourg International Access Code 00 Country Code 352 Website support euro dell com E mail tech_be dell com Technical Support Brussels Belgium 3420808075 Home Small Business Sales Brussels Belgium toll free 080016884 Corporate Sales Brussels Belgium 02 481 91 00 Customer Care Brussels Belgium 02 ...

Page 115: ...888 3355 Customer Service 001 877 384 8979 or 001 877 269 3383 Main 50 81 8800 or 01 800 888 3355 Montserrat General Support toll free 1 866 278 6822 Netherlands Antilles General Support 001 800 882 1519 Netherlands Amsterdam International Access Code 00 Country Code 31 City Code 20 Website support euro dell com Technical Support 020 674 45 00 Technical Support Fax 020 674 47 66 Home Small Busines...

Page 116: ...upport 001 800 220 1006 Norway Lysaker International Access Code 00 Country Code 47 Website support euro dell com E mail Support portable computers nor_nbk_support dell com E mail Support desktop computers nor_support dell com E mail Support servers nordic_server_support dell com Technical Support 671 16882 Relational Customer Care 671 17514 Home Small Business Customer Care 23162298 Switchboard 6...

Page 117: ...800 805 7545 St Kitts and Nevis General Support toll free 1 877 441 4731 St Lucia General Support 1 800 882 1521 St Vincent and the Grenadines General Support toll free 1 877 270 4609 Singapore Singapore International Access Code 005 Country Code 65 Technical Support Dimension and Inspiron and Electronics Accessories toll free 1800 394 7430 Technical Support Optiplex Latitude and Precision toll fr...

Page 118: ...rt Customer Service and Sales Penang Malaysia 604 633 4810 Spain Madrid International Access Code 00 Country Code 34 City Code 91 Website support euro dell com E mail support euro dell com es es emaildell Home and Small Business Technical Support 902 100 130 Customer Care 902 118 540 Sales 902 118 541 Switchboard 902 118 541 Fax 902 118 539 Corporate Technical Support 902 100 130 Customer Care 902...

Page 119: ...central_Europe dell com E mail for French speaking HSB and Corporate Customers support euro dell com ch fr emaildell Technical Support Home and Small Business 0844 811 411 Technical Support Corporate 0844 822 844 Customer Care Home and Small Business 0848 802 202 Customer Care Corporate 0848 821 721 Fax 022 799 01 90 Switchboard 022 799 01 01 Taiwan International Access Code 002 Country Code 886 W...

Page 120: ...ECare Form Home asp E mail dell_direct_support dell com Technical Support Corporate Preferred Accounts PAD 1000 employees 0870 908 0500 Technical Support direct PAD and general 0870 908 0800 Global Accounts Customer Care 01344 373 186 Home and Small Business Customer Care 0870 906 0010 Corporate Customer Care 01344 373 185 Preferred Accounts 500 5000 employees Customer Care 0870 906 0010 Central G...

Page 121: ...s toll free 1 800 695 8133 Printers and Projectors Technical Support toll free 1 877 459 7298 Public government education and healthcare Customer Service and Technical Support toll free 1 800 456 3355 Employee Purchase Program EPP Customers toll free 1 800 234 1490 Dell Sales toll free 1 800 289 3355 or toll free 1 800 879 3355 Dell Outlet Store Dell refurbished computers toll free 1 888 798 7561 ...

Page 122: ...122 Appendix w w w d e l l c o m s u p p o r t d e l l c o m ...
Page 123: ...oin cell battery replacing 85 computer crashes 60 restore to previous operating state 71 slow performance 56 61 specifications 93 stops responding 60 conflicts software and hardware incompatibilities 74 connecting audio device 34 TV 34 copying CDs helpful tips 32 how to 31 copying DVDs helpful tips 32 how to 31 D Dell contacting 102 support policy 101 support site 11 Dell Diagnostics 51 Dell Media...

Page 124: ...port Center 12 help file 9 hinge cover removing 88 I IEEE 1394 connector description 18 problems 58 Internet connection 23 IRQ conflicts 74 K keyboard description 15 numeric keypad 39 problems 58 removing 89 shortcuts 40 keyboard status lights description 16 keypad numeric 39 L labels Microsoft Windows 10 Service Tag 10 M media control buttons description 15 play pause Dell MediaDirect 15 33 memor...

Page 125: ...t start up 59 computer stops responding 60 conditions indicated by power light 63 conflicts 74 Dell Diagnostics 51 drives 53 DVD drive 54 error messages 56 hard drive 55 IEEE 1394 58 keyboard 58 lockups 59 network 62 power 63 printer 64 program crashes 60 program stops responding 60 programs and Windows compatibility 60 restore to previous operating state 71 scanner 65 slow computer performance 56...

Page 126: ... conflicts 74 Dell Diagnostics 51 external keyboard problems 58 Hardware Troubleshooter 74 Help and Support Center 12 restore to previous operating state 71 TV connecting 34 enabling display settings in Windows XP 37 U uninterruptible power supply See UPS UPS 25 USB connectors description 20 V video problems 68 video connector description 20 W warranty 9 Windows XP Device Driver Rollback 70 enabli...

Reviews: