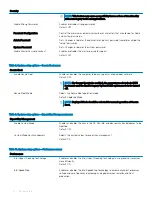
Security
NOTE:
This feature may cause compatibility issues or loss of functionality
with some legacy tools and applications.
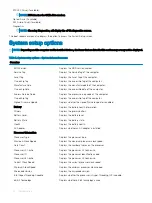
Enable Strong Passwords
Enables or disables strong passwords.
Default: OFF.
Password Configuration
Control the minimum and maximum number of characters that are allowed for Admin
and System passwords.
Admin Password
Sets, Changes, or deletes the administrator (admin) password (sometimes called the
"setup" password).
System Password
Sets, Changes, or deletes the system password.
Enable Master Password Lockout
Enables or disables the master password support.
Default: OFF.
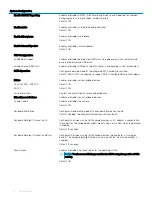
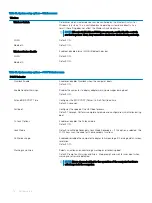
Table 8. System setup options—Secure Boot menu
Secure Boot
Enable Secure Boot
Enables or disables the computer to boos using only validated boot software.
Default: OFF.
NOTE:
For Secure Boot to be enabled, the computer needs to be in UEFI
boot mode and the Enable Legacy Option ROMs option needs to be turned
off.
Secure Boot Mode
Selects the Secure Boot operation mode.
Default: Deployed Mode.
NOTE:
Deployed Mode should be selected for normal operation of Secure
Boot.
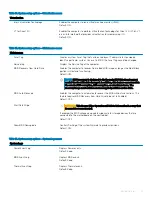
Table 9. System setup options—Expert Key Management menu
Expert Key Management
Enable Custom Mode
Enables or disables the keys in the PK, KEK, db, and dbx security key databases to be
modified.
Default: OFF.
Custom Mode Key Management
Selects the custom values for expert key management.
Default: PK.
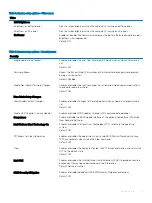
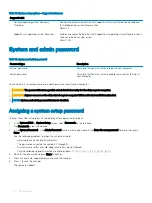
Table 10. System setup options—Performance menu
Performance
Intel Hyper-Threading Technology
Enables or disables the Intel Hyper-Threading Technology to use processor resources
more efficiently.
Default: ON.
Intel SpeedStep
Enables or disables the Intel SpeedStep Technology to dynamically adjust processor
voltage and core frequency, decreasing average power consumption and heat
production.
74
System setup
Summary of Contents for Inspiron 7390 2n1
Page 20: ...20 Removing the battery ...
Page 23: ...Removing the wireless card 23 ...
Page 25: ...Post requisites Replace the base cover Replacing the wireless card 25 ...
Page 36: ...Post requisites Replace the base cover 36 Replacing the solid state drive ...
Page 46: ...10 Lift the display assembly off the palm rest assembly 46 Removing the display assembly ...
Page 48: ...Post requisites 1 Replace the fan 2 Replace the base cover 48 Replacing the display assembly ...
Page 57: ...Removing the keyboard 57 ...
Page 62: ...62 Removing the power button with fingerprint reader ...


