6.
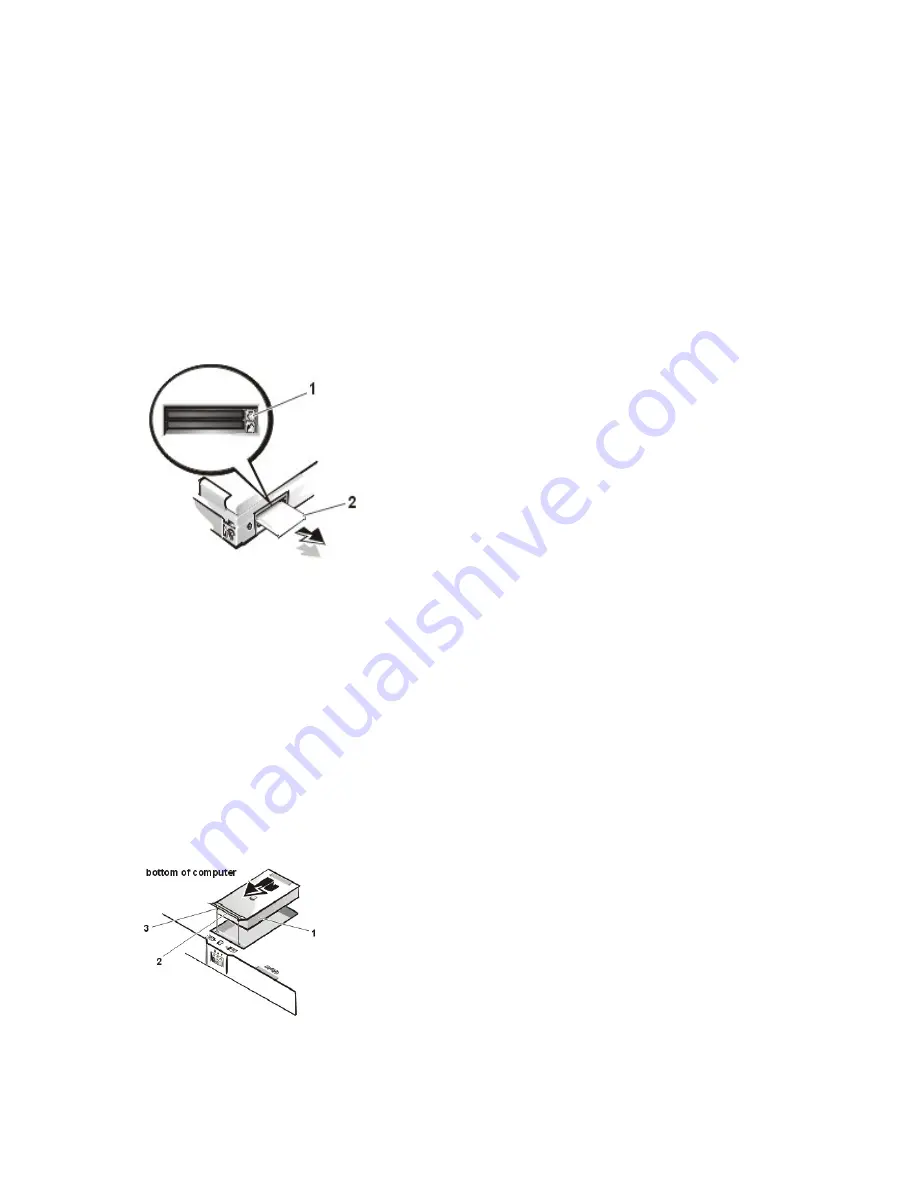
Remove PC Cards (see Figure 4).
To remove PC Cards from the top connector, press the top eject button. When the button slides out, press it again to release the card. Gently
remove the card. Press the eject button again until it is flush with the computer casing. Grasp the end of the card, and pull it completely from
the slot.
To remove PC Cards from the bottom connector, follow the same procedure.
Figure 4. PC Card Removal
7.
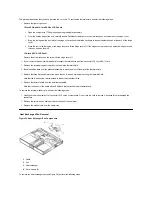
Remove the hard-disk drive assembly (see Figure 5).
Loosen the two captive screws that secure the hard-disk drive into the bottom of the computer. The front edge of the cover pops up slightly.
Slide the hard-disk drive toward the front of the computer and then lift the drive out of the computer.
Figure 5. Hard-Disk Drive Assembly Removal
2
Battery
3
Latch release
NOTICE: Use the PC Card configuration utility on the taskbar to select and stop a card before removing it from the computer.
If you do not remove the card in the configuration utility, you could lose data from open application programs.
1
Top eject button
2
PC card
NOTICE: When the hard-disk drive is not in the computer, store it in a hard-disk drive case to protect it from exposure to
static electricity.
NOTICE: Handle the hard-disk drive gently and don
’
t bump or drop the drive. Rough handling of the drive could induce
failure or loss of data.
1
Hard-disk drive
2
Hinge
Summary of Contents for Inspiron 7500
Page 6: ...Back to Contents Page AC Adapter Dell Inspiron 7500 ...
Page 7: ...Back to Contents Page Audio Jacks Dell Inspiron 7500 ...
Page 10: ...Back to Contents Page Component Locations Back View Dell Inspiron 7500 ...
Page 12: ...Back to Contents Page Battery Charge Gauge Dell Inspiron 7500 ...
Page 13: ...Back to Contents Page Removing and Installing a Battery Dell Inspiron 7500 ...
Page 26: ...Back to Contents Page ...
Page 38: ...Exploded View of 13 3 Inch Display Assembly Dell Inspiron 7500 ...
Page 39: ...Exploded View of 14 1 Inch Display Assembly Dell Inspiron 7500 ...
Page 44: ...Back to Contents Page Exploded View of Computer Dell Inspiron 7500 ...
Page 47: ...Back to Contents Page Component Locations Front View Dell Inspiron 7500 New artwork pending ...
Page 54: ...Back to Contents Page I O Connectors Dell Inspiron 7500 ...
Page 60: ...Back to Contents Page 30 Cone of Infrared Light Dell Inspiron 7500 ...
Page 64: ...Back to Contents Page Embedded Numeric Keypad Dell Inspiron 7500 ...
Page 89: ...Back to Contents Page PC Card Slots Dell Inspiron 7500 ...
Page 103: ...Back to Contents Page Removing the Memory Module Dell Inspiron 7500 ...
Page 104: ...Back to Contents Page Removing the Memory Module Cover Dell Inspiron 7500 ...
Page 136: ...Back to Contents Page Removing the Hard Disk Drive Dell Inspiron 7500 ...
Page 138: ...Back to Contents Page Removing Devices From the Media Bay Dell Inspiron 7500 ...
Page 140: ...Back to Contents Page Security Cable Slot Dell Inspiron 7500 ...
Page 159: ...Back to Contents Page Touch Pad Dell Inspiron 7500 ...


