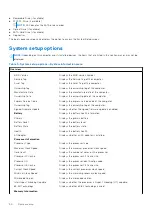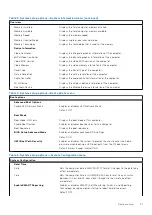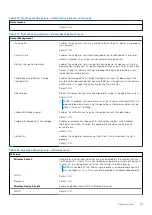
Table 12. System setup options—Wireless menu (continued)
Wireless
Bluetooth
Default: ON.
Table 13. System setup options—POST Behavior menu
POST Behavior
Numlock Enable
Enables or disables Numlock when the computer boots.
Default: ON.
Enable Adapter Warnings
Enables the computer to display adapter warning messages during boot.
Default: ON.
Extend BIOS POST Time
Configures the BIOS POST (Power-On Self-Test) load time.
Default: 0 seconds.
Fastboot
Configures the speed of the UEFI boot process.
Default: Thorough. Performs complete hardware and configuration initialization
during boot.
Fn Lock Options
Enables or disables the Fn lock mode.
Default: ON.
Lock Mode
Default: Lock Mode Secondary. Lock Mode Secondary = If this option is
selected, the F1-F12 keys scan the code for their secondary functions.
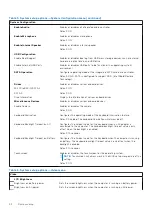
Pull Screen Logo
Enabled or disabled the computer to display full screen logo if the image match
screen resolution.
Default: OFF.
Warnings and Errors
Selects an action on encountering a warning or error during boot.
Default: Prompt on Warnings and Errors. Stop, prompt and wait for user input
when warnings or errors are detected.
NOTE:
Errors deemed critical to the operation of the computer hardware
will always halt the computer.
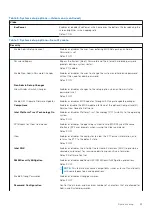
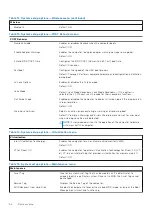
Table 14. System setup options—Virtualization menu
Virtualization
Intel Virtualization Technology
Enables the computer to run a virtual machine monitor (VMM).
Default: ON.
VT for Direct I/O
Enables the computer to perform Virtualization Technology for Direct I/O (VT-
d). VT-d is an Intel method that provides virtualization for memory map I/O.
Default: ON.
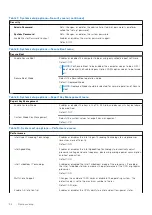
Table 15. System setup options—Maintenance menu
Maintenance
Asset Tag
Creates a system Asset Tag that can be used by an IT administrator to
uniquely identify a particular system. Once set in BIOS, the Asset Tag cannot
be changed.
Service Tag
Displays the Service Tag of the computer.
BIOS Recovery from Hard Drive
Enables the computer to recover from a bad BIOS image, as long as the Boot
Block portion is intact and functioning.
96
System setup
Summary of Contents for Inspiron 7590 2in1
Page 17: ...Removing the base cover 17 ...
Page 22: ...22 Removing the battery ...
Page 24: ...Post requisites Replace the base cover 24 Replacing the battery ...
Page 26: ...26 Removing the memory modules ...
Page 28: ...Post requisites Replace the base cover 28 Replacing the memory modules ...
Page 30: ...30 Removing the wireless card ...
Page 32: ...Post requisites Replace the base cover 32 Replacing the wireless card ...
Page 36: ...36 Removing the I O board ...
Page 38: ...Post requisites Replace the base cover 38 Replacing the I O board ...
Page 45: ...Post requisites Replace the base cover Replacing the solid state drive 45 ...
Page 51: ...Removing the hard drive 51 ...
Page 56: ...56 Removing the touchpad ...
Page 58: ...58 Replacing the touchpad ...
Page 66: ...Post requisites 1 Replace the fan 2 Replace the base cover 66 Replacing the display assembly ...
Page 70: ...70 Removing the system board ...
Page 81: ...Removing the power button with fingerprint reader 81 ...
Page 85: ...Removing the palm rest and antenna assembly 85 ...

