background image

Software

This chapter details the supported operating systems along with instructions on how to install the drivers.

Topics:

Downloading Windows drivers

Downloading Windows drivers

1. Turn on the notebook.
2. Go to 

Dell.com/support

.

3. Click 

Product Support

, enter the Service Tag of your notebook, and then click 

Submit

.

NOTE:

 If you do not have the Service Tag, use the auto detect feature or manually browse for your notebook model.

4. Click 

Drivers and Downloads

.

5. Select the operating system installed on your notebook.
6. Scroll down the page and select the driver to install.
7. Click 

Download File

 to download the driver for your notebook.

8. After the download is complete, navigate to the folder where you saved the driver file.
9. Double-click the driver file icon and follow the instructions on the screen.

5

34

Software

Summary of Contents for Latitude 7210

Page 1: ...Dell Latitude 7210 2 in 1 Setup and specifications guide Regulatory Model T04J Regulatory Type T04J001 ...

Page 2: ...al damage to hardware or loss of data and tells you how to avoid the problem WARNING A WARNING indicates a potential for property damage personal injury or death 2020 Dell Inc or its subsidiaries All rights reserved Dell EMC and other trademarks are trademarks of Dell Inc or its subsidiaries Other trademarks may be trademarks of their respective owners Rev 2A00 ...

Page 3: ...ngerprint reader 16 Video 16 Computer environment 16 Sensor and control specifications 16 3 Create a USB recovery drive for Windows 17 4 System setup 18 Boot menu 18 Navigation keys 18 Boot Sequence 19 System setup options 19 General options 19 System configuration 20 Video screen options 21 Security 21 Secure boot 23 Intel Software Guard Extensions options 23 Performance 24 Power management 24 Po...

Page 4: ... a USB flash drive 28 Updating the Dell BIOS in Linux and Ubuntu environments 29 Flashing the BIOS from the F12 One Time boot menu 29 System and setup password 32 Assigning a system setup password 32 Deleting or changing an existing system setup password 33 5 Software 34 Downloading Windows drivers 34 6 Getting help 35 Contacting Dell 35 4 Contents ...

Page 5: ...enu Recommended Table 1 Locate Dell apps Dell apps Details Dell Product Registration Register your computer with Dell Dell Help Support Access help and support for your computer SupportAssist Proactively checks the health of your computer s hardware and software Renew or upgrade your warranty by clicking the warranty expiry date in SupportAssist Dell Update Updates your computer with critical fixe...

Page 6: ...is view displays only the standard components and all the optional components may not be listed Front view 1 IR emitter 2 IR camera 3 Ambient light sensor 4 Front RGB camera 5 Front rear camera status light 6 LCD display 2 6 Specifications of Latitude 7210 2 in 1 ...

Page 7: ...olume up down button 3 Nano SIM card slot optional 4 Contacted smart card reader 5 microSD card slot 6 USB 3 1 Gen 2 Type C ports with Thunderbolt3 PowerDelivery DisplayPort 7 Speaker 8 Pogo connector Specifications of Latitude 7210 2 in 1 7 ...

Page 8: ...Side right view 1 Speaker 2 Wedge shaped lock slot 3 1 USB 3 1 Gen 1 Type A port with PowerShare 4 Power button 5 Battery charge LED 6 Microphone 7 Microphone 8 Specifications of Latitude 7210 2 in 1 ...

Page 9: ... mm 0 37 in 12 15mm 0 47 in Width 292 00 mm 11 50 in 292 00 mm 11 50 in Depth 208 80 mm 8 23 in 208 80mm 8 23 in Weight maximum 0 85 kg 1 87 lb NOTE The weight of your computer depends on the configuration ordered and the manufacturing variability 0 935 kg 2 06lb NOTE The weight of your computer depends on the configuration ordered and the manufacturing variability Specifications of Latitude 7210 ...

Page 10: ...e 4 MB 4 MB 6 MB 8 MB 12 MB Integrated graphics Intel UHD Graphics 620 Intel UHD Graphics 620 Intel UHD Graphics 620 Intel UHD Graphics 620 Intel UHD Graphics 620 Chipset Table 4 Chipset Description Values Chipset Intel Processor 10th Generation Intel Core i3 i5 i7 DRAM bus width 64 bit Flash EPROM NA PCIe bus Up to Gen3 Operating system Windows 10 Home 64 bit Windows 10 Professional 64 bit Memory...

Page 11: ...Description Values Internal M 2 NOTE To learn more about the features of different types of M 2 cards see the knowledge base article SLN301626 Battery Table 8 Battery specifications Description Values Type 2 Cell 38 WHr Polymer 2 Cell 38 WHr Long Cycle Life Polymer Voltage 8 90 VDC 8 90 VDC Weight maximum 0 16 kg 0 35 lb 0 16 kg 0 35 lb Dimensions Height 4 80 mm 0 188 in 4 80 mm 0 19 in Width 81 2...

Page 12: ...umber Intel Dual Band Wireless AX 201 Qualcomm QCA61x4A 802 11ac MU MIMO Dual Band 2x2 Wi Fi Qualcomm Snapdragon X20 LTE A Qualcomm Snapdragon X20 LTE A DW5821e eSIM capable WW except US China Turkey Qualcomm Snapdragon X20 LTE A for AT T Verizon Sprint US Transfer rate 1 73 Gbps Up to 867 Mbps Up to 867 Mbps Up to 867 Mbps Up to 867 Mbps Frequency bands supported 2 4 5 GHz 160 MHz 2 4 GHz 5 GHz 2...

Page 13: ...e storage configuration For computers with M 2 drive the M 2 drive is the primary drive Table 11 Storage specifications Storage type Interface type Capacity M 2 2230 Class 35 SSD Gen 3 PCIe x4 NVMe Up to 1 TB M 2 2230 Class 35 SED SSD Gen 3 PCIe x4 NVMe 256 GB Media card reader Table 12 Media card reader specifications Description Values Type 1 Micro SD 4 0 Card slot Cards supported Secure Digital...

Page 14: ...30 fps 1920 x 1080 at 30 fps 1920 x 1080 at 30 fps Infrared camera Still image 5 03 megapixel 0 23 megapixel Video 1920 x 1080 at 30 fps 640 x 360 at 30 fps Diagonal viewing angle Camera 88 9 degrees 77 3 88 9 Infrared camera 86 7 degrees 86 7 Power adapter Table 15 Power adapter specifications Description Values Type 65 W USB Type C 45 W USB Type C SFF Diameter connector 22 00 mm x 66 00 mm x 99 ...

Page 15: ...mensions active area Height 172 80 mm 6 80 in Width 259 20 mm 10 20 in Diagonal 312 42mm 12 26 in Native resolution 1920 x 1280 Megapixels 2 30 Color gamut 100 sRGB Pixels Per Inch PPI 188 Contrast ratio min 1000 1 Response time max 40 ms Refresh rate 60 Hz 48 Hz Horizontal view angle 89 9 degrees Vertical view angle 89 9 degrees Pixel pitch 0 135 mm Power consumption maximum 3 44 W Anti glare vs ...

Page 16: ...contaminant level G1 as defined by ISA S71 04 1985 Table 19 Computer environment Description Operating Storage Temperature range 0 C to 35 C 32 F to 95 F 40 C to 65 C 40 F to 149 F Relative humidity maximum 10 to 90 non condensing 0 to 95 non condensing Vibration maximum 0 66 GRMS 1 30 GRMS Shock maximum 110 G 160 G Altitude maximum 15 2 m to 3048 m 4 64 ft to 5518 4 ft 15 2 m to 10668 m 4 64 ft t...

Page 17: ...your computer 2 In Windows search type Recovery 3 In the search results click Create a recovery drive The User Account Control window is displayed 4 Click Yes to continue The Recovery Drive window is displayed 5 Select Back up system files to the recovery drive and click Next 6 Select the USB flash drive and click Next A message appears indicating that all data in the USB flash drive will be delet...

Page 18: ... appears to initiate a one time boot menu with a list of the valid boot devices for the system Diagnostics and BIOS Setup options are also included in this menu The devices listed on the boot menu depend on the bootable devices in the system This menu is useful when you are attempting to boot to a particular device or to bring up the diagnostics for the system Using the boot menu does not make any...

Page 19: ...rd Drive if available Diagnostics NOTE Choosing Diagnostics displays the ePSA diagnostics screen The boot sequence screen also displays the option to access the System Setup screen System setup options NOTE Depending on the tabletcomputerlaptop and its installed devices the items listed in this section may or may not appear General options Table 20 General options Option Description System Informa...

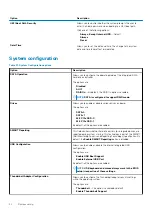
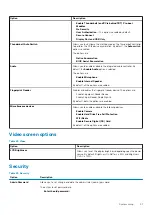
Page 20: ...drives on board The options are SATA 0 SATA 1 M 2 PCIe SSD 0 M 2 PCIe SSD 1 By default all the options are enabled SMART Reporting This field controls whether hard drive errors for integrated drives are reported during system startup This technology is part of the SMART Self Monitoring Analysis and Reporting Technology specification By default the Enable SMART Reporting option is disabled USB Conf...

Page 21: ...re enabled Fingerprint Reader Enables or disables the fingerprint reader device The options are Enable Fingerprint Reader Device Enable Finger Reader Single Sign On By default both the options are enabled Miscellaneous devices Allows you to enable or disable the following devices Enable Camera Enable Hard Drive Free Fall Protection WiFi Radio Enable Secure Digital SD Card By default all the option...

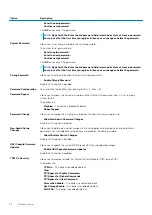
Page 22: ...nal HDD password when it is set during a system restart The options are Disabled This option is enabled by default Reboot bypass Password Change Allows you to change the system password when the administrator password is set Allow Non Admin Password Changes By default this option is enabled Non Admin Setup Changes Allows you to determine whether changes to the setup options are allowed when an adm...

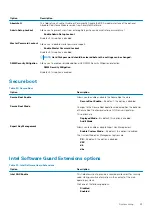
Page 23: ...ot Table 24 Secure Boot Option Description Secure Boot Enable Allows you to enable or disable the Secure Boot Feature Secure Boot Enable By default this option is disabled Secure Boot Mode Changes to the Secure Boot operation mode modifies the behavior of Secure Boot to allow evaluation of UEFI driver signatures This options are Deployed Mode By default this option is enabled Audit Mode Expert Key...

Page 24: ...el SpeedStep This option is set by default C States Control Allows you to enable or disable the additional processor sleep states C states This option is set by default Intel TurboBoost This option enables or disables the Intel TurboBoost mode of the processor Hyper Thread Control Allows you to enable or disable the HyperThreading in the processor Disabled Enabled Default Power management Table 27...

Page 25: ...ault the Enable Advanced Battery Charge Mode option is disabled Primary Battery Charge Configuration Allows you to select the charging mode for the battery The options are Adaptive enabled by default Standard ExpressCharge Primarily AC use Custom If Custom Charge is selected you can also configure Custom Charge Start and Custom Charge Stop NOTE All charging mode may not be available for all the ba...

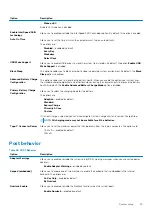
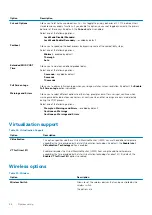
Page 26: ...s Allows you to select different options to either stop prompt and wait for user input continue when warnings are detected but pause on errors or continue when either warnings or errors are detected during the POST process Select one of the following options Prompt on Warnings and Errors enabled by default Continue on Warnings Continue on Warnings and Errors Virtualization support Table 29 Virtual...

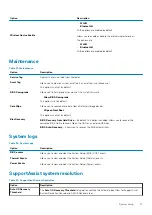
Page 27: ...evices Wipe on Next Boot This option is not set by default Bios Recovery BIOS Recovery from Hard Drive By default this option is enabled Allows you to recover the corrupted BIOS from a recovery file on the HDD or an external USB key BIOS Auto Recovery Allows you to recover the BIOS automatically System logs Table 32 System Logs Option Description BIOS events Allows you to view and clear the System...

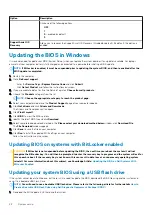
Page 28: ... to view the BIOS versions 9 Identify the latest BIOS file and click Download 10 Select your preferred download method in the Please select your download method below window click Download File The File Download window appears 11 Click Save to save the file on your computer 12 Click Run to install the updated BIOS settings on your computer Follow the instructions on the screen Updating BIOS on sys...

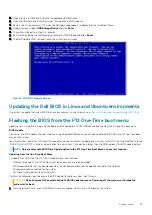
Page 29: ...ble USB key or you can also update the BIOS from the F12 One Time boot menu on the system Most Dell systems built after 2012 have this capability and you can confirm by booting your system to the F12 One Time Boot Menu to see if BIOS FLASH UPDATE is listed as a boot option for your system If the option is listed then the BIOS supports this BIOS update option NOTE Only systems with BIOS Flash Updat...

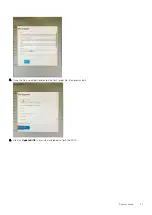
Page 30: ...press the F12 key to access the One Time Boot Menu Highlight BIOS Update using the mouse or arrow keys then press Enter 3 The Bios flash menu will open then click the Flash from file 4 Select external USB device 30 System setup ...

Page 31: ...5 Once the file is selected Double click the flash target file then press submit 6 Click the Update BIOS then system will reboot to flash the BIOS System setup 31 ...

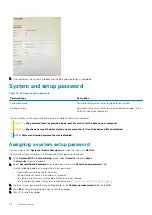
Page 32: ...led Assigning a system setup password You can assign a new System or Admin Password only when the status is in Not Set To enter the system setup press F2 immediately after a power on or reboot 1 In the System BIOS or System Setup screen select Security and press Enter The Security screen is displayed 2 Select System Admin Password and create a password in the Enter the new password field Use the f...

Page 33: ...m Security and press Enter The System Security screen is displayed 2 In the System Security screen verify that Password Status is Unlocked 3 Select System Password alter or delete the existing system password and press Enter or Tab 4 Select Setup Password alter or delete the existing setup password and press Enter or Tab NOTE If you change the System and or Setup password re enter the new password...

Page 34: ...k Submit NOTE If you do not have the Service Tag use the auto detect feature or manually browse for your notebook model 4 Click Drivers and Downloads 5 Select the operating system installed on your notebook 6 Scroll down the page and select the driver to install 7 Click Download File to download the driver for your notebook 8 After the download is complete navigate to the folder where you saved th...

Page 35: ...ne based support and service options Availability varies by country and product and some services may not be available in your area To contact Dell for sales technical support or customer service issues 1 Go to Dell com support 2 Select your support category 3 Verify your country or region in the Choose a Country Region drop down list at the bottom of the page 4 Select the appropriate service or s...

Reviews: