S y s t e m I n f o r m a t i o n G u i d e
23
Running the Dell Diagnostics
Dell provides a number of tools to help you if your computer does not perform as expected.
For information on these help tools, see "Getting Help" in your online
User’s Guide
.
If you have a computer problem and are unable to access the online
User’s Guide
, use the
Dell Diagnostics to help you determine the cause of the problem and to help you solve it.
The Dell Diagnostics are located on your hard drive.
NOTE:
If your computer cannot display a screen image, contact Dell. Otherwise, run the
Diagnostics before you call Dell technical support; the diagnostic tests provide information you
may need when you call.
1
Turn off the computer.
2
If the computer is docked, undock it.
3
Connect the computer to an electrical outlet.
4
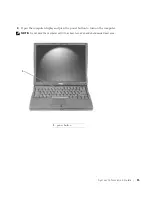
Press and hold down the Dell AccessDirect™ button while you turn on the computer.
The computer begins to run the Pre-boot System Assessment, a series of embedded
diagnostics that perform initial testing on your system board, keyboard, hard drive, and
display.
•
During the Assessment, answer any questions that appear.
•
If a component failure is detected, the computer stops and beeps. To stop the
Assessment and reboot to the operating system, press
; to continue to the
next test, press
; to retest the component that failed, press
.
•
If failures are detected during the Pre-boot System Assessment, write down the
error code(s) and then contact Dell before continuing on to the Dell Diagnostics.
•
If you receive a message stating that no Diagnostics Utility partition has been
found, follow the instructions on the screen to run the Dell Diagnostics from your
Drivers and Utilities
CD.
If the Pre-boot System Assessment completes successfully, you receive the message
Booting Dell Diagnostic Utility Partition. Press any key to
continue
.
5
Press any key to start the Dell Diagnostics from the Diagnostics Utility partition on
your hard drive.
Summary of Contents for Latitude C540 Series
Page 2: ......
Page 6: ...4 Contents ...
Page 30: ...28 Obsah ...
Page 52: ...50 P íručka k za ízení w w w d e l l c o m s u p p o r t e u r o d e l l c o m ...
Page 56: ...54 Indhold ...
Page 78: ...76 Systeminformation w w w d e l l c o m s u p p o r t e u r o d e l l c o m ...
Page 82: ...80 Sisällysluettelo ...
Page 104: ...102 Järjestelmätiedot w w w d e l l c o m s u p p o r t e u r o d e l l c o m ...
Page 108: ...106 µ ...
Page 121: ... µ 119 4 ΣΗΜΕΙΩΣΗ µ 1 µ 1 ...
Page 127: ... µ 125 Κάτω όψη 1 3 Mini PCI modem µµ µ µ µ 2 µ µ 3 µ 1 2 3 ...
Page 132: ...130 µ w w w d e l l c o m s u p p o r t e u r o d e l l c o m ...
Page 136: ...134 Tartalom ...
Page 158: ...156 Rendszerinformációs kézikönyv w w w d e l l c o m s u p p o r t e u r o d e l l c o m ...
Page 162: ...160 Innhold ...
Page 184: ...182 Systeminformasjonsveiledning w w w d e l l c o m s u p p o r t e u r o d e l l c o m ...
Page 188: ...186 Spis tre ci ...
Page 216: ...214 Содержание ...
Page 242: ...240 Obsah ...
Page 264: ...262 Príručka systémové informácie w w w d e l l c o m s u p p o r t e u r o d e l l c o m ...
Page 268: ...266 Kazalo ...
Page 294: ...292 Innehåll ...
Page 316: ...314 Systeminformationsguide w w w d e l l c o m s u p p o r t e u r o d e l l c o m ...
Page 323: ...332 Ó È Í Ó È Ú Ó Ú Î Ï Ó Ó Ë Ó ÒÈË Î ıÈ Á PC ÁÈ Ô ÂÎ Î ıÈ Á ÁË Ï ÏÂ Ó ...
Page 337: ...318 Â Î Ô Ú È È È Ì ...
Page 341: ......

