28
Dell Latitude CPt V/CPt S Series and CPx H/CPx J Series Service Manual
4 1$:(
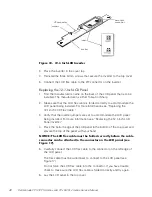
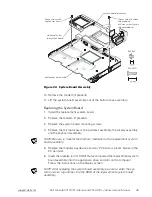
3. Place the inverter in the cover top.
4. Reinstall the three 3-mm screws that secure the inverter to the top cover.
5. Connect the LCD flex cable to the ZIF connector on the inverter.
%,'%) *
1.
Find the manufacturer’s name on the back of the LCD panel that is to be
installed. The manufacturer is either Torisan or Sharp.
2. Make sure that the LCD flex cable is folded correctly to accommodate the
LCD panel being installed. For more information see “Replacing the
12.1-Inch LCD Flex Cable.”
3. Verify that the inverter jumpers are set to accommodate the LCD panel
being installed. For more information see “Replacing the 12.1-Inch LCD
Panel Inverter.”
4. Place the bottom edge of the LCD panel in the bottom of the top cover and
elevate the top of the panel with your hand.
=$%
=$*
5. Carefully connect the LCD flex cable to the connector on the left edge of
the LCD panel.
The flex cable must be curled back to connect to the LCD panel (see
Figure 17).
Do not force the LCD flex cable into the connector. If you have trouble,
check to make sure the LCD flex cable is folded correctly and try again.
6. Lay the LCD panel in the top cover.
inverter
jumpers
label
ZIF connector
back-light
connector

