background image

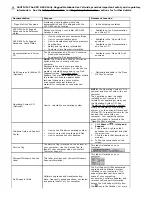
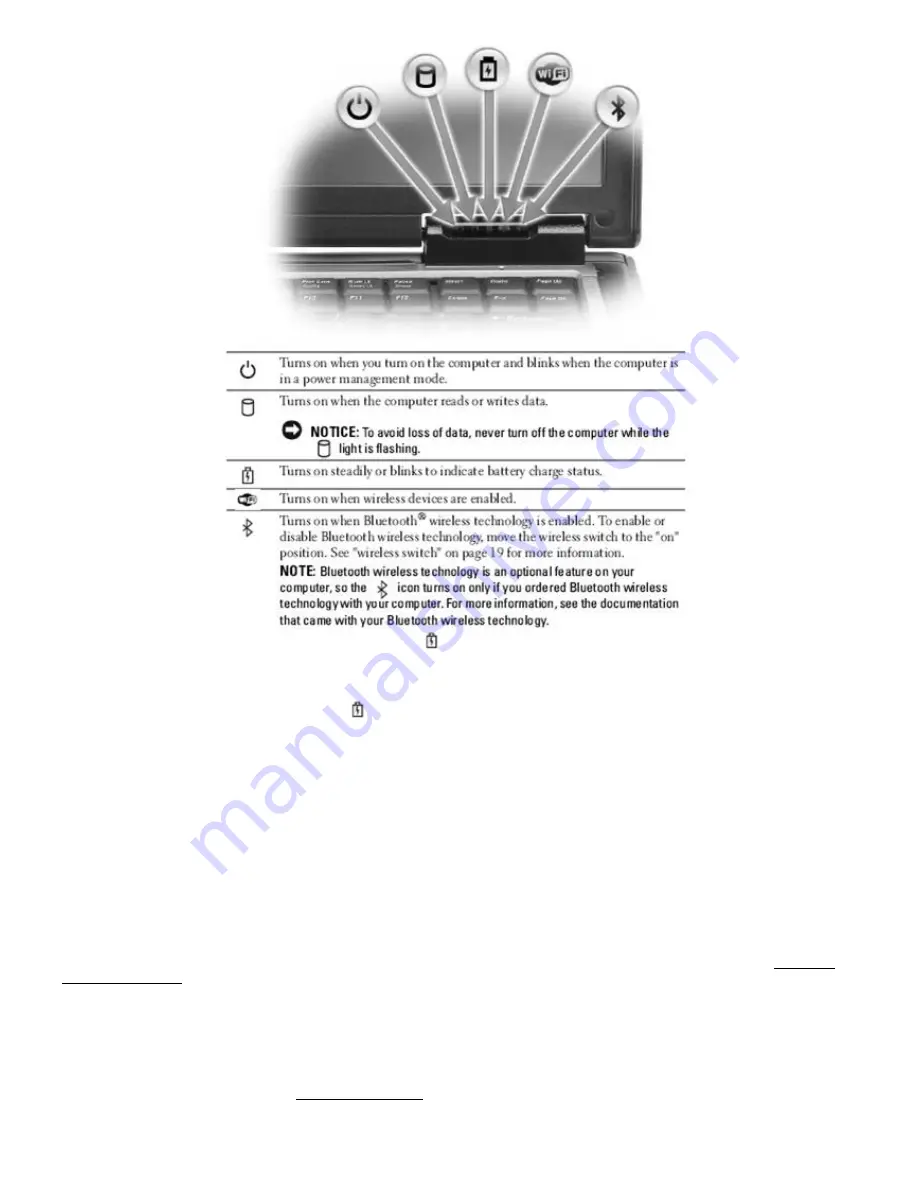
If the computer is connected to an electrical outlet, the   light operates as follows:

– Solid green: The battery is charging.

– Flashing green: The battery is almost fully charged.

– Off: The battery is adequately charged (or external power is not available to charge the battery).

If the computer is running on a battery, the   light operates as follows:

– Off: The battery is adequately charged (or the computer is turned off).

– Flashing orange: The battery charge is low.

– Solid orange: The battery charge is critically low.

2.2.2


 Volume Control Buttons

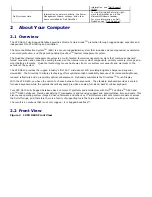
Press these buttons to adjust the volume.

2.2.3


 Mute Button

Press this button to turn off the volume.

2.2.4


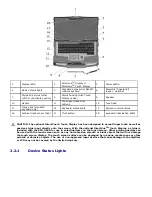
 Displays

For more information about the standard DirectVue

TM

 Display and the optional DirectVue Touch Display, see "

123H

Using the

DirectVue Displays".  The Display Latch keeps the display closed.  The Display Latch Button is pressed to release the

display latch and open the display.

2.2.5


 Keyboard

You have the option of choosing the standard sealed, full-sized keyboard or the backlit, rubber, sealed full-sized
keyboard.  Both keyboards include a numeric keypad as well as the Microsoft

®

 Windows

®

 logo key. For information on

supported keyboard shortcuts, see "

124H

Using the Keyboard".

Summary of Contents for Latitude D630 XFR

Page 1: ...y manner whatsoever without the written permission of Dell Incorporated is strictly forbidden This document is provided for informational purposes only and may contain typographical errors and technical inaccuracies The content is provided as is without express or implied warranties of any kind Dell the DELL logo Latitude Wi Fi Catcher and ExpressCharge are registered trademarks of Dell Inc QuadCo...

Page 2: ...ienced users Optionally available in the Open Me First envelope Operating System CD Optional How to reinstall your operating system NOTE The Operating System CD is optional and may not ship with your computer The operating system is already installed on your computer To reinstall your operating system use the Operating System CD See 120HRestoring Your Operating System After you reinstall your oper...

Page 3: ...tem components and elements to the exterior of the system The XFR D630 provides the rugged industry s first 14 1 wide aspect LCD providing brighter sharper and superior viewability The DirectVueTM Display technology offers optimal sunlight readability because of its increased brightness reduced reflectivity and a proprietary optical enhancement Optionally available is the DirectVueTM Touch Display...

Page 4: ...d illumination lights CAUTION The optional DirectVueTM Touch Display has been designed to accept finger touch as well as passive stylus input directly onto the screen With the optional DirectVueTM Touch Display a stylus is included with the XFR D630 for use in selecting items on the touch screen Other pointing devices can be used with the touch screen such as any non abrasive smooth or blunt objec...

Page 5: ... 2 Volume Control Buttons Press these buttons to adjust the volume 2 2 3 Mute Button Press this button to turn off the volume 2 2 4 Displays For more information about the standard DirectVueTM Display and the optional DirectVue Touch Display see 123HUsing the DirectVue Displays The Display Latch keeps the display closed The Display Latch Button is pressed to release the display latch and open the ...

Page 6: ...p arrow key Increases brightness on the integrated display only not on an external monitor Fn and down arrow key Decreases brightness on the integrated display only not on an external monitor 2 2 8 Touch Pad Provides the functionality of a mouse see 125HTouch Pad and Track Stick 2 2 9 Track Stick Provides the functionality of a mouse see 126HTouch Pad and Track Stick NOTE The track stick is only s...

Page 7: ...dentity For information on how to activate and use the security management software that controls the fingerprint reader see 128HSecurity Management Software 2 2 13 Speaker To adjust the volume of the integrated speaker press the volume control buttons mute button or volume control keyboard shortcuts see 129HKey Combinations 2 2 14 Ambient Light Sensor Detects available environmental light and aut...

Page 8: ... to be non hazardous WARNING Explosion Hazard Do not utilize any of the connectors hubs unless area is known to be non hazardous 2 3 1 Air Vents The computer uses an internal fan to create airflow through the vents which prevents the computer from overheating The Air Vents are part of the QuadCool thermal management system They provide external venting of internal heat via the enhanced convection ...

Page 9: ...ation and instructions on removing the blank see 132HSmart Cards 2 3 6 Wireless Switch When enabled through Dell QuickSet this switch can scan for a wireless LAN WLAN in your vicinity You can also use it to rapidly turn off or on any wireless devices such as WLAN cards and internal cards with Bluetooth wireless technology see 133HDell Wi Fi Catcher Network Locator 1 off position disables wireless ...

Page 10: ...ors This protection is a component of the Armored Protection System Figure 2 6 XFR D630 Right Side with Connectors Devices Revealed 1 XBay expansion bay 2 XBay device latch release 3 USB connectors 2 The following is applicable to UL 1604 and CSA C22 2 No 213 compliant systems WARNING Explosion Hazard Do not disconnect equipment unless power has been removed or the area is known to be non hazardou...

Page 11: ...ium hinged and friction fit doors This protection is a component of the Armored Protection System Figure 2 8 XFR D630 Back View with Connectors Revealed 1 Network connector RJ 45 2 Modem connector RJ 11 3 USB connectors 2 4 Serial connector 5 Video connector 6 AC adapter connector 7 Air vents protected from ingress CAUTION Do not block push objects into or allow dust to accumulate in the air vents...

Page 12: ...d network connections For information on using the network adapter see the device user s guide supplied with your computer 2 5 2 Modem Connector RJ 11 Connect the telephone line to the modem connector For information on using the modem see the documentation supplied with your modem 2 5 3 USB Connectors Connects USB devices such as a mouse keyboard or printer 2 5 4 Serial Connector Connects serial ...

Page 13: ...ly to avoid damaging the cable When you wrap the AC adapter cable ensure that you follow the angle of the connector on the AC adapter to avoid damaging the cable 2 5 7 Air Vents The computer uses an internal fan to create airflow through the vents which prevents the computer from overheating The Air Vents are part of the QuadCool thermal management system They provide external venting of internal ...

Page 14: ...ardous 2 6 1 Docking Device Connector Lets you attach your computer to a docking device See the documentation that came with your docking device for more information 2 6 2 Memory Module Cover The memory module cover provides a cover for the compartment that contains the second memory module connector DIMM B see 137HMemory 2 6 3 Hard Disk Drive Compartment Cover The hard disk drive compartment cove...

Page 15: ...ou can use the optional Operating System media for this process or you can create a wizard disk with the Files and Settings Transfer Wizard 3 1 1 Running the Files and Settings Transfer Wizard With the Operating System Media NOTE This procedure requires the Operating System media This media is optional and may not be included with all computers To prepare the new computer for the file transfer 1 C...

Page 16: ...ppears 8 Click Finish To transfer data to the destination computer 1 On the Now go to your old computer screen on the destination computer click Next 2 On the Where are the files and settings screen select the method you chose for transferring your settings and files and click Next Follow the instructions on the screen The wizard reads the collected files and settings and applies them to your dest...

Page 17: ...brightness display settings 3D screen savers or other power intensive programs such as complex 3D graphics applications Running the computer in maximum performance mode See 142HConfiguring Power Management Settings for information about accessing Windows Power Options Properties or Dell Quickset which you can use to configure power management settings You can check the battery charge see 143HCheck...

Page 18: ...e To check the battery charge press and release the status button on the battery charge gauge to illuminate the charge level lights Each light represents approximately 20 percent of the total battery charge For example if the battery has 80 percent of its charge remaining four of the lights are on If no lights appear the battery has no charge 4 2 3 2 Check the Battery Health NOTE You can check bat...

Page 19: ...ICE If your computer loses AC and battery power while in standby or sleep mode it may lose data To enter standby mode in Windows XP click the Start button click Turn off computer and then click Stand by To enter sleep mode in Windows Vista click the Windows Vista Start button and then click Sleep Depending on how you set the power management options in the Power Options Properties window or the Qu...

Page 20: ... F to charge If the battery is not in this temperature range when a charge is attempted the light flashes alternately green and orange This may happen when the battery has gotten hot from being used in your computer or in a hot environment Disconnect the computer from the electrical outlet and allow the computer and the battery to cool to the charging temperature range Then connect the computer to...

Page 21: ...rdous To remove the battery 1 If the computer is connected to a docking device docked undock it See the documentation that came with your docking device for instructions 2 Ensure that the computer is turned off 3 If the 2 screws that secure the quarter turn latches are installed remove the 2 screws on the latches on the battery compartment using a 1 Philips screw driver See 153HBottom View for the...

Page 22: ...et Battery Meter see 156HDell QuickSet Battery Meter Display Functions Fn F8 Switches the video image to the next display option The options include the integrated display an external monitor and both displays simultaneously Fn F7 Scales between wide screen and standard aspect ratio video resolutions Fn and left arrow key Activates the ambient light sensor which controls brightness of the display ...

Page 23: ...mouse NOTE The track stick is only supported on the standard keyboard Figure 5 2 Touch Pad and Track Stick 1 Touch pad buttons Track stick buttons 2 Touch Pad 3 Track stick To move the cursor lightly slide your finger over the touch pad To select an object lightly tap once on the surface of the touch pad or use your thumb to press the left touch pad button To select and move or drag an object posi...

Page 24: ...ctVue Display as well as the optional DirectVue Touch Display 6 1 Adjusting Brightness When your computer is running on battery power you can conserve power by setting the brightness to the lowest comfortable setting by pressing Fn and the up or down arrow key on the keyboard NOTE Brightness key combinations only affect the display on your portable computer not monitors or projectors that you atta...

Page 25: ...r or projector attached and turned on the image may appear on either the computer display or the external device Press Fn F8 to switch the video image between the display only the external device only or the display and the external device simultaneously 6 4 Setting Display Resolution and Refresh Rate To display a program at a specific resolution both the graphics card and the display must support...

Page 26: ...erties window To disable dual independent display mode 1 Click the Settings tab in the Display Properties window 2 Click the monitor 2 icon uncheck the Extend my Windows desktop onto this monitor option and then click Apply If necessary press Fn F8 to bring the screen image back to the computer display 6 6 Swapping Primary and Secondary Displays To swap your primary and secondary display designati...

Page 27: ... calibration to improve accuracy for entering or selecting data on the touch display or to further configure it to your specific application Please refer to the pre loaded documentation for the Touchkit Configuration Utility for a complete description of all its capabilities and functionality You can launch the pre loaded documentation for the Touchkit Configuration Utility by selecting Start Prog...

Page 28: ...ithin the 169HSetting tab the linearization function provides for more precise mapping of the stylus or finger touch inputs After linearization is completed the linearity of the touch screen will be shown in the Linearization Curve window Draw Test used for accuracy and performance checking 1 4 Points Calibration The touch screen must be calibrated before it can work accurately This function pops ...

Page 29: ... the bottom of the window to indicate the time elapsed If the touch screen is not touched before the time line bar reaches the right end the calibration task will be terminated automatically 1 Draw Test This function is used for accuracy and performance checking You can use the stylus or finger touch to draw or write across the displayed area You can press the Clear button to clear the window Pres...

Page 30: ...will affect the double click behavior for all of the mice devices in the system Two continuous clicks within the specified area in the specified double click time will be recognized as a double click event 5 Mouse Emulation mode There are 5 mouse emulation modes for the Touchkit touch screen controllers Press on the button to change the emulation mode Normal Mode You can select this mode to select...

Page 31: ...n to map the touch screen working area to the correct system display area using the Display property page 6 7 2 5 Edge Parameters For some special touch screen applications where the edge area of the full screen cannot be reached Touchkit provides you with this edge compensation tool to solve the problem and allow for touching the edge area without accuracy loss ...

Page 32: ...or a network For example with a network set up in a home or small office you can print to a shared printer access drives and files on another computer browse other networks or access the Internet You can set up a local area network LAN using a network or broadband modem cable or set up a wireless LAN WLAN The Windows XP and Windows Vista operating systems provide wizards to help guide you through ...

Page 33: ...indows XP Operating System 1 Click Start All Programs Accessories Communications Network Setup Wizard Next Checklist for creating a network NOTE Selecting the connection method labeled This computer connects directly to the Internet enables the integrated firewall provided with Windows XP Service Pack 2 SP2 2 Complete the checklist 3 Return to the Network Setup Wizard and follow the instructions i...

Page 34: ...sted on the General tab NOTE If your computer is set to the Classic Start menu option you can view network connections by clicking the Start Settings Network Connections If Wireless Network Connection does not appear you may not have a wireless network card The Order Confirmation for Your Computer The order confirmation that you received when you ordered your computer lists the hardware and softwa...

Page 35: ...y See 175HWireless Local Area Network for more information about how to prepare for connecting your computer to a WLAN Your wireless network card requires specific software and drivers for connecting to a network The software is already installed NOTE If the software is removed or corrupted follow the instructions in the user documentation for your wireless network card For information on the type...

Page 36: ... Wide Area Network A Mobile Broadband network also known as a Wireless Wide Area Network WWAN is a high speed digital cellular network that provides Internet access over a much wider geographical area than a WLAN which typically covers only from 100 to 1000 feet Your computer can maintain Mobile Broadband network access as long as the computer is within a cellular data coverage zone Contact your s...

Page 37: ...ility Or 1 Click Start All Programs Dell Wireless 2 Click Dell Wireless Broadband and follow the instructions on the screen 7 5 4 Enabling Disabling the Dell Mobile Broadband Card NOTE If you are unable to connect to a Mobile Broadband network ensure that you have all the components for establishing a Mobile Broadband connection see 177HWhat You Need to Establish a Mobile Broadband Network Connect...

Page 38: ...nd configure the switch to control WiFi network connections For more information on the Wi Fi Catcher Network Locator and to enable the feature through Dell QuickSet right click the QuickSet icon in the taskbar and select Help 7 5 7 Microsoft Windows Firewall Windows Firewall provides basic protection from unauthorized access to your computer while it is connected to the Internet Windows Firewall ...

Page 39: ...the following basic buttons A DVD player includes the following basic buttons For more information on playing media click Help on the CD or DVD player if available 8 2 Copying Media NOTE Ensure that you follow all copyright laws when you create media This section applies only to computers that have a CD RW DVD RW or CD RW DVD combo drive NOTE The types of media drives offered by Dell may vary by c...

Page 40: ...a drives select the drive into which you have inserted your source media and then click Disc Copy The computer copies the data from the source media to the blank one Once you have finished copying the source media the media that you have created automatically ejects 8 2 2 Using Blank Media CD RW drives can write to CD recording media only including high speed CD RW media while DVD writable drives ...

Page 41: ...laying 1 Open the Volume Control window 2 Click and drag the bar in the Volume Control column and slide it up or down to increase or decrease the volume For more information on volume control options click Help in the Volume Control window The Volume Meter displays the current volume level including mute on your computer Either click the QuickSet icon in the taskbar and select or deselect Disable ...

Page 42: ...t cards provide valuable tools for security data storage and special programs see 187HSmart Cards 9 1 4 Card Blanks Your computer shipped with a plastic blank installed in the card slots Blanks protect unused slots from dust and other particles Save the blank for use when no card is installed in the slots blanks from other computers may not fit your computer To remove a blank see 188HRemoving a Ca...

Page 43: ...ds the appropriate device driver If the configuration program tells you to load the manufacturer s drivers use the floppy disk or CD that came with the PC Card 9 2 2 ExpressCard 1 Place the ExpressCard in the adapter the adapter is included with the ExpressCard 2 Install the ExpressCard with adapter the same way as a PC Card see 191HPC Cards 9 3 Removing a Card or Blank CAUTION Before you begin an...

Page 44: ...torage and special programs Using smart cards can improve system security by combining something a user has the smart card with something only the user should know a PIN to provide more secure user authentication than passwords alone 10 2 2 Installing a Smart Card There are 2 models of smart card reader available for the XFR D630 notebook The standard reader does not allow the smart card to be ful...

Page 45: ...tects the card To install a smart card into the enclosed smart card reader 1 The smart card reader is located behind the Audio Wi Fi door Lower the hinged door on the left side of the notebook that protects the smart card reader slot See Figure 10 1 above 2 Hold the card so that the gold contact pad is facing upward and pointing toward the smart card slot See Figure 10 2 above 3 Slide the smart ca...

Page 46: ...he Microsoft Windows operating system to create user accounts or to change passwords Once you create a user password you must enter it each time you turn on or unlock your computer If you do not enter a password within 2 minutes the computer returns to its previous operating state For more information see your Windows documentation 10 3 1 About Passwords NOTE Passwords are disabled when you receiv...

Page 47: ...on The administrators or technicians can assign identical administrator passwords to groups of computers allowing you to assign a unique primary password To set or change administrator passwords access User Accounts from the Control Panel When you set an administrator password the Configure Setup option becomes available in system setup The Configure Setup option allows you to restrict access to s...

Page 48: ... through a system setup option NOTICE To secure your TPM data and encryption keys follow the backup procedures documented in the Broadcom Secure Foundation Getting Started Guide In the event of these backups being incomplete lost or damaged Dell will be unable to assist in the recovery of encrypted data 10 4 1 Enabling the TPM Feature 1 Enable the TPM software a Restart the computer and press F2 d...

Page 49: ... agency in that area If you do not know call a law enforcement agency where you live If the computer belongs to a company notify the security office of the company Contact Dell Customer Support to report the missing computer Provide the computer Service Tag the case number and the name address and phone number of the law enforcement agency to which you reported the missing computer If possible giv...

Page 50: ...ounterclockwise and then remove the ball 3 Wipe the ball with a clean lint free cloth 4 Blow carefully into the ball cage or use a can of compressed air to dislodge dust and lint 5 If the rollers inside the ball cage are dirty clean the rollers with a cotton swab moistened lightly with isopropyl alcohol 6 Recenter the rollers in their channels if they are misaligned Ensure that fluff from the swab...

Page 51: ...idden diagnostic utility partition on your hard drive NOTE If your computer cannot display a screen image contact Dell 1 If the computer is connected to a docking device docked undock it See the documentation that came with your docking device for instructions Ensure the computer is connected to a known good electrical outlet 2 Turn on or restart your computer 3 Diagnostics can be invoked one of t...

Page 52: ...iagnostics Main Menu 1 After the Dell Diagnostics loads and the Main Menu screen appears click the button for the option you want NOTE It is recommended that you select Test System to run a complete test on your computer Option Function Test Memory Run the stand alone memory test Test System Run the System Diagnostics Exit Exit the Diagnostics 2 After you have selected the Test System option from ...

Page 53: ...and health scans of your computing environment 11 2 1 Accessing the Dell Support Utility Access the Dell Support Utility from the Dell Support icon on the taskbar or from the Start menu If the Dell Support icon does not appear in your taskbar 1 Click the Start button and point to Programs 2 Click Dell Support and point to Dell Support Settings 3 Ensure that the Show icon on the taskbar option is c...

Page 54: ...tream is interrupted an error occurs Try closing all programs before you write to the CD DVD RW TURN OFF STANDBY MODE IN WINDOWS BEFORE WRITING TO A CD DVD RW DISC Search for the keyword standby in the Windows Help and Support Center for information on power management modes To access the Help and Support Center click Start Help and Support CHANGE THE WRITE SPEED TO A SLOWER RATE See the help file...

Page 55: ...click Control Panel 2 Click Printers and Other Hardware 3 Click Phone and Modem Options 4 Click the Modems tab 5 Click the COM port for your modem 6 Click Properties click the Diagnostics tab and then click Query Modem to verify that the modem is communicating with Windows If all commands receive responses the modem is operating properly ENSURE THAT YOU ARE CONNECTED TO THE INTERNET Ensure that yo...

Page 56: ...ive tests in the Dell Diagnostics see 218HDell Diagnostics HARD DISK DRIVE CONTROLLER FAILURE 0 The hard drive does not respond to commands from the computer Shut down the computer remove the hard drive see 219HHard Drive Problems and boot the computer from media Then shut down the computer reinstall the hard drive and restart the computer If the problem persists try another drive Run the Hard Dis...

Page 57: ...cs see 235HDell Diagnostics NOT ENOUGH MEMORY OR RESOURCES EXIT SOME PROGRAMS AND TRY AGAIN You have too many programs open Close all windows and open the program that you want to use OPERATING SYSTEM NOT FOUND Reinstall the hard drive see 236HDrive Problems If the problem persists contact Dell Customer Support OPTIONAL ROM BAD CHECKSUM The optional ROM apparently failed Contact Dell Customer Supp...

Page 58: ...em setup program When you attach an external keyboard the integrated keyboard remains fully functional 11 7 1 External Keyboard problems NOTE When you attach an external keyboard the integrated keyboard remains fully functional CHECK THE KEYBOARD CABLE Shut down the computer Disconnect the keyboard cable and check it for damage and firmly reconnect the cable If you are using a keyboard extension c...

Page 59: ...llation instructions in its documentation or on a floppy disk or CD END THE PROGRAM 1 Press Ctrl Shift Esc simultaneously 2 Click Task Manager 3 Click the program that is no longer responding 4 Click End Task CHECK THE SOFTWARE DOCUMENTATION If necessary uninstall and then reinstall the program 11 8 4 A program is designed for an earlier Microsoft Windows operating system RUN THE PROGRAM COMPATIBI...

Page 60: ... DIMM A is also referred to as primary memory IF YOU RECEIVE AN INSUFFICIENT MEMORY MESSAGE Save and close any open files and exit any open programs you are not using to see if that resolves the problem See the software documentation for minimum memory requirements If necessary install additional memory see 250HMemory Reinstall the secondary memory modules see 251HMemory to ensure that your comput...

Page 61: ...Broadband network If the searching state persists ensure that the signal strength is adequate No service The Dell Mobile Broadband Card Utility did not locate a Mobile Broadband network Ensure that the signal strength is adequate Restart the Dell wireless utility or contact your Mobile Broadband network provider Check your Mobile Broadband Network Service Contact your Mobile Broadband network serv...

Page 62: ...o verify that the computer turns on ELIMINATE POSSIBLE INTERFERENCE Turn off nearby fans fluorescent lights halogen lamps or other appliances ADJUST THE POWER PROPERTIES See 265HConfiguring Power Management Settings RESEAT THE MEMORY MODULES If the computer power light turns on but the display remains blank reinstall the secondary memory modules see 266HMemory If this does not resolve the issue co...

Page 63: ...tup and troubleshooting information UNLOCK THE SCANNER Ensure that your scanner is unlocked if it has a locking tab or button RESTART THE COMPUTER AND TRY THE SCANNER AGAIN CHECK THE CABLE CONNECTIONS See the scanner documentation for cable connection information Ensure that the scanner cables are securely connected to the scanner and the computer VERIFY THAT THE SCANNER IS RECOGNIZED BY MICROSOFT...

Page 64: ... 11 17 Touch Pad or Mouse Problems CHECK THE TOUCH PAD SETTINGS 1 Click the Start button click Control Panel and then click Printers and Other Hardware 2 Click Mouse 3 Try adjusting the settings CHECK THE MOUSE CABLE Shut down the computer Disconnect the mouse cable check it for damage and firmly reconnect the cable If you are using a mouse extension cable disconnect it and connect the mouse direc...

Page 65: ... other appliances ROTATE THE COMPUTER TO FACE A DIFFERENT DIRECTION Eliminate sunlight glare which can cause poor picture quality ADJUST THE WINDOWS DISPLAY SETTINGS 1 Click the Start button and then click Control Panel 2 Click Appearance and Themes 3 Click the area you want to change or click the Display icon 4 Try different settings for Color quality and Screen resolution RUN THE VIDEO DIAGNOSTI...

Page 66: ...right corner of the screen displays help information for the currently highlighted option the lower right corner displays information about the computer System setup key functions are listed across the bottom of the screen 12 4 Commonly Used Options Certain options require that you reboot the computer for new settings to take effect 12 4 1 Changing the Boot Sequence The boot sequence or boot order...

Page 67: ...u to map the serial port COM address or disable the serial port and its address which frees computer resources for another device to use 13 Reinstalling Software 13 1 Drivers 13 1 1 What Is a Driver A driver is a program that controls a device such as a printer mouse or keyboard All devices require a driver program A driver acts like a translator between the device and any other programs that use ...

Page 68: ...e connected to the computer Using Windows Device Driver Rollback If a problem occurs on your computer after you install or update a driver use Windows Device Driver Rollback to replace the driver with the previously installed version Microsoft Windows XP 1 Click Start My Computer Properties Hardware Device Manager 2 Right click the device for which the new driver was installed and click Properties...

Page 69: ...ws Vista 1 Click the Windows Vista start button and right click Computer 2 Click Properties Device Manager NOTE The User Account Control window may appear If you are an administrator on the computer click Continue otherwise contact your administrator to enter the Device Manager 3 Double click the type of device for which you are installing the driver for example Audio or Video 4 Double click the n...

Page 70: ... my computer to an earlier time or Create a restore point 3 Click Next and follow the remaining on screen prompts Microsoft Windows Vista 1 Click the Windows Vista Start button and click Help and Support 2 In the search box type System Restore and press Enter NOTE The User Account Control window may appear If you are an administrator on the computer click Continue otherwise contact your administra...

Page 71: ...ust also reinstall the device drivers virus protection program and other software NOTICE The Operating System media provides options for reinstalling Windows XP The options can overwrite files and possibly affect programs that are installed on your hard drive Therefore do not reinstall Windows XP unless a Dell technical support representative instructs you to do so 1 Save and close any open files ...

Page 72: ...ble As you pull connectors apart keep them evenly aligned to avoid bending any connector pins Also before you connect a cable ensure that both connectors are correctly oriented and aligned NOTICE To avoid damaging the computer perform the following steps before you begin working inside the computer 1 Ensure that the work surface is flat and clean to prevent the computer cover from being scratched ...

Page 73: ...s one user accessible SODIMM socket accessed from the bottom of the computer DIMM B DIMM B is also referred to as secondary memory You can add or replace memory modules to the SODIMM sockets accessible from the bottom of the computer DIMM B However you must not attempt to access the SODIMM socket located beneath the keyboard DIMM A without first contacting Dell Customer Support DIMM A is also refe...

Page 74: ...tor slot b Slide the module firmly into the slot at a 45 degree angle and rotate the module down until it clicks into place If you do not feel the click remove the module and reinstall it 1 Tab 2 Notch 5 Replace the cover NOTICE If the cover is difficult to close remove the module and reinstall it Forcing the cover to close may damage your computer 6 Insert the battery into the battery bay or conn...

Page 75: ...ties on the new hard drive CAUTION If you remove the hard drive from the computer when the drive is hot do not touch the metal housing of the hard drive CAUTION Before you begin any of the procedures in this section follow the safety instructions in the 301HSafety Information section of this manual CAUTION Before performing these procedures to prevent data loss turn off the computer Do not remove ...

Page 76: ...in protective antistatic packaging See Protecting Against Electrostatic Discharge in the 305HSafety Information section 6 Remove the new drive from its packaging Save the original packaging for storing or shipping the hard drive NOTICE Use firm and even pressure to slide the drive into place If you use excessive force you may damage the connector 7 Slide the hard drive into the bay until it is ful...

Page 77: ...omputer Avoid pressing down on them or placing heavy objects on top of them 1 Optical drive 2 Device latch release To remove a device from the XBay 1 If the computer is running double click the Safely Remove Hardware icon on the taskbar click the device you want to eject and click Stop 2 Unfasten the XBay device locking screw located on the bottom of the notebook 1 XBay protective door 2 Captive X...

Page 78: ...s Friction Fit Doors All 3 types of doors are components of the Armored Protection System that protects the XFR D630 in the most challenging environments This section provides the information required should you need to replace one of the doors 14 7 1 Compartment Door The compartment door is utilized on compartments accessed from the bottom of the computer such as the battery and hard disk drive c...

Page 79: ...secured with optional M2 screws If the screws are present remove them using a 1 Philips screw driver If not proceed to step 2 2 Lift the handle on the latch 3 Turn the latch a quarter turn in the direction of the unlock icon 4 Lift the compartment door away from the system 5 Reverse this procedure to replace and secure the compartment door If a single quarter turn latch should fail it can be repla...

Page 80: ...sliding latch The devices and or connectors protected by these doors can be accessed by pushing the latch in the direction indicated by the arrow and then rotating the door away from the computer along its hinge The door can be closed by rotating the door back along its hinge toward the computer and pushing the latch until it is secured The latch on the hinged door can also be locked by sliding th...

Page 81: ... to protect the devices and connectors from ingress The devices and or connectors protected by these doors can be accessed by lifting the door away from the system and rotating it along the seam Reverse this procedure to close and secure the cover Figure 14 9 Friction Fit Door Removal 1 Friction fit door 2 Screws 2 To remove a friction fit door NOTICE The number of screws will vary depending on th...

Page 82: ...main handle assembly with the mounting holes in the front plate of the XFR D630 as shown in the figure above 2 Secure the main handle assembly to the XFR D630 using the 6 screws provided 3 Install the 6 screws 3 on each side on the top of the handle assembly that secure the handle to the handle brackets 4 Align each of the handle covers over the main handle assembly ends as shown 5 If your XFR D63...

Page 83: ...Handle If the handle is not already installed proceed to step 2 2 Align the shoulder strap gaskets with the holes in the main handle assembly and the handle covers 3 Align the shoulder strap anchors with the holes in the gasket and the handle 4 Use the screws provided to attach the shoulder strap anchors to the XFR D630 14 10 Stylus Tether and Clip DirectVue Touch Display option If your XFR D630 i...

Page 84: ...he left or right side of the handle 14 10 1 Replacing a Stylus Clip The stylus clip is installed on the handle assembly s end screw on the left or right side of the notebook The stylus clip provides an eyelet into which the stylus tether can be routed to attach the stylus and stylus tether to the notebook Figure 14 13 Stylus Clip Assembly ...

Page 85: ...lus clip 3 Place the new stylus clip between the handle cover and the screw 4 Install and tighten the screw ensuring the screw head secures the stylus clip in place 14 10 2 Replacing a Stylus Figure 14 15 Stylus and Tether 1 Stylus 2 Stylus tether with loops on each end To replace the stylus 1 Remove the tether and stylus from the stylus clip a At the stylus clip loosen the looped end of the tethe...

Page 86: ...h the loop until the stylus is free from the tether 3 Using the new tether a Place one of the looped ends of the tether through the hole in the end of the stylus and then place the free end of the tether through the loop b Pull the remainder of the tether through the loop until tight 4 Attach the stylus and tether to the stylus clip a Place the free end of the tether through the stylus clip b Pull...

Page 87: ...ovides you with easy access to configure or view the following types of settings Network connectivity Power management Display System information Depending on what you want to do in Dell QuickSet you can start it by either clicking double clicking or right clicking the QuickSet icon in the Microsoft Windows taskbar The taskbar is located in the lower right corner of your screen For more informatio...

Page 88: ... speed your passage through customs Investigate the customs regulations of the countries you plan to visit and consider acquiring an international carnet also known as a merchandise passport from your government Find out what type of electrical outlets are used in the countries you will visit and have appropriate power adapters Check with your credit card company for information about the kinds of...

Page 89: ...Ensure that the computer documentation is available 17 5 Diagnostic Checklist CAUTION Before you begin any of the procedures in this section follow the safety instructions in the Safety section of this manual Name Date Address Phone number Service Tag bar code on the bottom of the computer Return Material Authorization Number if provided by Dell support technician Operating system and version Devi...

Page 90: ...ard Cards supported PC card 3 3 V and 5 V PC Card connector size 80 pins PCI E Card Flash Card Module FCM 512 MB 1 GB Memory Memory module connector one user accessible SODIMM socket Memory module capacities 512 MG 1 GB 2 GB 4 GB capable Memory type DDR2 SODIMM Minimum memory 512 MB Maximum memory 4 GB Smart Card Read write capabilities reads and writes to all ISO 7816 1 2 3 4 microprocessor cards...

Page 91: ...n 512MB Up to 256MB shared at total system memory of 512MB or greater Audio Audio type two channel high definition audio Azalia Audio controller IDT STAC9205 Codec Stereo conversion 24 bit analog to digital and digital to analog Interfaces Internal High definition audio Azalia External Microphone in connector stereo headphones speakers connector Speaker One 4 ohm speaker Internal speaker amplifier...

Page 92: ...A maximum at 4 second pulse 3 34 A continuous Output power 65 W or higher Rated output voltage 19 5 1 0 VDC Dimensions Height 32 mm 1 27 inches Width 337 mm 13 31 inches Depth 238 mm 9 3 inches Biometric Fingerprint Reader Optional Type UPEK TCS3 TouchStrip strip sensor with CMOS active capacitive pixel sensing technology Physical Height 57 66 mm 2 27 inches Width 346 96 mm 13 66 inches Depth 258 ...

Page 93: ...ire gauge AWG and an FCC compliant RJ 11 modular plug This equipment may contain Optical Disk Drives ODD CD ROM CDR W DVD etc which have built in laser devices To prevent any risk of exposure to laser radiation do not disable or open any ODD assembly for any reason These ODDs comply with safety requirements and are classified as Class 1 Laser Products under US DHHS Standard and EN IEC60825 1 Laser...

Page 94: ...vided AC adapter approved for use with this device Use of another AC adapter may cause a fire or explosion Place the AC adapter in a ventilated area such as a desk top or on the floor when you use it to run the computer or to charge the battery Do not cover the AC adapter with papers or other items that will reduce cooling also do not use the AC adapter inside a carrying case The AC adapter may be...

Page 95: ...etected disconnect the device from the electrical outlet and contact Dell Customer Support 1 Save and close any open files exit any open programs and shut down the computer 2 Disconnect the AC adapter from electrical outlet and then if possible disconnect the AC adapter from the computer 3 Turn off any attached external devices then disconnect them from their power sources and then from the comput...

Page 96: ...y terminals The resulting excessive current flow can lead to extremely high temperatures and may cause damage to the battery pack or surrounding materials or personal injury such as burns Dispose of used batteries properly See 324HBattery Disposal in this document 19 3 Ergonomic Instructions for Portable Computers CAUTION Improper or prolonged keyboard use may result in injury CAUTION Viewing a di...

Page 97: ...eption This equipment has been tested and found to comply with the limits for a Class B digital device pursuant to Part 15 of the FCC Rules This device complies with Part 15 of the FCC Rules Operation is subject to the following two conditions 1 This device may not cause harmful interference 2 This device must accept any interference received including interference that may cause undesired operati...

Page 98: ...ttery is able to be depleted and recharged battery operating time The length of time minutes or hours that a portable computer battery powers the computer BIOS Basic Input Output System A program or utility that serves as an interface between the computer hardware and the operating system Unless you understand what effect these settings have on the computer do not change them Also referred to as s...

Page 99: ...ine Memory Module A special module that has no memory chips and is used to fill unused RIMM slots cursor The marker on a display or screen that shows where the next keyboard touch pad or mouse action will occur It often is a blinking solid line an underline character or a small arrow D DDR SDRAM Double Data Rate SDRAM A type of SDRAM that doubles the data burst cycle improving system performance D...

Page 100: ... connector design that provides improved bidirectional data transmission Similar to EPP ECP uses direct memory access to transfer data and often improves performance EIDE Enhanced Integrated Device Electronics An improved version of the IDE interface for hard drives and CD drives EMI ElectroMagnetic Interference Electrical interference caused by electromagnetic radiation EPP Enhanced Parallel Port...

Page 101: ...ysical processor to function as two logical processors capable of performing certain tasks simultaneously Hz hertz A unit of frequency measurement that equals 1 cycle per second Computers and electronic devices are often measured in kilohertz kHz megahertz MHz gigahertz GHz or terahertz THz I IC Integrated Circuit A semiconductor wafer or chip on which thousands or millions of tiny electronic comp...

Page 102: ...tly save your files while you are working on them and always save your files before you shut down the computer Your computer can contain several different forms of memory such as RAM ROM and video memory Frequently the word memory is used as a synonym for RAM memory address A specific location where data is temporarily stored in RAM memory mapping The process by which the computer assigns memory a...

Page 103: ...ferring data between two devices through the processor as part of the data path pixel A single point on a display screen Pixels are arranged in rows and columns to create an image A video resolution such as 800 x 600 is expressed as the number of pixels across by the number of pixels up and down Plug and Play The ability of the computer to automatically configure devices Plug and Play provides aut...

Page 104: ...y that checks files folders and the hard disk s surface for errors ScanDisk often runs when you restart the computer after it has stopped responding SCSI small computer system interface A high speed interface used to connect devices to a computer such as hard drives CD drives printers and scanners The SCSI can connect many devices using a single controller Each device is accessed by an individual ...

Page 105: ...omputer U UAC User Account Control Microsoft Windows Vista security feature that when enabled provides an added layer of security between user accounts and access to operating system settings UMA Unified Memory Allocation System memory dynamically allocated to video UPS Uninterruptible Power Supply A backup power source used when the electrical power fails or drops to an unacceptable voltage level...

Page 106: ...WLAN Wireless Local Area Network A series of interconnected computers that communicate with each other over the air waves using access points or wireless routers to provide Internet access write protected Files or media that cannot be changed Use write protection when you want to protect data from being changed or destroyed To write protect a 3 5 inch floppy disk slide its write protect tab to the...

Reviews: