Site Location and Preparation
|
19
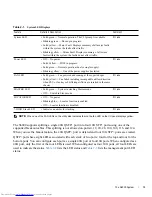
Fan Combinations
The S6000 has stock keeping units (SKUs) that support the following configurations. Installation of the
fans is done as part of the factory install based on SKU type.
• AC PSU with fan airflow from I/O to PSU
• AC PSU with fan airflow from PSU to I/O
•
DC PSU with fan airflow from I/O to PSU
•
DC PSU with fan airflow from PSU to I/O
All fans and PSUs in a configuration must be in the same airflow direction. Should a mixed airflow
configuration happen, the software notifies you of the invalid configuration.
The S6000 supports three fan trays with airflow directions from the I/O to the utility or the utility to
the I/O.
For proper ventilation, position the S6000 in an equipment rack (or cabinet) with a minimum of
five inches (12.7cm) of clearance around the exhaust vents. When you install two S6000 systems near
each other, position the two chassis at least five inches (12.7cm) apart to permit proper airflow. The fan
speed increases when the internal temperature reaches 72°C and decreases to normal speed when the
temperature falls to 58°C. The S6000 never intentionally turns off the fans.
To see the log messages, use the
show logging
command. For more information, refer to the System Logs
chapters of the
FTOS Command Ling Reference Guide for the S6000 System
and
FTOS Configuration
Guide for the S6000 System
.
Power
To connect the chassis to the applicable power source, use the appropriate power cord with the S6000
system.
•
If the switch is an AC model, an AC power cord (country/region specific) is included with the system.
•
If the switch is a DC model, a DC power cord (country/region specific) is included with the system.
When installing AC systems, follow the requirements of the National Electrical Code, ANSI/NFPA 70
where applicable.
The system is powered-up as soon as the power cord is connected between the system and the power
source.
CAUTION:
Always disconnect the power cable before you service the power supply slots.
CAUTION:
Use the power supply cord as the main disconnect device on the AC system. Make sure that the
socket-outlet is located/installed near the equipment and is easily accessible.
Storing Components
If you do not install your S6000 and components immediately, Dell Networking recommends properly
storing the system and all optional components until you are ready to install them.
Summary of Contents for Networking S6000 System
Page 1: ...Dell Networking S6000 Installation Guide Publication Date October 2013 ...
Page 6: ...6 w w w d e l l c o m s u p p o r t d e l l c o m ...
Page 8: ...8 About this Guide w w w d e l l c o m s u p p o r t d e l l c o m ...
Page 16: ...16 The S6000 System w w w d e l l c o m s u p p o r t d e l l c o m ...
Page 42: ...42 Management Ports w w w d e l l c o m s u p p o r t d e l l c o m ...
Page 50: ...50 Specifications w w w d e l l c o m s u p p o r t d e l l c o m ...
Page 54: ...54 Technical Support w w w d e l l c o m s u p p o r t d e l l c o m ...
Page 55: ......
Page 56: ...w w w d ell com support dell com Printed in the U S A ...


