


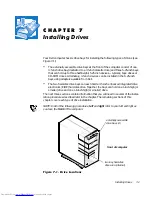


Installing Drives
7-7
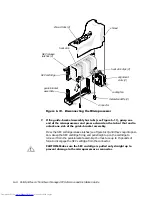
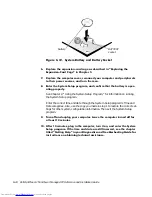
)LJXUH$WWDFKLQJWKH'ULYH%UDFNHWWRWKH1HZ'ULYH
To further ensure proper positioning of the drive in the chassis, insert and tighten
all four screws
in the order in which the holes are numbered (the holes are
marked “1” through “4”).
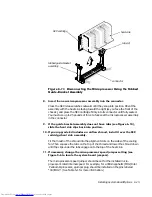
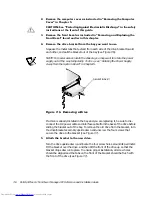
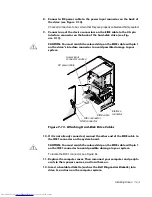
6OLGHWKHQHZGULYHLQWRWKHGULYHED\XQWLOWKHGULYHVQDSVVHFXUHO\
LQWRSODFHVHH)LJXUH
Make sure that both bracket tabs snap into place in the drive bay.
)LJXUH,QVHUWLQJWKH1HZ'ULYH,QWRWKH'ULYH%D\
,I\RXDUHLQVWDOOLQJDGULYHWKDWKDVLWVRZQFRQWUROOHUFDUGLQVWDOOWKH
FRQWUROOHUFDUGLQDQH[SDQVLRQVORW
See “Installing an Expansion Card” in Chapter 6.
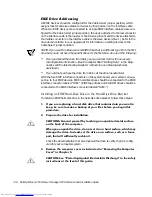
&RQQHFWD'&SRZHUFDEOHWRWKHSRZHULQSXWFRQQHFWRURQWKHEDFNRI
WKHGULYHVHH)LJXUH
bracket
bracket tabs (2)
5.25-inch drive
5.25-inch drive
Summary of Contents for OptiPlex G1
Page 1: ... ZZZ GHOO FRP HOO 2SWL3OH 0LQL 7RZHU 0DQDJHG 3 6 VWHPV 5 5 1 1 167 7 21 8 ...
Page 8: ...x ...
Page 20: ...xxii ...
Page 34: ...1 14 Dell OptiPlex G1 Mini Tower Managed PC Reference and Installation Guide ...
Page 56: ...2 22 Dell OptiPlex G1 Mini Tower Managed PC Reference and Installation Guide ...
Page 89: ...Working Inside Your Computer 5 9 LJXUH 6 VWHP RDUG XPSHUV jumpered unjumpered ...
Page 128: ...7 16 Dell OptiPlex G1 Mini Tower Managed PC Reference and Installation Guide ...
Page 134: ...A 6 Dell OptiPlex G1 Mini Tower Managed PC Reference and Installation Guide ...
Page 156: ...D 4 Dell OptiPlex G1 Mini Tower Managed PC Reference and Installation Guide ...


