


Using Integrated Devices
4-5
6HOHFW&RP)DVW(WKHU/LQN;/1,&&DQGWKHQFOLFN2.
:KHQSURPSWHGUHPRYHGLVNHWWH IURPWKHGLVNHWWHGULYHDQGLQVHUW
GLVNHWWH
&OLFN&ORVHLQWKH:LQGRZV:HOFRPHVFUHHQDQGWKHQFOLFN&ORVHDJDLQ
LQWKH1HWZRUNZLQGRZ
,I\RXDUHSURPSWHGHQWHULQIRUPDWLRQDERXW\RXUVSHFLILFQHWZRUN
See your system administrator for more information.
&OLFN<HVLQWKH1HWZRUN6HWWLQJV&KDQJHZLQGRZWRUHVWDUW\RXU
V\VWHP
:LQGRZV1,&
NOTE: If you are installing the Microsoft Windows 95 operating system for the first
time, you must use either the Windows 95 service release version provided by Dell or
its equivalent. Because of the advanced architecture of your system, some compo-
nents do not function correctly with Windows 95 versions earlier than Service
Release 2.
Windows 95 automatically detects and installs the NIC driver. The following instruc-
tions are for reconfiguring the NIC driver on systems running Windows 95, Service
Release 2 or Service Release 2.1. To determine the service release version of your
Windows 95 operating system, click the Start button, point to Settings, and click Con-
trol Panel. Double-click the System icon to access the System Properties window, and
click the General tab. If your system version is 4.00.950 B, then your operating sys-
tem is Windows 95 Service Release 2 or Service Release 2.1. For Windows 95
Service Release 1 or Windows 95 operating systems not installed by Dell, the system
version is 4.00.950 A and 4.00, respectively.
To connect your system to, and configure it for use on, an Ethernet network, follow
these steps:
8VHWKH3URJUDP'LVNHWWH0DNHUORFDWHGLQWKH'HOO$FFHVVRULHVIROGHU
WRPDNHDGLVNHWWHFRS\RIWKH1,&GULYHUVLQVWDOOHGRQ\RXUKDUGGLVN
GULYH
9HULI\WKDWWKHLQWHJUDWHG1,&LVHQDEOHGLQWKH6\VWHP6HWXSSURJUDP
DQGFRQQHFWHGWRLWVQHWZRUN
See Chapter 2, “Using the System Setup Program,” for more information.
6WDUW:LQGRZV
&OLFNWKH6WDUWEXWWRQSRLQWWR6HWWLQJVDQGFOLFN&RQWURO3DQHO7KHQ
GRXEOHFOLFNWKH6\VWHPLFRQ
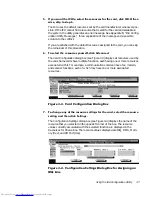
,QWKH6\VWHP3URSHUWLHVZLQGRZFOLFNWKH'HYLFH0DQDJHUWDE
,QWKHOLVWRIV\VWHPGHYLFHVGRXEOHFOLFN2WKHU'HYLFHV7KHQFOLFN3&,
(WKHUQHW&RQWUROOHU
Summary of Contents for OptiPlex G1
Page 1: ... ZZZ GHOO FRP HOO 2SWL3OH 0LQL 7RZHU 0DQDJHG 3 6 VWHPV 5 5 1 1 167 7 21 8 ...
Page 8: ...x ...
Page 20: ...xxii ...
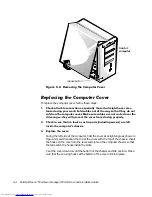
Page 34: ...1 14 Dell OptiPlex G1 Mini Tower Managed PC Reference and Installation Guide ...
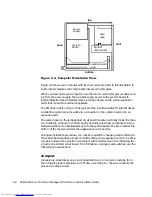
Page 56: ...2 22 Dell OptiPlex G1 Mini Tower Managed PC Reference and Installation Guide ...
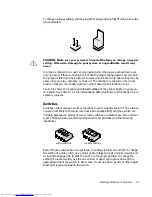
Page 89: ...Working Inside Your Computer 5 9 LJXUH 6 VWHP RDUG XPSHUV jumpered unjumpered ...
Page 128: ...7 16 Dell OptiPlex G1 Mini Tower Managed PC Reference and Installation Guide ...
Page 134: ...A 6 Dell OptiPlex G1 Mini Tower Managed PC Reference and Installation Guide ...
Page 156: ...D 4 Dell OptiPlex G1 Mini Tower Managed PC Reference and Installation Guide ...


