background image

Activating the Dell PERC 3/Di

1-1

Activating the Integrated RAID Controller

This document explains how to activate your Dell™ system’s PowerEdge™ expandable 
RAID controller 3/Di (PERC 3/Di). Your upgrade kit includes a RAID controller memory 
module, RAID hardware key, RAID battery, and RAID software.

  WARNING: Before you perform this procedure, you must turn off the system and 

disconnect it from its electrical outlet. For more information, see “Safety 

First—For You and Your Computer” in your system’s 

Installation and 

Troubleshooting Guide.

 NOTICE: 

To avoid possible data loss, back up all data on the hard-disk drives before changing 

the mode of operation of the integrated SCSI controller from SCSI to RAID.

  CAUTION: See “Protecting Against Electrostatic Discharge” in the safety 

instructions in your 

System Information document.

1

Open the system doors. 
See “Opening the System Doors” in your system 

Installation and 

Troubleshooting Guide

.

2

Open the ejectors on the RAID controller memory module socket by pressing down 

and outward, which allows you to insert the memory module into the socket.
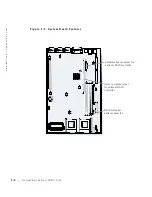
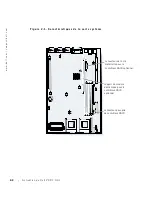
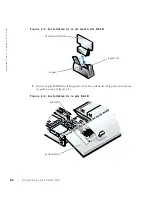
See Figure 1-1 for the location of the socket on the system board.

Summary of Contents for PERC 3/Di

Page 1: ...www dell com support dell com Dell Systems ACTIVATING THE DELL PERC 3 DI ...

Page 2: ...in severe injury ____________________ Information in this document is subject to change without notice 2001 Dell Computer Corporation All rights reserved Reproduction in any manner whatsoever without the written permission of Dell Computer Corporation is strictly forbidden Trademarks used in this text Dell PowerEdge and the DELL logo are trademarks of Dell Computer Corporation Other trademarks and...

Page 3: ...ter in your system s Installation and Troubleshooting Guide NOTICE To avoid possible data loss back up all data on the hard disk drives before changing the mode of operation of the integrated SCSI controller from SCSI to RAID CAUTION See Protecting Against Electrostatic Discharge in the safety instructions in your System Information document 1 Open the system doors See Opening the System Doors in ...

Page 4: ...Di w w w d e l l c o m s u p p o r t d e l l c o m Fig u re 1 1 S y s t em B o a rd Fe at u re s hardware key connector for optional RAID controller memory module socket for optional RAID controller RAID controller battery connector ...

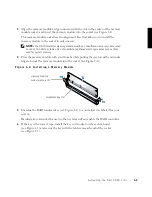
Page 5: ...mory modules such as those used for system memory 4 Press the memory module with your thumbs while pulling the ejectors with your index fingers to lock the memory module into the socket see Figure 1 2 Fig u re 1 2 I n s ta l l i n g a M em o r y M o d u l e 5 Examine the RAID hardware key see Figure 1 3 to ensure that it is labeled for your system Hardware keys intended for use in other systems wi...

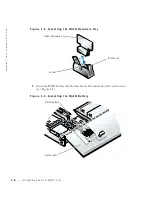
Page 6: ...t d e l l c o m Figure 1 3 I n stalling th e RAI D Ha rd w ar e Ke y 7 Insert the RAID battery into the bracket on the underside of the system door see Figure 1 4 Figure 1 4 I n stalling th e RAI D Batt er y socket latches 2 RAID hardware key RAID battery system door ...

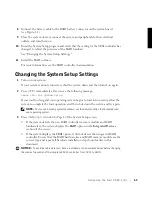
Page 7: ...r System Setup If you wait too long and your operating system begins to load into memory allow the system to complete the load operation and then shut down the system and try again NOTE To ensure an orderly system shutdown see the documentation that accompanied your operating system 3 Press Alt p to switch to Page 2 of the System Setup screen If the system detects the new RAID controller memory mo...

Page 8: ...to RAID Enabled Channel A displays RAID and Channel B displays SCSI When the RAID option is set to SCSI Channel A and Channel B display SCSI 5 Press Alt b to save settings and then reboot the system 6 Configure the RAID subsystem and install the RAID driver and management software For more information see the PERC 3 Di controller documentation ...

Page 9: ...www dell com support dell com Systèmes Dell ACTIVATION DE DELL PERC 3 DI ...

Page 10: ...graves ____________________ Les informations contenues dans ce document sont sujettes à modification sans préavis 2001 Dell Computer Corporation Tous droits réservés Toute reproduction sous quelque forme que ce soit sans l autorisation écrite de Dell Computer Corporation est strictement interdite Marques utilisées dans ce texte Dell PowerEdge et le logo DELL sont des marques de Dell Computer Corpo...

Page 11: ...pannage de votre système AVIS Pour éviter la perte possible de données sauvegardez toutes les données sur les unités de disque dur avant de changer le mode de fonctionnement du contrôleur SCSI intégré de SCSI à RAID PRÉCAUTION Reportez vous à la section Protection contre les décharges électrostatiques dans les consignes de sécurité du document intitulé Informations sur le système 1 Ouvrez les port...

Page 12: ... p o r t d e l l c o m Fig u re 2 1 C ar ac té ri stiq u e s d e l a c a rt e s y s t èm e connecteur de la clé matérielle pour le contrôleur RAID optionnel support du module de mémoire pour le contrôleur RAID optionnel connecteur pour pile de contrôleur RAID ...

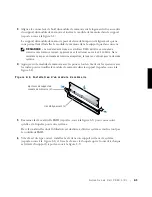
Page 13: ...tilisés pour la mémoire système 4 Appuyez sur le module de mémoire avec les pouces tout en tirant sur les éjecteurs avec les index pour verrouiller le module de mémoire dans le support reportez vous à la figure 2 2 Fig u re 2 2 I n s ta l l a tio n d u n mo d u l e d e m é mo i r e 5 Examinez la clé matérielle RAID reportez vous à la figure 2 3 pour vous assurer qu elle est étiquetée pour votre sy...

Page 14: ... m Figure 2 3 I n stallation de la clé mat ér ielle R AID 7 Insérez la pile RAID dans la languette sur la face inférieure de la porte du système reportez vous à la figure 2 4 Figure 2 4 I n stallation de la pile RAI D support loquets 2 clé matérielle RAID pile RAID porte système ...

Page 15: ...on du système 1 Allumez votre système Si votre système est déjà allumé arrêtez le puis rallumez le 2 Appuyez sur F2 dès que vous voyez le message suivant s afficher Press F2 for System Setup Appuyez sur F2 pour accéder au programme de configuration du système Si vous attendez trop longtemps et que votre système d exploitation commence à se charger en mémoire laissez le système terminer son chargem...

Page 16: ...s les données sur les unités de disque dur avant de changer le mode de fonctionnement du contrôleur SCSI intégré de SCSI à RAID 4 Appuyez sur la touche fléchée gauche ou droite pour modifier l option RAID sur RAID Enabled RAID activé Le canal A affiche RAID et le canal B affiche SCSI Quand l option RAID est définie sur SCSI les canaux A et B affichent SCSI 5 Appuyez sur Alt b pour enregistrer les ...

Page 17: ...www dell com support dell com Dell Systeme DELL PERC 3 DI AKTIVIEREN ...

Page 18: ...ion an die bei Nichtbeachtung zu schweren Verletzungen führen könnte ____________________ Irrtümer und technische Änderungen vorbehalten 2001 Dell Computer Corporation Alle Rechte vorbehalten Nachdrucke jeglicher Art ohne die vorherige schriftliche Genehmigung der Dell Computer Corporation sind strengstens untersagt Warenzeichen in diesem Text Dell PowerEdge und das DELL Logo sind Warenzeichen der...

Page 19: ...Installations und Fehlerbehebungshandbuch des Systems HINWEIS Um Datenverlust zu vermeiden sichern Sie alle Daten auf den Festplattenlaufwerken bevor Sie den Betriebsmodus des integrierten SCSI Controllers von SCSI zu RAID ändern VORSICHTSHINWEIS Siehe Schutz vor elektrostatischer Entladung in den Sicherheitshinweisen der Systeminformationdokumentation 1 Öffnen Sie die Systemtüren Siehe Systemtüre...

Page 20: ...s u p p o r t d e l l c o m A b b i l d u n g 3 1 Kom p o n en t en d e r S y s t em p l a ti n e Anschluß des Hardwareschlosses des optionalen RAID Controllers Speichermodulsockel für den optionalen RAID Controller Batterieanschluß des RAID Controller ...

Page 21: ...cher eingesetzt werden 4 Drücken Sie mit den Daumen auf das Speichermodul während Sie gleichzeitig mit den Zeigefingern die Klammern ziehen um das Speichermodul im Sockel zu verriegeln siehe Abbildung 3 2 A b b i l d u n g 3 2 S p eic h e rm od u l i n s ta l l i e re n 5 Prüfen Sie das RAID Hardwareschloß siehe Abbildung 3 3 um sicherzustellen daß es für Ihr System gekennzeichnet ist Hardwareschl...

Page 22: ...l l c o m Abbildung 3 3 RAID H ar d wa re schloß ins talliere n 7 Setzen Sie die RAID Batterie in die Halterung an der Unterseite der Systemtür ein siehe Abbildung 3 4 Abbildung 3 4 RAID Batt erie installiere n Sockel Riegel 2 RAID Hardwareschloß RAID Batterie Systemtür ...

Page 23: ...1 Schalten Sie das System ein Wenn das System bereits eingeschaltet ist ist es aus und dann wieder einzuschalten 2 Drücken Sie unmittelbar nach Einblenden der folgenden Meldung F2 Press F2 for System Setup Drücken Sie F2 für System Setup Bei zu langem Warten wird das Betriebssystem bereits in den Speicher geladen Sollte dies passieren warten Sie ab bis der Ladevorgang abgeschlossen ist fahren Sie ...

Page 24: ...en auf den Festplattenlaufwerken bevor Sie den Betriebsmodus des integrierten SCSI Controllers von SCSI zu RAID ändern 4 Drücken Sie die Nach Links oder die Nach Rechts Taste um die Option RAID auf RAID Enabled RAID aktiviert zu ändern Kanal A zeigt RAID und Kanal B SCSI an Wenn die Option RAID auf SCSI gesetzt ist zeigen die Kanäle A und B SCSI an 5 Drücken Sie Alt b um die Einstellungen zu speic...

Page 25: ...www dell com support dell com Sistemas Dell ACTIVACIÓN DE DELL PERC 3 DI ...

Page 26: ..._ La información contenida en este documento puede modificarse sin aviso previo 2001 Dell Computer Corporation Quedan reservados todos los derechos Queda estrictamente prohibida la reproducción de este documento en cualquier forma sin la autorización por escrito de Dell Computer Corporation Marcas comerciales utilizadas en este texto Dell PowerEdge el logotipo DELL son marcas comerciales de Dell C...

Page 27: ...ión de problemas de su sistema AVISO Para evitar posibles pérdidas de datos haga copias de seguridad de todos los datos en las unidades de disco duro antes de cambiar el modo de operación del controlador integrado SCSI de SCSI a RAID PRECAUCIÓN Consulte la sección Protección contra descargas electrostáticas en las instrucciones de seguridad que se encuentran en el documento Información del sistema...

Page 28: ... p p o r t d e l l c o m Fig u ra 4 1 C ar ac te rí stic a s d e l a p l a c a b a s e conector de la llave de hardware para el controlador RAID opcional zócalo de módulo de memoria para controlador RAID opcional conector para la batería del controlador RAID ...

Page 29: ...ilizados para memoria del sistema 4 Presione hacia abajo el módulo de memoria con los pulgares mientras tira hacia arriba los expulsores con los dedos índices para trabar el módulo de memoria en el zócalo consulte la Figura 4 2 Fig u ra 4 2 I n s ta l a ci ó n d e u n mó d u l o d e m e mo r ia 5 Examine la llave del hardware de RAID consulte la Figura 4 3 para asegurarse de que está etiquetada pa...

Page 30: ... s ta l a ci ó n d e l a l l a ve d e h ar d wa re R A ID 7 Inserte la batería RAID en el soporte por debajo de la puerta del sistema consulte la Figura 4 4 Fig u ra 4 4 I n s ta l a ci ó n d e l a b at er ía de l R A ID zócalo pestillos 2 llave de hardware RAID batería del RAID puerta del sistema ...

Page 31: ...a demasiado y su sistema operativo empieza a cargarse en la memoria permita que el sistema complete la operación de carga y después finalice el sistema operativo e intente nuevamente NOTA Para asegurar un apagado ordenado del sistema operativo consulte la documentación incluida con el mismo 3 Presione Alt p para cambiar a la página 2 de la pantalla del programa Configuración del sistema Si el sist...

Page 32: ... El Canal A muestra RAID y el Canal B muestra SCSI Cuando la opción RAID está establecida en SCSI el Canal A y el Canal B muestran SCSI 5 Presione Alt b para guardar la configuración y luego reinicie el sistema 6 Configure el subsistema RAID e instale el controlador de RAID y el software de administración Para obtener más información consulte la documentación del controlador PERC 3 Di ...

Reviews: