background image

160

PowerConnect J-SRX210 Services Gateway Hardware Guide

Summary of Contents for PowerConnect J-SRX210

Page 1: ...Dell PowerConnect J Series J SRX210 Services Gateway Hardware Guide Published 2010 06 16 ...

Page 2: ...ogo and PowerConnect are trademarks of Dell Inc Juniper Networks the Juniper Networks logo JUNOS NetScreen ScreenOS and Steel Belted Radius are registered trademarks of Juniper Networks Inc in the United States and other countries JUNOSe is a trademark of Juniper Networks Inc All other trademarks service marks registered trademarks or registered service marks are the property of their respective o...

Page 3: ...r virtualizations are physically contained on a single chassis c Product purchase documents paper or electronic user documentation and or the particular licenses purchased by Customer may specify limits to Customer s use of the Software Such limits may restrict use to a maximum number of seats registered endpoints concurrent users sessions calls connections subscribers clusters nodes realms device...

Page 4: ... SOFTWARE WILL OPERATE WITHOUT ERROR OR INTERRUPTION OR WILL BE FREE OF VULNERABILITY TO INTRUSION OR ATTACK In no event shall Juniper s or its suppliers or licensors liability to Customer whether in contract tort including negligence breach of warranty or otherwise exceed the price paid by Customer for the Software that gave rise to the claim or if the Software is embedded in another Juniper prod...

Page 5: ...period of up to three years from the date of distribution Such request can be made in writing to Juniper Networks Inc 1194 N Mathilda Ave Sunnyvale CA 94089 ATTN General Counsel You may obtain a copy of the GPL at http www gnu org licenses gpl html and a copy of the LGPL at http www gnu org licenses lgpl html 15 Miscellaneous This Agreement shall be governed by the laws of the State of California ...

Page 6: ...vi ...

Page 7: ...vices Gateway Front Panel and Back Panel Views Low Memory High Memory and PoE Version 9 J SRX210 Services Gateway Front Panel 10 J SRX210 Services Gateway Back Panel 10 J SRX210 Services Gateway with Integrated Convergence Services Front Panel and Back Panel Views 12 J SRX210 Services Gateway with Integrated Convergence Services Front Panel 12 J SRX210 Services Gateway with Integrated Convergence ...

Page 8: ...nce Services Interoperability 38 Configuring the J SRX210 Services Gateway with Integrated Convergence Services 39 Chapter 6 J SRX210 Services Gateway Mini Physical Interface Modules 41 J SRX210 Services Gateway Mini Physical Interface Modules 41 Part 2 Setting Up the J SRX210 Services Gateway Chapter 7 Preparing the Site for the J SRX210 Services Gateway Installation 45 Site Preparation Checklist...

Page 9: ...g On the J SRX210 Services Gateway 75 Connecting the J SRX210 Services Gateway to the Power Supply 75 Connecting and Organizing Interface Cables to the J SRX210 Services Gateway 76 Grounding the J SRX210 Services Gateway 77 Powering On and Powering Off the J SRX210 Services Gateway 78 Powering On the J SRX210 Services Gateway 78 Powering Off the J SRX210 Services Gateway 79 Resetting the J SRX210 ...

Page 10: ... the Configuration File When the J SRX210 Services Gateway Is Inaccessible 113 Using the Reset Config Button on the J SRX210 Services Gateway 114 Changing the Reset Config Button Behavior on the J SRX210 Services Gateway 114 Dell Support 115 Part 4 Appendixes Appendix A Safety and Regulatory Compliance Information 119 J SRX210 Services Gateway Definition of Safety Warning Levels 119 J SRX210 Servi...

Page 11: ...way Ethernet Port 148 RJ 45 Connector Pinouts for the J SRX210 Services Gateway Console Port 148 RJ 11 Connector Pinouts for the J SRX210 Services Gateway with Integrated Convergence Services FXO and FXS Ports 149 Appendix D Getting Help 151 Obtaining Assistance 151 Online Services 152 Automated Order Status Service 153 Support Service 153 Dell Enterprise Training and Certification 153 Problems Wi...

Page 12: ...xii PowerConnect J SRX210 Services Gateway Hardware Guide ...

Page 13: ... on the services gateway perform initial software configuration and perform routine maintenance After completing the installation and basic configuration procedures covered in this guide see the JUNOS Software configuration guides for information about further JUNOS Software configuration Audience This guide is designed for network administrators who are installing and maintaining a PowerConnect J...

Page 14: ...nities Attribute Introduces important new terms Identifies book names Identifies RFC and Internet draft titles Italic text like this Configure the machine s domain name edit root set system domain name domain name Represents variables options for which you substitute a value in commands or configuration statements Italic text like this To configure a stub area include the stub statement at the edi...

Page 15: ...lect All Interfaces To cancel the configuration click Cancel Represents J Web graphical user interface GUI items you click or select Bold text like this In the configuration editor hierarchy select Protocols Ospf Separates levels in a hierarchy of J Web selections bold right angle bracket Repair and Warranty CAUTION Many repairs may only be done by a certified service technician You should only pe...

Page 16: ...xvi PowerConnect J SRX210 Services Gateway Hardware Guide ...

Page 17: ...Gateway Hardware Components and Specifications on page 7 J SRX210 Services Gateway 3G ExpressCard on page 25 J SRX210 Services Gateway Power over Ethernet Support on page 31 J SRX210 Services Gateway with Integrated Convergence Services on page 35 J SRX210 Services Gateway Mini Physical Interface Modules on page 41 1 ...

Page 18: ...2 PowerConnect J SRX210 Services Gateway Hardware Guide ...

Page 19: ...delivering secure reliable data and voice services over IP along with multiple interfaces that support WAN and LAN connectivity Besides SIP analog voice support additional features include 3G wireless support DSLAM flexible data voice T1 E1 and Power over Ethernet PoE The device provides Internet Protocol Security IPsec virtual private network VPN and firewall services for small sized and medium s...

Page 20: ...and shell that runs on top of a UNIX based operating system kernel The CLI is a straightforward command interface On a single line you type commands that are executed when you press the Enter key The CLI provides command Help and command completion Related Topics J SRX210 Services Gateway Specifications on page 7 J SRX210 Services Gateway Hardware Features on page 4 J SRX210 Services Gateway Hardw...

Page 21: ... None None ForeignExchange Subscriber FXS and Foreign Exchange Office FXO interface One One One One Mini PIM slots Status Alarm HA Power Mini PIMs 3G ExpressCard Port TX RX and PoE and Voice Interface Status Alarm HA Power Mini PIMs 3G ExpressCard Port TX RX and PoE Status Alarm HA Power Mini PIMs 3G ExpressCard Port TX RX and PoE Status Alarm HA Power Mini PIMs 3G ExpressCard Port TX RX and PoE L...

Page 22: ... J SRX210 Services Gateway Specifications on page 7 6 PowerConnect J SRX210 Services Gateway Hardware Guide ...
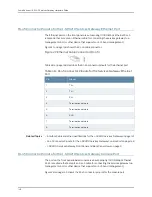
Page 23: ... page 12 J SRX210 Services Gateway Built In Interfaces on page 14 J SRX210 Services Gateway LEDs on page 17 J SRX210 Services Gateway Boot Devices and Dual Root Partitioning Scheme on page 22 J SRX210 Services Gateway Cooling System on page 22 J SRX210 Services Gateway Power Supply on page 24 J SRX210 Services Gateway Specifications The J SRX210 Services Gateway chassis is a rigid sheet metal stru...

Page 24: ...ysical specifications of the device Table 5 J SRX210 Services Gateway Specifications Value Specification 1 73 in x 11 02 in x 7 04 in 44 mm x 280 mm x 179 mm Dimensions H x W x D 3 43 lb 1 56 kg for J SRX210 Services Gateway Low Memory and High Memory models 3 50 lb 1 59 kg for J SRX210 Services Gateway with PoE 3 76 lb 1 70 kg for J SRX210 Services Gateway with Integrated Convergence Services Cha...

Page 25: ...nge 70 dB A or less per EN ISO 7779 Noise level CAUTION Before removing or installing components of a functioning services gateway attach an electrostatic discharge ESD strap to an ESD point and place the other end of the strap around your bare wrist Failure to use an ESD strap could result in damage to the services gateway Related Topics J SRX210 Services Gateway Description on page 3 J SRX210 Se...

Page 26: ...ber Mini PIM slot 1 Power button 2 LEDs Status Alarm Power 3G ExpressCard Mini PIM HA 3 Reset Config button 4 Universal Serial Bus USB ports 5 Console port 6 Gigabit Ethernet ports and Fast Ethernet ports 7 For more information on the front panel components see the following topics J SRX210 Services Gateway Built In Interfaces on page 14 J SRX210 Services Gateway LEDs on page 17 J SRX210 Services ...

Page 27: ...t 5 NOTE The cable tie holder provides support to hold the power cord on to the power supply point The lock provides the capability to lock and secure the device to the installation site Related Topics J SRX210 Services Gateway Specifications on page 7 J SRX210 Services Gateway Built In Interfaces on page 14 J SRX210 Services Gateway LEDs on page 17 J SRX210 Services Gateway Boot Devices on page 2...

Page 28: ...gence Services Front Panel Figure 5 on page 12 shows the front panel of the J SRX210 Services Gateway with Integrated Convergence Services Figure 5 J SRX210 Services Gateway with Integrated Convergence Services Front Panel J SRX210 Table 8 on page 12 lists the front panel components of the services gateway NOTE The numbers in Table 8 on page 12 correspond to the numbers in Figure 5 on page 12 Tabl...

Page 29: ...X210 Services Gateway with Integrated Convergence Services Back Panel g031102 Table 9 on page 13 lists the back panel components of the J SRX210 Services Gateway with Integrated Convergence Services NOTE The numbers in Figure 6 on page 13 correspond to the numbers in Table 9 on page 13 Table 9 J SRX210 Services Gateway with Integrated Convergence Services Back Panel Components Component Number Pow...

Page 30: ...ide LAN and WAN connectivity to hubs switches local servers and workstations To forward incoming data packets to the device To receive outgoing data packets from the device To connect power devices to receive network connectivity and electric power PoE functionality For the PoE and media gateway model of the J SRX210 Services Gateway Consist of two fixed ports Are labeled as port ge 0 0 0 and port...

Page 31: ...hernet ports support Power over Ethernet on the J SRX210 Services Gateway PoE version and media gateway version Fast Ethernet The USB ports can be used as follows To support a USB storage device that functions as a secondary boot device in case of the internal flash failure on startup if the USB storage device is installed and configured NOTE You must install and configure the USB storage device o...

Page 32: ...n FXO1 interface and the FXS2 interface The relay automatically connects the FXS2 port and the FXO1 port in the event of a power failure Consist of two ports Use an RJ 11 connector Foreign Exchange Subscriber FXS interface The FXO port can be used to provide direct connection to the telephone exchange or Public Switched Telephone Networks PSTN central office Consist of two ports Use an RJ 11 conne...

Page 33: ...Views on page 12 J SRX210 Services Gateway LEDs on page 17 J SRX210 Services Gateway Boot Devices on page 22 J SRX210 Services Gateway Cooling System on page 22 J SRX210 Services Gateway Power Supply on page 24 J SRX210 Services Gateway LEDs This topic includes the following sections Front Panel LEDs on page 17 Ethernet Port LEDs on page 19 Voice Interface Port LED on page 20 Front Panel LEDs Figu...

Page 34: ...sed to determine if the Mini PIM is present and detected by the device The Mini PIM LED has the following indicator colors Green and steadily on indicates that the Mini PIM is functioning normally Off indicates that the Mini PIM is not present or not detected by the device Mini PIM LED The Power LED can be used to determine if the device is receiving power The Power LED has the following indicator...

Page 35: ...s faulty or not detected by the device Indicates that the ExpressCard is plugged in but not registered with the Network Amber and steadily on indicates that the ExpressCard is plugged in and registered with the Network Off indicates that the ExpressCard is not plugged in 3G ExpressCardLED Ethernet Port LEDs On the J SRX210 Services Gateway each Gigabit Ethernet port and Fast Ethernet port has two ...

Page 36: ...e connected power device is receiving power Steady Green PoE LED 2 PoE Power over Ethernet is on but the connected power device is not receiving power device fault or not enough power Steady Yellow PoE is off Off Unlit NOTE The PoE LED is enabled only on the Power over Ethernet PoE model of the J SRX210 Services Gateway For non PoE models the PoE LED remains off Voice Interface Port LED On the J S...

Page 37: ...LEDs glow red blinking while initializing If there is an error the LEDs remain red otherwise change to green Blinking Red Port has detected a hardware initialization failure Steady Red Related Topics J SRX210 Services Gateway Specifications on page 7 J SRX210 Services Gateway Front Panel and Back Panel Views on page 9 J SRX210 Services Gateway with Integrated Convergence Services Front Panel and B...

Page 38: ...s to boot from the default storage media it tries to boot from the alternate storage media With the dual root partitioning scheme the J SRX210 Services Gateway first tries to boot the JUNOS Software from the primary root partition and then from the backup root partition on the default storage media If both primary and backup root partitions of a media fail to boot then the device tries to boot fro...

Page 39: ... airflow for the J SRX210 Services Gateway with low memory high memory and Power over Ethernet PoE models Figure 10 Airflow Through the J SRX210 Services Gateway Chassis Related Topics J SRX210 Services Gateway Specifications on page 7 J SRX210 Services Gateway Front Panel and Back Panel Views on page 9 J SRX210 Services Gateway with Integrated Convergence Services Front Panel and Back Panel Views...

Page 40: ...Gateway Specifications on page 7 J SRX210 Services Gateway Front Panel and Back Panel Views on page 9 J SRX210 Services Gateway with Integrated Convergence Services Front Panel and Back Panel Views on page 12 J SRX210 Services Gateway Boot Devices on page 22 J SRX210 Services Gateway Cooling System on page 22 Monitoring the J SRX210 Services Gateway Power System on page 113 24 PowerConnect J SRX21...

Page 41: ...Physical Specifications on page 27 Introduction Wireless WAN access is becoming widely available and comparably priced to ISDN and DSL The J SRX210 Services Gateway provides support for a wireless interface as a backup for primary interfaces such as Gigabit Ethernet or Fast Ethernet To facilitate wireless connectivity the J SRX210 Services Gateway has a 3G port with an ExpressCard interface on the...

Page 42: ...of new cards through the CLI You can activate CDMA ExpressCards from the JUNOS CLI Unlocking ExpressCards You can unlock GSM ExpressCards from the JUNOS CLI If the SIM is locked you need to unlock it before making a call NOTE Only GSM cards support locking and unlocking of the SIM Interface support The ExpressCard interface supports the IP over PPP interface from the network through the wireless l...

Page 43: ...ary source 1 5V secondary source Voltage supply Related Topics J SRX210 Services Gateway 3G ExpressCard Basic CLI Commands on page 28 Installing the 3G ExpressCard in the J SRX210 Services Gateway ExpressCard Slot on page 27 Installing the 3G ExpressCard in the J SRX210 Services Gateway ExpressCard Slot TIP Placing the J SRX210 Services Gateway on a flat level surface with the Dell logo facing up ...

Page 44: ...he slot Use firm pressure as you insert the card You will encounter the first point of resistance when you begin to insert the 3G ExpressCard After you align the 3G ExpressCard lift the card slightly and use firm pressure to slide it into the slot When you have partially inserted the 3G ExpressCard you will encounter the second point of resistance Use additional pressure to finish inserting the 3G...

Page 45: ...wireless gsm sim unlock cl 0 0 8 pin Unlocks the GSM SIM set interfaces cl 0 0 8 cellular options gsm options sim unlock code Unlocks the SIM automatically on reboot request modem wireless gsm sim unblock cl 0 0 8 puk puk numberpin new pin number NOTE You must obtain the PUK value from your cellular service provider Recovers the SIM from the Pin Unlock Key PUK state When you attempt to unlock the ...

Page 46: ...30 PowerConnect J SRX210 Services Gateway Hardware Guide ...
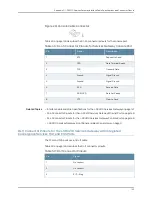
Page 47: ...ta and electric power to pass over a copper Ethernet LAN cable The J SRX210 Services Gateway supports PoE on four ports which supply electric power over the same ports that are used to connect network devices PoE ports allow you to plug in devices that require both network connectivity and electric power such as VoIP and IP phones and wireless access points You can configure the gateway to act as ...

Page 48: ... A powered device is classified based on the maximum power that it draws across all input voltages and operational modes When the class based power management mode is configured on the services gateway power is allocated by taking into account the maximum power ratings defined for the different classes of devices Table 17 on page 32 lists the classes and their power ratings as specified by the IEE...

Page 49: ...Power over Ethernet PoE feature support on your J SRX210 Services Gateway you must configure the services gateway You can configure PoE using the CLI configuration editor For more details on configuring PoE see the JUNOS Software Interfaces and Routing Configuration Guide Related Topics J SRX210 Services Gateway Description on page 3 J SRX210 Services Gateway Specifications on page 7 J SRX210 Serv...

Page 50: ...34 PowerConnect J SRX210 Services Gateway Hardware Guide ...

Page 51: ...ces Gateway with Integrated Convergence Services on page 37 J SRX210 Services Gateway with Integrated Convergence Services Interoperability on page 38 Configuring the J SRX210 Services Gateway with Integrated Convergence Services on page 39 About the J SRX210 Services Gateway with Integrated Convergence Services This topic includes following sections Basic Functions on page 36 Supported Features o...

Page 52: ...nd the media gateway Assumes the call routing role as a survivable call server for local SIP or Analog phones in the event of loss of WAN connections Supports emergency calling E911 by providing the mechanism to detect emergency calls from local VoIP phones and passes these calls to the PSTN when detected Provides power failover support for one analog phone and PSTN FXO port Supported Features The...

Page 53: ...Gateway with Integrated Convergence Services functions as follows Analog telephones and fax machines are directly connected to the J SRX210 Services Gateway with Integrated Convergence Services through Foreign Exchange Station FXS interfaces The telephone exchange or PSTN central office is directly connected to the J SRX210 Services Gateway with Integrated Convergence Services through Foreign Exch...

Page 54: ...SRX210 Services Gateway with Integrated Convergence Services Interoperability The J SRX210 Services Gateway with Integrated Convergence Services aligns with the open convergence architecture and supports different brands of call servers and SIP phones Table 18 on page 38 summarizes the SIP phones softphones and analog devices supported by J SRX210 Services Gateway with Integrated Convergence Servi...

Page 55: ...J SRX210 Services Gateway with Integrated Convergence Services To enable voice support on your J SRX210 Services Gateway with Integrated Convergence Services you must configure the services gateway You can configure the voice functionality using CLI configuration editor J Web configuration editor For more information on configuring voice see the Integrated Convergence Services Configuration and Ad...

Page 56: ...40 PowerConnect J SRX210 Services Gateway Hardware Guide ...

Page 57: ...le Mini PIMs are removable and insertable into the device You can install a Mini PIM into the Mini PIM slot available on the front panel of the services gateway chassis For more information about supported Mini PIMs including how to install and configure Mini PIMs refer to the J SRX Series Services Gateways for the Branch Physical Interface Modules Hardware Guide NOTE The Mini PIMs available on th...

Page 58: ...42 PowerConnect J SRX210 Services Gateway Hardware Guide ...

Page 59: ...y on page 55 Unpacking the J SRX210 Services Gateway on page 57 Preparing the J SRX210 Services Gateway for Installation on page 61 Installing the J SRX210 Services Gateway on page 65 Connecting Grounding and Powering On the J SRX210 Services Gateway on page 75 J SRX210 Services Gateway Autoinstallation on page 81 Connecting the J SRX210 Services Gateway to Management Devices on page 83 Performing...

Page 60: ...44 PowerConnect J SRX210 Services Gateway Hardware Guide ...

Page 61: ...X210 Services Gateway Rack Requirements on page 49 Clearance Requirements for Airflow and Hardware Maintenance of the J SRX210 Services Gateway on page 50 J SRX210 Services Gateway Electrical and Power Requirements on page 51 Site Preparation Checklist for the J SRX210 Services Gateway The checklist in Table 19 on page 45 summarizes the tasks you need to perform when preparing a site for installin...

Page 62: ...ng required space clearances Secure the rack to the floor and building structure Cabinet Installation J SRX210 Services Gateway Cabinet Requirements on page 48 Verify that your cabinet meets the minimum requirements Plan the cabinet location including required space clearances Wall Installation Preparing the J SRX210 Services Gateway for Wall Mount Installation on page 64 Verify that the area sele...

Page 63: ...ns help you plan an acceptable operating environment for your J SRX210 Services Gateway and avoid environmentally caused equipment failures For the cooling system to function properly the airflow around the chassis must be unrestricted Allow sufficient clearance between the front and back of the chassis and adjacent equipment Ensure that there is adequate circulation in the installation location F...

Page 64: ... mounting brackets The minimum total clearance inside the cabinet is 30 7 in 78 cm between the inside of the front door and the inside of the rear door NOTE The holes for the mounting brackets chassis are spaced 1 25 in 3 2 cm apart measured from the center of the hole Clearance requirements Ensure sufficient ventilation through the cabinet is sufficient to prevent overheating Ensure adequate cool...

Page 65: ...ack we recommend you support the back of the device with a shelf or other structure Rack Requirements The holes within each rack set are spaced at 1 U 1 75 in 4 5 cm The device can be mounted in any rack that provides holes or hole patterns spaced at 1 U 1 75 in 4 5 cm increments The mounting brackets and front mount flanges used to attach the chassis to a rack are designed to fasten to holes spac...

Page 66: ...ce Table 22 Clearance Requirements for the Services Gateway Requirement for Clearance Recommended Clearance Location Space for service personnel to remove and install hardware components NOTE More space is required for installing and removing Mini PIMs 2 5 in 6 35 cm Front of the chassis Space for service personnel to remove and install hardware components 2 5 in 6 35 cm Rear of the chassis Space ...

Page 67: ...ts for the device Electrical wiring guidelines for the device installation site Power connection and power cord specifications for the device Grounding guidelines and specifications for the device Related Topics J SRX210 Services Gateway Site Electrical Wiring Guidelines on page 143 J SRX210 Services Gateway Power Specifications and Requirements on page 144 Site Preparation Checklist for the J SRX...

Page 68: ...52 PowerConnect J SRX210 Services Gateway Hardware Guide ...

Page 69: ...s on page 121 Review the safety guidelines explained 1 Site Preparation Checklist for the J SRX210 Services Gateway on page 45 Verify that you have prepared your site for the installation of the services gateway using the checklist 2 Unpacking the J SRX210 Services Gateway on page 57 Unpack the services gateway and verify that the parts are received 3 Preparing the J SRX210 Services Gateway for Ra...

Page 70: ...ower on the services gateway 8 Related Topics Unpacking the J SRX210 Services Gateway on page 57 General Site Guidelines for Installing the J SRX210 Services Gateway on page 47 Preparing the J SRX210 Services Gateway for Rack Mount Desk Mount and Wall Mount Installation on page 61 J SRX210 Services Gateway Installation on page 65 54 PowerConnect J SRX210 Services Gateway Hardware Guide ...

Page 71: ...sk J SRX210 Services Gateway Installation on page 65 Phillips screwdrivers numbers 1 and 2 Tie wrap Installing the J SRX210 Services Gateway Connecting the J SRX210 Services Gateway to the Power Supply on page 75 Electrostatic discharge ESD grounding wrist strap Connecting the J SRX210 Services Gateway Grounding the J SRX210 Services Gateway on page 77 Phillips screwdrivers numbers 1 and 2 Groundi...

Page 72: ...ounding the J SRX210 Services Gateway on page 77 Connecting the J SRX210 Services Gateway to the Power Supply on page 75 Packing the J SRX210 Services Gateway and Components for Shipment on page 157 56 PowerConnect J SRX210 Services Gateway Hardware Guide ...

Page 73: ...u are ready to begin installation To unpack the J SRX210 Services Gateway 1 Open the box in which the device is shipped 2 Verify the parts received against the lists in Verifying Parts Received with the J SRX210 Services Gateway on page 58 3 Store the shipping box and packing material in case you need to return or move the device at a later time Related Topics Required Tools and Parts for Installi...

Page 74: ...for a Fully Configured J SRX210 Services Gateway Quantity Component 1 For Low Memory model J SRX210B J SRX210 Services Gateway with 2xGE 6xFE ports 1xMini PIM slot and base memory 512 MB RAM 1GB Flash For High Memory model J SRX210H J SRX210 Services Gateway with 2xGE 6xFE ports 1xMini PIM slot and high memory 1GB RAM 1GB Flash For PoE model J SRX210H POE J SRX210 Services Gateway with 2xGE 6xFE p...

Page 75: ...t your Dell customer service representative for more information NOTE The Mini Physical Interface Modules Mini PIMs are not shipped with the device You have to order them separately Contact your Dell customer service representative for more information Related Topics Required Tools and Parts for Installing and Maintaining the J SRX210 Services Gateway on page 55 Unpacking the J SRX210 Services Gat...

Page 76: ...60 PowerConnect J SRX210 Services Gateway Hardware Guide ...

Page 77: ...RX210 Services Gateway for Rack Mount Installation on page 62 Preparing the J SRX210 Services Gateway for Desk Mount Installation on page 63 Preparing the J SRX210 Services Gateway for Wall Mount Installation on page 64 The mounting kits for rack wall and desk installation of the J SRX210 Services Gateway must be ordered separately Contact your Dell customer service representative for more informa...

Page 78: ...0 Services Gateway on page 50 Place the rack or cabinet in its permanent location allowing adequate clearance for airflow and maintenance and secure it to the building structure UnpackingtheJ SRX210ServicesGateway on page 57 Remove the services gateway chassis from the shipping carton Verify that you have the following parts available in your rack mounting kit for the J SRX210 Services Gateway Rac...

Page 79: ...ance Requirements for Airflow and Hardware Maintenance of the J SRX210 Services Gateway on page 50 Place the desk in its permanent location allowing adequate clearance for airflow and maintenance and secure it to the building structure Unpacking the J SRX210 Services Gateway on page 57 Remove the services gateway chassis from the shipping carton Verify that you have the following parts available i...

Page 80: ... the J SRX210 Services Gateway on page 45 Verify that the site meets the requirements Unpacking the J SRX210 Services Gateway on page 57 Remove the services gateway chassis from the shipping carton Verify that you have the following parts available in yourwall mountingkittomounttheJ SRX210Services Gateway on wall Wall mounting brackets Screws NOTE The wall mounting kit is not shipped with the devi...

Page 81: ...n of how to make the installation site a safe environment and a list of safety warnings see the Appendix A for Safety and Regulatory Compliance Information on page 119 NOTE Providing an exhaustive set of guidelines for working with electrical equipment is beyond the scope of this guide Related Topics General Site Guidelines for Installing the J SRX210 Services Gateway on page 47 Required Tools and...

Page 82: ...d with the J SRX210 Services Gateway 60 watt power supply adapter for the J SRX210 Services Gateway Low Memory and High Memory models 150 watt power supply adapter for the J SRX210 Services Gateway with PoE and the J SRX210 Services Gateway with Integrated Convergence Services To adjust the power supply adapter tray To accommodate the 60 watt power supply use the two 420 028535 screws to attach th...

Page 83: ...0 Services Gateway in a Rack You can front mount the J SRX210 Services Gateway in a rack Many types of racks are acceptable including four post telco racks enclosed cabinets and open frame racks For more information about the type of rack or cabinet the J SRX210 Services Gateway can be installed into see J SRX210 Services Gateway Rack Requirements on page 49 NOTE The rack mounting kit is not shipp...

Page 84: ...8 Table 30 J SRX210 Services Gateway Rack Installation Parts Part S No Mounting brackets 1 Screws Mounting bracket 2 Power supply adapter tray 3 Screws Power supply adapter tray 4 2 Use a number 1 Phillips screwdriver to install the screws that secure the mounting brackets and power supply adapter tray to the chassis as shown in Figure 15 on page 68 Figure 15 J SRX210 Services Gateway Rack Install...

Page 85: ...e chassis is level Figure 17 J SRX210 Services Gateway Rack Installation Hanging the Services Gateway in a Rack J SRX J SRX 210 210 6 Have a second person install a mounting screw into each of the two aligned holes Use a number 1 Phillips screwdriver to tighten the screws 7 Install the second screw in each mounting bracket 8 Verify that the mounting screws on one side of the rack are aligned with ...

Page 86: ...to stabilize the device on the desk You can install the device in a horizontal or vertical position The vertical position requires the vertical installation kit which consists of a vertical installation stand with the rubber feet attached NOTE The desk mounting kit is not shipped with the device and must be ordered separately To install the device in a horizontal position The horizontal position i...

Page 87: ...s Gateway on Desk J SRX210 Related Topics J SRX210 Services Gateway General Safety Guidelines and Warnings on page 121 Required Tools and Parts for Installing and Maintaining the J SRX210 Services Gateway on page 55 Preparing the J SRX210 Services Gateway for Desk Mount Installation on page 63 Installing the J SRX210 Services Gateway in a Rack on page 67 Installing the J SRX210 Services Gateway on...

Page 88: ...ounting Brackets J SRX J SRX 210 210 Table 31 on page 72 lists the parts used for installing the J SRX210 Services Gateway on the wall The numbers in Figure 20 on page 72 correspond to the numbers in Table 31 on page 72 Table 31 J SRX210 Services Gateway Wall Installation Parts Part Numbers Mounting brackets 1 Screws Mounting bracket 2 3 Use a number 1 Phillips screwdriver to install the screws th...

Page 89: ... the Services Gateway on Wall Related Topics J SRX210 Services Gateway General Safety Guidelines and Warnings on page 121 Required Tools and Parts for Installing and Maintaining the J SRX210 Services Gateway on page 55 Preparing the J SRX210 Services Gateway for Rack Mount Installation on page 62 Adjusting the Power Supply Adapter Tray for the J SRX210 Services Gateway on page 66 Installing the J ...

Page 90: ...e Mini PIM you must remove the faceplate See the J SRX Series Services Gateways for the Branch Physical Interface Modules Hardware Guide for information about installing the Mini PIMs NOTE The Mini PIMs available on the J SRX210 Services Gateway are not hot swappable YouneedtopoweroffthedevicebeforeremovingorinstallingMini PIMs Related Topics J SRX210 Services Gateway Installation Safety Guideline...

Page 91: ...f the J SRX210 Services Gateway on page 78 Connecting the J SRX210 Services Gateway to the Power Supply To connect the device to the power supply CAUTION Before connecting the device to the power supply attach an ESD strap to an ESD point and place the other end of the strap around your bare wrist 1 Plug the DC connector end of the power cable into the power connector on the back of the device see...

Page 92: ... must configure each network interface before it can operate on the device To connect and organize the interface cable to the device 1 Have ready a length of the type of cable used by the interface 2 Insert the cable connector into the cable connector port on the interface faceplate 3 Arrange network cables as follows to prevent them from dislodging or developing stress points Secure cables so tha...

Page 93: ... one 6 32 UNC screw Table 32 on page 77 lists the specifications of the grounding cable used with the device Table 32 Grounding Cable Specifications for the Services Gateway Specification Grounding Requirement 14 AWG single strand wire cable Grounding cable Up to 4 A Amperage of grounding cable Ring type vinyl insulated TV14 6R lug or equivalent Grounding lug CAUTION Before device installation beg...

Page 94: ...Specifications on page 145 Powering On and Powering Off the J SRX210 Services Gateway on page 78 J SRX210 Services Gateway General Safety Guidelines and Warnings on page 121 Powering On and Powering Off the J SRX210 Services Gateway This topic describes the following procedures 1 Powering On the J SRX210 Services Gateway on page 78 2 Powering Off the J SRX210 Services Gateway on page 79 3 Resettin...

Page 95: ...tself off without shutting down the operating system NOTE Do not press the power button while the device is shutting down NOTE The Power button on the services gateway is a standby power switch If the services gateway is connected to a power source when you press the Power button to power the device off the device remains in standby mode and a small amount 5 V and 3 3 V of standby voltage is still...

Page 96: ... Gateway The Reset Config button located at the front panel of the J SRX210 Services Gateway removes the current configuration and resets the device to the default configuration The button is recessed in the front panel to prevent it from being pressed accidentally NOTE Pressing and holding the Reset Config button for 15 seconds or more deletes all configurations on the device and loads and commit...

Page 97: ...nfiguration editor or the CLI configuration editor to configure a device for autoinstallation For the autoinstallation process to work you must store one or more host specific or default configuration files on a configuration server in the network and have a service available typicallyDynamicHostConfigurationProtocol DHCP toassignanIPaddress to the services gateway Autoinstallation takes place aut...

Page 98: ...82 PowerConnect J SRX210 Services Gateway Hardware Guide ...

Page 99: ...page 88 Connecting to the CLI at the User End for the J SRX210 Services Gateway on page 89 Connecting a J SRX210 Services Gateway to the J Web Interface If you plan to use the J Web interface to configure the J SRX210 Services Gateway you must connect through one of the built in Ethernet management ports When the services gateway is powered on for the first time the system looks for a DHCP server ...

Page 100: ... front panel turns solid green 5 Turn on the power to the management device The services gateway assigns an IP address to the management device within the 192 168 1 0 24 subnetwork if the services gateway is configured to use DHCP 6 From the management device open a Web browser and enter the IP address 192 168 1 1 in the address field 7 Configure basic settings for your services gateway NOTE You m...

Page 101: ... on page 85 shows a connection to a local management device A remote connection to the services gateway through a modem requires the cable and connector shown provided in the services gateway accessory box plus a DB 9 female to DB 25 male or similar adapter for your modem which you must purchase separately To connect to the CLI using a local management device through the console port on the servic...

Page 102: ...terminal emulation screen on your management device displays the startup sequence When the services gateway has finished starting up a login prompt appears 11 Log in as the user root No password is required at initial connection but you must assign a root password before committing any configuration settings Related Topics Connecting a J SRX210 Services Gateway to the CLI Remotely on page 86 Perfo...

Page 103: ...re the modem If your modem is not Hayes compatible refer to the documentation for your modem and enter the equivalent modem commands To configure the modem on the services gateway end 1 Connect the modem to a PC or laptop computer 2 Power on the modem 3 From the PC or laptop computer start your asynchronous terminal emulation application such as Microsoft Windows HyperTerminal and select the COM p...

Page 104: ...Figure 28 on page 149 shows the console cable connector on the services gateway 4 Plug the other end of the Ethernet cable into the RJ 45 to DB 9 serial port adapter supplied with your services gateway 5 Connect the serial port adapter to a separately purchased DB 9 female to DB 25 male adapter or other adapter appropriate for your modem 6 Plug the modem adapter into the DB 25 connector on the mod...

Page 105: ...rmation on the AT commands see the JUNOS Software Administration Guide An OK response verifies that the modem can communicate successfully with the COM port on the PC or laptop 6 Dial the modem that is connected to the console port on the services gateway by entering ATDT remote modem number For example if the number of the modem connected to the console port on the services gateway is 00130330330...

Page 106: ...90 PowerConnect J SRX210 Services Gateway Hardware Guide ...

Page 107: ...nfiguration on page 91 Understanding Built In Ethernet Ports on page 92 Mapping the Chassis Cluster Ports on page 92 Understanding Management Access on page 93 Preparing J SRX210 Services Gateway for Configuration The services gateway is shipped with the JUNOS Software preinstalled and ready to be configured when the device is powered on When the device boots it first attempts to start the image o...

Page 108: ...b interface Any DHCP client host for example a PC or laptop computer directly connected to any of ge 0 0 1 or fe 0 0 2 to fe 0 0 7 ports receives an address on the 192 168 1 1 24 network Mapping the Chassis Cluster Ports On the J SRX210 Services Gateway the following ports are not user configurable when the services gateway is operating in chassis cluster mode The fxp0 port is dedicated as the out...

Page 109: ...ining SSH software see http www ssh com and http www openssh com If you are using a JUNOScript server to configure and monitor devices you can activate cleartext access on the device to allow unencrypted text to be sent directly over a Transmission Line Protocol TCP connection without using any additional protocol such as SSH SSL or Telnet For more information about the JUNOScript application prog...

Page 110: ...ssword by entering a cleartext password an encrypted password or an SSH public key string DSA or RSA edit root set system root authentication plain text password New password password Retype new password password 6 Configure an administrator account on the device edit root set system login user admin class super user authentication plain text password 7 Commit the configuration to activate it on t...

Page 111: ...e set interface nat to zone untrust admin set security nat source rule set interface nat rule rule1 match source address 0 0 0 0 0 destination address 0 0 0 0 0 admin set security nat source rule set interface nat rule rule1 then source nat interface 15 Check the configuration for validity edit admin commit check configuration check succeeds 16 Commit the configuration to activate it on the device...

Page 112: ...ics Connecting a J SRX210 Services Gateway to the CLI Locally on page 85 Connecting a J SRX210 Services Gateway to the CLI Remotely on page 86 J SRX210 Services Gateway Software Configuration Overview on page 91 Performing Initial Software Configuration on the J SRX210 Services Gateway Using J Web Interface on page 96 J SRX210 Services Gateway Secure Web Access Overview on page 101 Performing Init...

Page 113: ...ess in the 192 168 1 24 subnetwork Do not assign the 192 168 1 1 IP address to the management device as this IP address is assigned to the device 4 Access the J Web interface a Launch a Web browser from the management device b Enter 192 168 1 1 in the Address box c Specify the default user name as root Do not enter any value in the Password box d Press Enter The J Web Initial Setup page is display...

Page 114: ...lete an IP address by clicking it in the box above the Add button then clicking Remove Specifies a DNS server that the services gateway can use to resolve hostnames into addresses DNS Name Servers Add a domain name by typing it in the box to the left of the Add button then clicking Add Delete a domain name by clicking it in the box above the Add button then clicking Remove Adds each domain name th...

Page 115: ...e Specifies an NTP server that the services gateway can reach to synchronize the system time NTPServers Set the time immediately using the NTP server select NTP Servers The services gateway sends a request to the NTP server and synchronizes the system time NOTE If you are configuring other settings on this page the services gateway also synchronizes the system time using the NTP server when you cl...

Page 116: ...Static Routing page click Add c Add an IP address for Route and Next hop d Click OK The configured IP address is included in the Static Routing page 5 Configure basic security zones and bind them to traffic interfaces a In the J Web interface under the Configure tab navigate to Security Zones b Under Security Zone click Add c Enter a name for the zone in the Zone Name field d Scroll down to the In...

Page 117: ...te key and an authentication certificate for providing the SSL service SSL encrypts communication between your device and the Web browser with a session key negotiated by the SSL server certificate An SSL certificate includes identifying information such as a public key and a signature made by a certificate authority CA When you access the services gateway through HTTPS an SSL handshake authentica...

Page 118: ...102 PowerConnect J SRX210 Services Gateway Hardware Guide ...

Page 119: ...ART 3 Maintaining and Monitoring the J SRX210 Services Gateway Hardware Maintaining the J SRX210 Services Gateway Hardware Components on page 105 Monitoring the J SRX210 Services Gateway on page 107 103 ...

Page 120: ...104 PowerConnect J SRX210 Services Gateway Hardware Guide ...

Page 121: ...mance of the services gateway you should regularly perform the following preventive maintenance procedures Inspect the installation site for moisture loose wires or cables and excessive dust Make sure that airflow is unobstructed around the device and into the air intake vents Check the Status LED on the front panel of the device and on the Mini Physical Interface Module Mini PIM you are using Rou...

Page 122: ...ounding and power cables connected to the device are securely in place and that there is no moisture accumulating near the device CAUTION We recommend using a surge protector for the power connection Maintaining the Power Supply Related Topics Connecting the J SRX210 Services Gateway to the Power Supply on page 75 Clearance Requirements for Airflow and Hardware Maintenance of the J SRX210 Services...

Page 123: ...itoring the J SRX210 Services Gateway Chassis Using the CLI on page 107 Monitoring the J SRX210 Services Gateway Components Using LEDs on page 109 Monitoring the J SRX210 Services Gateway Using Chassis Alarm Conditions on page 111 Monitoring the J SRX210 Services Gateway Power System on page 113 Monitoring the J SRX210 Services Gateway Chassis Using the CLI You can monitor alarms to troubleshoot h...

Page 124: ...rgence Services user host show chassis hardware Item Version Part number Serial number Description Chassis Routing Engine REV 01 750 021778 VG8859 RE SRX210 VOICE FPC 0 FPC PIC 0 2x GE 6x FE 1x 3G 2xFXS 1xFXO Power Supply 0 show chassis environment user host show chassis environment Class Item Status Measurement Temp Routing Engine OK 33 degrees C 91 degrees F Fans SRX210 Chassis fan OK Spinning a...

Page 125: ...way Hardware Components on page 105 Dell Support on page 115 Monitoring the J SRX210 Services Gateway Components Using LEDs The LEDs available on the services gateway display the status of various components Table 41 on page 109 describes the LEDs Table 41 Component LEDs on the Services Gateway Possible Causes and Corrective Actions Meaning State LED Normal condition No action is required Indicate...

Page 126: ... is up and running if the Alarm LED is off it indicates that no alarms are present on the device Off Normal condition No action is required The device is receiving power and is functioning normally Green Power LED Normal condition No action is required The Power button has been pressed and quickly released The device is gracefully shutting down or starting up Amber Normal condition if the services...

Page 127: ...The Voice Interface port LED glows red blinking while initializing If there is an error the LED remains red otherwise the LED changes to green Red blinking contact Dell Support See Dell Support on page 115 The Port has detected a hardware initialization failure Red steady Related Topics Monitoring the J SRX210 Services Gateway Chassis Using the CLI on page 107 Monitoring the J SRX210 Services Gate...

Page 128: ...ware Guide for information about replacing the Mini PIMs A Mini PIM has failed Mini Physical Interface Module Mini PIM Amber minor Check the room temperature See J SRX210 Services Gateway Specifications on page 7 Check the air flow See General Site Guidelines for Installing the J SRX210 Services Gateway on page 47 Check the fans See J SRX210 Services Gateway Cooling System on page 22 If you must r...

Page 129: ...ble Ensure that the socket you plug in is in working condition Ensure the device has an AC input voltage between 110 and 240 VAC If you cannot determine the cause of the problem or need additional assistance contact Dell Support See Dell Support on page 115 The device is not receiving power Off Related Topics Monitoring the J SRX210 Services Gateway Chassis Using the CLI on page 107 Monitoring the...

Page 130: ...el By default pressing and quickly releasing the Reset Config button loads and commits the rescue configuration through the J Web interface or the CLI The Status LED glows amber during this time For details see the JUNOS Software CLI User Guide By default pressing and holding the Reset Config button for 15 seconds or more until the Status LED glows amber deletes all configurations on the device in...

Page 131: ...cue option prevents the Reset Config button from loading the rescue configuration The no clear option prevents the Reset Config button from deleting all configurations on the services gateway To return the function of the Reset Config button to its default behavior remove the config button statement from the device configuration Related Topics Using the Reset Config Button on the J SRX210 Services...

Page 132: ...116 PowerConnect J SRX210 Services Gateway Hardware Guide ...

Page 133: ...Compliance Information on page 119 J SRX210 Services Gateway Power Guidelines Requirements and Specifications on page 143 J SRX210 Services Gateway Interface Cable Specifications and Connector Pinouts on page 147 Getting Help on page 151 117 ...

Page 134: ...118 PowerConnect J SRX210 Services Gateway Hardware Guide ...

Page 135: ...SRX210 Services Gateway Electrical Safety Guidelines and Warnings on page 137 J SRX210 Services Gateway Agency Approvals on page 138 J SRX210ServicesGatewayComplianceStatementsforEMCRequirementsonpage140 J SRX210 Services Gateway Compliance Statements for Environmental Requirements on page 141 J SRX210 Services Gateway Compliance Statements for Acoustic Noise on page 142 J SRX210 Services Gateway ...

Page 136: ...r Vermeidung von Unfällen bewußt Avvertenza Questo simbolo di avvertenza indica un pericolo La situazione potrebbe causare infortuni alle persone Prima di lavorare su qualsiasi apparecchiatura occorre conoscere i pericoli relativi ai circuiti elettrici ed essere al corrente delle pratiche standard per la prevenzione di incidenti Advarsel Dette varselsymbolet betyr fare Du befinner deg i en situasj...

Page 137: ... could trip on them Wear safety glasses if you are working under any conditions that could be hazardous to your eyes Do not perform any actions that create a potential hazard to people or make the equipment unsafe Never install or manipulate wiring during electrical storms Never install electrical jacks in wet locations unless the jacks are specifically designed for wet environments Do not open or...

Page 138: ...cted access areas A restricted access area is an area to which access can be gained only by service personnel through the use of a special tool lock and key or other means of security and which is controlled by the authority responsible for the location Waarschuwing Dit toestel is bedoeld voor installatie op plaatsen met beperkte toegang Een plaats met beperkte toegang is een plaats waar toegang s...

Page 139: ...leres av den autoriteten som er ansvarlig for området Aviso Esta unidade foi concebida para instalação em áreas de acesso restrito Uma área de acesso restrito é uma área à qual apenas tem acesso o pessoal de serviço autorizado que possua uma ferramenta chave e fechadura especial ou qualquer outra forma de segurança Esta área é controlada pela autoridade responsável pelo local Atención Esta unidad ...

Page 140: ...surement should be in the range of 1 to 10 Mohms When handling any component that is removed from the chassis verify that the equipment end of your ESD strap is attached to one of the ESD points on the chassis Avoid contact between the component and your clothing ESD voltages emitted from clothing can still damage components When removing or installing a component always place it component side up...

Page 141: ...xtinguishing fire on or around equipment that draws air from the environment for cooling use this type of inert oxygen displacement extinguisher instead of an extinguisher that leave residues on equipment Do not use multipurpose Type ABC chemical fire extinguishers dry chemical fire extinguishers near Dell equipment The primary ingredient in these fire extinguishers is monoammonium phosphate which...

Page 142: ...k Mounting Requirements and Warnings Ensure that the equipment rack into which the services gateway is installed is evenly and securely supported to avoid the hazardous condition that could result from uneven mechanical loading WARNING To prevent bodily injury when mounting or servicing the services gateway in a rack take the following precautions to ensure that the system remains stable The follo...

Page 143: ...ineeseen aloita kuormittaminen sen alaosasta kaikkein raskaimmalla esineellä ja siirry sitten sen yläosaan Jos telinettä varten on vakaimet asenna ne ennen laitteen asettamista telineeseen tai sen huoltamista siinä Attention Pour éviter toute blessure corporelle pendant les opérations de montage ou de réparation de cette unité en casier il convient de prendre des précautions spéciales afin de main...

Page 144: ...o caricare il supporto dal basso all alto con il componente più pesante sistemato sul fondo del supporto Se il supporto è dotato di dispositivi stabilizzanti installare tali dispositivi prima di montare o di procedere alla manutenzione dell unità nel supporto Advarsel Unngå fysiske skader under montering eller reparasjonsarbeid på denne enheten når den befinner seg i et kabinett Vær nøye med at sy...

Page 145: ... parte inferior hacia la superior colocando el equipo más pesado en la parte inferior Si el bastidor dispone de dispositivos estabilizadores instalar éstos antes de montar o proceder al mantenimiento del equipo instalado en el bastidor Varning För att undvika kroppsskada när du installerar eller utför underhållsarbete på denna enhet på en ställning måste du vidta särskilda försiktighetsåtgärder fö...

Page 146: ...inated ports or at fibers that connect to unknown sources Do not examine unterminated optical ports with optical instruments Avoid direct exposure to the beam WARNING Unterminated optical connectors can emit invisible laser radiation The lens in the human eye focuses all the laser power on the retina so focusing the eye directly on a laser source even a low power laser could permanently damage the...

Page 147: ...n Varoitus Älä katso säteeseen äläkä tarkastele sitä suoraan optisen laitteen avulla Attention Ne pas fixer le faisceau des yeux ni l observer directement à l aide d instruments optiques Warnung Nicht direkt in den Strahl blicken und ihn nicht direkt mit optischen Geräten prüfen Avvertenza Non fissare il raggio con gli occhi né usare strumenti ottici per osservarlo direttamente Advarsel Stirr elle...

Page 148: ...ono inseriti radiazioni invisibili possono essere emesse attraverso l apertura della porta Evitate di esporvi alle radiazioni e non guardate direttamente nelle aperture Advarsel Unngå utsettelse for stråling og stirr ikke inn i åpninger som er åpne fordi usynlig stråling kan emiteres fra portens åpning når det ikke er tilkoblet en fiberkabel Aviso Dada a possibilidade de emissão de radiação invisí...

Page 149: ...rie besteht Explosionsgefahr Ersetzen Sie die Batterie nur durch den gleichen oder vom Hersteller empfohlenen Batterietyp Entsorgen Sie die benutzten Batterien nach den Anweisungen des Herstellers Avvertenza Pericolo di esplosione se la batteria non è installata correttamente Sostituire solo con una di tipo uguale o equivalente consigliata dal produttore Eliminare le batterie usate secondo le istr...

Page 150: ...muck einschließlich Ringe Ketten und Uhren abnehmen Metallgegenstände erhitzen sich wenn sie an das Netz und die Erde angeschlossen werden und können schwere Verbrennungen verursachen oder an die Anschlußklemmen angeschweißt werden Avvertenza Prima di intervenire su apparecchiature collegate alle linee di alimentazione togliersi qualsiasi monile inclusi anelli collane braccialetti ed orologi Gli o...

Page 151: ...tema o collegare oppure scollegare i cavi durante un temporale con fulmini Advarsel Utfør aldri arbeid på systemet eller koble kabler til eller fra systemet når det tordner eller lyner Aviso Não trabalhe no sistema ou ligue e desligue cabos durante períodos de mau tempo trovoada Atención No operar el sistema ni conectar o desconectar cables durante el transcurso de descargas eléctricas en la atmós...

Page 152: ...azione dell aria sia impedita lasciate uno spazio di almeno 15 2 cm di fronte alle aperture delle ventole Advarsel Unngå overoppheting av eventuelle rutere i J SRX Series services gateway Disse skal ikke brukes på steder der den anbefalte maksimale omgivelsestemperaturen overstiger 40 ο C 104 ο F Sørg for at klaringen rundt lufteåpningene er minst 15 2 cm 6 tommer for å forhindre nedsatt luftsirku...

Page 153: ...viso A descartagem final deste produto deverá ser efectuada de acordo com os regulamentos e a legislação nacional Atención El desecho final de este producto debe realizarse según todas las leyes y regulaciones nacionales Varning Slutlig kassering av denna produkt bör skötas i enlighet med landets alla lagar och föreskrifter Related Topics J SRX210 Services Gateway Laser and LED Safety Guidelines a...

Page 154: ... extension cords and missing safety grounds Operate the services gateway within marked electrical ratings and product usage instructions For the services gateway and peripheral equipment to function safely and correctly use the cables and connectors specified for the attached peripheral equipment and make certain they are in good condition Related Topics J SRX210 Services Gateway Electrical and Po...

Page 155: ...07 Japanese Radiated Emissions Immunity EN 55024 A1 A2 1998 Information Technology Equipment Immunity Characteristics EN 61000 3 2 2006 Power Line Harmonics EN 61000 3 3 A1 A2 A3 1995 Power Line Voltage Fluctuations EN 61000 4 2 A1 A2 1995 Electrostatic Discharge EN 61000 4 3 A1 A2 2002 Radiated Immunity EN 61000 4 4 2004 Electrical Fast Transients EN 61000 4 5 2006 Surge EN 61000 4 6 2007 Immunit...

Page 156: ...e pursuant to Part 15 of the FCC Rules These limits are designed to provide reasonable protection against harmful interference in a residential installation This equipment generates uses and can radiate radio frequency energy and if not installed and used in accordance with the instructions may cause harmful interference to radio communications However there is no guarantee that interference will ...

Page 157: ...th the limits for a Class A digital device of the FCC Rules These limits are designed to provide reasonable protection against harmful interference when the equipment is operated in a commercial environment This equipment generates uses and can radiate radio frequency energy and if not installed and used in accordance with the instruction manual may cause harmful interference to radio communicatio...

Page 158: ...for Acoustic Noise on page 142 J SRX210 Services Gateway Agency Approvals on page 138 J SRX210 Services Gateway Compliance Statements for Acoustic Noise Maschinenlärminformations Verordnung 3 GPSGV der höchste Schalldruckpegel beträgt 70 dB A oder weniger gemäss EN ISO 7779 Translation The maximum emitted sound pressure level is 70 dB A or less per EN ISO 7779 Related Topics J SRX210ServicesGatewa...

Page 159: ... site CAUTION It is particularly important to provide a properly grounded and shielded environment and to use electrical surge suppression devices Table 44 Site Electrical Wiring Guidelines for the Services Gateway Guideline Site Wiring Factor To ensure that signaling functions optimally Install wires correctly Improperly installed wires can emit radio interference Do not exceed the recommended di...

Page 160: ...y from lightning or radio transmitters you may want to seek expert advice Electromagnetic Compatibility EMC CAUTION To comply with intrabuilding lightning surge requirements the intrabuilding wiring must be shielded The shielding for the wiring must be grounded at both ends Related Topics General Site Guidelines for Installing the J SRX210 Services Gateway on page 47 J SRX210 Services Gateway Elec...

Page 161: ...st attach a cable lug to the grounding and power cables that you supply A cable with an incorrectly attached lug can damage the device for example by causing a short circuit To ground the device before connecting power you connect the grounding cable to earth ground and then attach the lug on the cable to the chassis grounding point with the screw Table 46 on page 145 lists the specifications of t...

Page 162: ...146 PowerConnect J SRX210 Services Gateway Hardware Guide ...

Page 163: ...age 149 Interface Cable and Wire Specifications for the J SRX210 Services Gateway Table 47 on page 147 lists the specifications for the cables that connect to ports Table 47 Cable and Wire Specifications for Ports Device Receptacle Maximum Length Cable Wire Supplied Cable Specification Port RJ 45 6 ft 1 83 m One 6 ft 1 83 m length with DB 9 DB 9 connectors RS 232 EIA 232 serial cable Console port ...

Page 164: ...nation network 4 Termination network 5 RXD 6 Termination network 7 Termination network 8 Related Topics Interface Cable and Wire Specifications for the J SRX210 Services Gateway on page 147 RJ 45 Connector Pinouts for the J SRX210 Services Gateway Console Port on page 148 J SRX210 Services Gateway Front Panel and Back Panel Views on page 9 RJ 45 Connector Pinouts for the J SRX210 Services Gateway ...

Page 165: ... Services Gateway on page 147 RJ 45 Connector Pinouts for the J SRX210 Services Gateway Ethernet Port on page 148 RJ 45 Connector Pinouts for the J SRX210 Services Gateway Console Port on page 148 J SRX210 Services Gateway Front Panel and Back Panel Views on page 9 RJ 11 Connector Pinouts for the J SRX210 Services Gateway with Integrated Convergence Services FXO and FXS Ports The FXO and FXS ports...

Page 166: ...0 Services Gateway on page 147 RJ 45 Connector Pinouts for the J SRX210 Services Gateway Ethernet Port on page 148 RJ 45 Connector Pinouts for the J SRX210 Services Gateway Console Port on page 148 J SRX210 Services Gateway with Integrated Convergence Services Front Panel and Back Panel Views on page 12 150 PowerConnect J SRX210 Services Gateway Hardware Guide ...

Page 167: ...mponents for Shipment on page 157 Dell Support on page 158 Obtaining Assistance If you experience a problem with your computer you can complete the following steps to diagnose and troubleshoot the problem 1 Fill out the diagnostics checklist See Diagnostics Checklist 2 Use Dell s extensive suite of online services available at Dell Support http www support dell com for help with installation and t...

Page 168: ...only http www dell com la Latin American and Caribbean countries http www dell ca Canada only You can access Dell Support through the following websites and e mail addresses Dell Support websites http www support dell com http www support jp dell com Japan only http www support euro dell com Europe only Dell Support e mail addresses mobile_support us dell com support us dell com la techsupport del...

Page 169: ... Dell Product Information If you need information about additional products available from Dell or if you would like to place an order visit the Dell website at http www dell com For the telephone number to call for your region or to speak to a sales specialist see Contacting Dell Returning Items for Warranty Repair or Credit Prepare all items being returned whether for repair or credit as follows...

Page 170: ...omputer documentation is available WARNING Before working inside your device follow the safety instructions in the Safety Environmental and Regulatory Information that shipped with your system Diagnostics Checklist Name Date Address Phone number Service Tag bar code on the back or bottom of the device Express Service Code Return Material Authorization Number if provided by Dell support technician ...

Page 171: ... is convenient for you Locating a J SRX210 Services Gateway Component Serial Number and Agency Labels This topic includes the following sections Listing the J SRX210 Services Gateway and Component Details with the CLI on page 155 J SRX210 Services Gateway Chassis Serial Number and Agency Labels on page 156 J SRX210 Services Gateway Mini Physical Interface Module Serial Number Label on page 156 Lis...

Page 172: ... Location of J SRX210 Serial Number and Agency Labels J SRX210 Services Gateway Mini Physical Interface Module Serial Number Label Mini Physical Interface Modules Mini PIMs are field replaceable on the J SRX210 Services Gateway Each Mini PIM has a unique serial number The serial number label is located on the right side of the Mini PIM when the Mini PIM is horizontally oriented as it would be inst...

Page 173: ...vices gateway software user host request system power off Wait until a message appears on the console confirming that the operating system has halted 4 Shut down power to the device by pressing the Power button on the front panel of the device 5 Disconnect power from the device 6 Remove the cables that connect to all external devices 7 Remove all field replaceable units FRUs from the device 8 If t...

Page 174: ...zation RMA number on the exterior of the box to ensure proper tracking CAUTION Do not stack any of the services gateway components during packing Related Topics Required Tools and Parts for Installing and Maintaining the J SRX210 Services Gateway on page 55 Locating a J SRX210 Services Gateway Component Serial Number and Agency Labels on page 155 Dell Support If you need assistance while troublesh...

Page 175: ...PART 5 Index Index on page 161 159 ...

Page 176: ...160 PowerConnect J SRX210 Services Gateway Hardware Guide ...

Page 177: ...ble chassis connecting 85 88 Ethernet cable connecting 85 88 cables 84 chassis alarms sample 111 Clearance Requirements 50 CLI show commands 107 compliance acoustic noise 142 EMC requirements 140 Environmental requirements 141 general standards 138 configuration Services Gateway 91 connectivity LAN 3 modem remote connection 85 through J Web 83 through the CLI locally 85 through the CLI remotely 85...

Page 178: ... FXO 35 FXS 35 G ge 0 0 connecting through J Web 83 guidelines electrical 137 electrical wiring 143 installing 47 H HA LED 18 hardware components maintenance 105 monitoring 111 Hayes compatible modem See modem connection to console port HTTP Hypertext Transfer Protocol on built in management interfaces 101 HTTPS Hypertext Transfer Protocol over SSL recommended for secure access 101 HyperTerminal f...

Page 179: ...ateway end 87 configuring modem at user end 89 connecting modem to device 88 overview 85 N NEBS standards 138 network 3 P parts list 58 PC See management device pinouts 149 RJ 45 148 PoE 3 31 configuring 33 PoE Status LED 20 Port LED TX RX POE 19 port settings 87 power shutdown 79 Power LED 18 monitoring 109 status 113 Power over Ethernet 31 power rating PoE classes 31 power supply connecting 75 m...

Page 180: ... grounding 77 hardware interfaces 14 HTTPS Web access 101 installation overview 53 installation process 53 installation types 61 LEDs 17 monitoring component LEDs 109 parts 55 PoE 31 power supply 24 78 powering off 79 powering on 78 preparing installation 61 rack installation 67 SSL access 101 tools 55 unpacking 57 verifying parts 58 wall installation 72 Services Gateway configuration 91 show chas...

Page 181: ...V Voice 3 W wall installing 72 wall installation preparing 64 wall mount preparing 64 warnings electrical 137 wire specifications 147 wireless 25 165 Index ...

Page 182: ...166 PowerConnect J SRX210 Services Gateway Hardware Guide ...

Reviews: