1-12
Installation Guide
www
.dell.com | support.dell.com
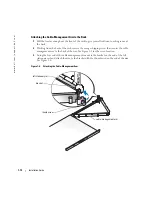
Attaching the Cable-Management Arm to the Rack
1
Pull the tray far enough out the front of the rack to give yourself sufficient working room at
the back.
2
Working from the back of the rack, remove the orange shipping screw that secures the cable-
management arm to the back of the tray. See Figure 1-5 for the screw location.
3
Swing the free end of the cable-management arm out to the bracket on the end of the left
stationary rail, and attach the arm to the bracket with the thumbscrew on the end of the arm.
See Figure 1-6.
Figure 1-6.
Attaching the Cable-Management Arm
thumbscrew
cable-management arm
left stationary rail
bracket
Summary of Contents for PowerEdge 1-U Keyboard Tray
Page 2: ......
Page 6: ...1 4 Contents ...
Page 22: ...2 4 Sommaire ...
Page 36: ...2 18 Guide d installation w w w d e l l c o m s u p p o r t d e l l c o m ...
Page 40: ...3 4 Inhalt ...
Page 54: ...3 18 Installationsanleitung w w w d e l l c o m s u p p o r t e u r o d e l l c o m ...
Page 55: ...w w w d e l l c o m s u p p o r t j p d e l l c o m Dell PowerEdge 1U キーボードトレイ 取り付けガイド ...
Page 58: ...4 4 目次 ...
Page 72: ...4 18 取り付けガイド w w w d e l l c o m s u p p o r t j p d e l l c o m ...
Page 76: ...1 4 Contenido ...
Page 90: ...5 18 Guía de instalación w w w d e l l c o m s u p p o r t d e l l c o m ...


