Installing Blade Components
155
3
Installing Blade Components
Recommended Tools
You may need the following items to perform the procedures in this section:
• #1 and #2 Phillips screwdrivers
• T8 and T10 Torx drivers
• Wrist grounding strap
Removing and Installing a Blade
Removing a Blade
1
Power down the blade using OS commands or the CMC, and ensure that
the blade's power is off.
When a blade is powered off, its front-panel power indicator is off. See
Figure 1-13.
2
Before removing full-height blades 3 or 4 or half-height blades 11 or 12,
rotate the LCD panel to the storage position to prevent accidental damage
to the LCD screen.
3
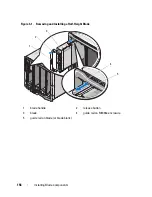
Press the release button on the handle. See Figure 3-1 or Figure 3-2.
4
Pull out the handle to unlock the blade from the enclosure.
5
Slide the blade out of the enclosure.
6
Install the I/O connector cover over the I/O connector.
CAUTION:
To protect the I/O connector pins, install the I/O connector cover any
time a blade is removed from the enclosure. (A full-height blade requires two
connector covers.)
CAUTION:
If you are permanently removing the blade, install a blade blank.
(A full-height blade requires two blade blanks.) Operating the system for extended
periods of time without a blade blank installed can cause the enclosure to
overheat. See "Installing a Blade Blank" on page 159.
Summary of Contents for PowerEdge M620
Page 1: ...Dell PowerEdge Modular Systems Hardware Owner s Manual ...
Page 60: ...60 About Your System Figure 1 24 Example of PowerEdge M610x Port Mapping of Blade 2 ...
Page 68: ...68 About Your System Figure 1 26 Example of Half Height Blade Port Mapping ...
Page 136: ...136 About Your System ...
Page 286: ...286 Installing Blade Components ...
Page 308: ...308 Installing Enclosure Components ...
Page 330: ...330 Running System Diagnostics ...
Page 360: ...360 System Board Information ...
Page 362: ...362 Getting Help ...
Page 368: ...Index 368 V video controller installing 273 ...

