64
Installing System Components
3
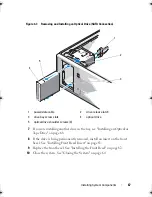
Remove the front bezel. See "Removing the Front Bezel" on page 61.
4
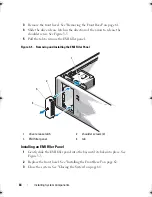
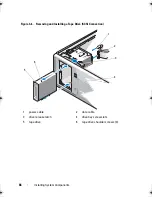
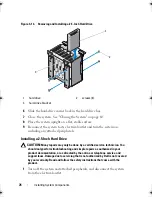
Slide the drive release latch in the direction of the arrow to release the
shoulder screw. See Figure 3-5.
5
Pull the tab to remove the EMI filler panel.
Figure 3-5. Removing and Installing the EMI Filler Panel
Installing an EMI Filler Panel
1
Gently slide the EMI filler panel into the bay until it clicks into place. See
Figure 3-5.
2
Replace the front bezel. See "Installing the Front Bezel" on page 62.
3
Close the system. See "Closing the System" on page 60.
1
drive release latch
2
shoulder screws (2)
3
EMI filler panel
4
tab
3
2
4
1
Coaster_HOM.book Page 64 Monday, November 3, 2014 3:23 PM
Summary of Contents for PowerEdge T110 II
Page 9: ...Contents 9 Index 137 ...
Page 10: ...10 Contents ...
Page 33: ...About Your System 33 ...
Page 34: ...34 About Your System ...
Page 56: ...56 Using the System Setup Program and UEFI Boot Manager ...
Page 126: ...126 Troubleshooting Your System ...
Page 136: ...136 Getting Help ...
Page 142: ...142 Index ...

