Installing System Components
91
CAUTION:
Many repairs may only be done by a certified service technician. You
should only perform troubleshooting and simple repairs as authorized in your
product documentation, or as directed by the online or telephone service and
support team. Damage due to servicing that is not authorized by Dell is not covered
by your warranty. Read and follow the safety instructions that came with the
product.
NOTE:
Maximum dimensions supported for the USB memory key are 24-mm (.94-in)
wide, 79-mm (3.11-in) long, and 8.6-mm (.33-in) tall.
1
Turn off the system, including any attached peripherals, and disconnect
the system from the electrical outlet.
2
Open the system. See "Opening the System".
3
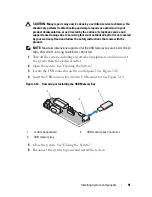
Locate the USB connector on the control panel. See Figure 3-10.
4
Insert the USB memory key into the USB connector. See Figure 3-10.
Figure 3-10.
Removing or Installing the USB Memory Key
5
Close the system. See "Closing the System."
6
Reconnect the system to power and restart the system.
1
control panel board
2
USB memory key connector
3
USB memory key
2
3
1
Summary of Contents for PowerVault DL2100
Page 1: ...Dell PowerVault DL2100 Systems Hardware Owner s Manual ...
Page 54: ...54 About Your System ...
Page 164: ...164 Troubleshooting Your System ...
Page 180: ...180 Jumpers and Connectors ...
Page 182: ...182 Getting Help ...
Page 192: ...192 Glossary ...
Page 200: ...200 Index ...


