Installing System Components
107
10
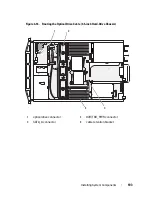
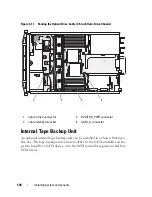
Connect the other end of the power cable to the DVD/TBU_PWR
connector on the system board. See Figure 6-2.
11
Connect the interface cable to the back of the tape backup unit.
12
Connect the other end of the interface cable to the appropriate controller.
a
For a SCSI device, connect to the SCSI controller expansion card.
b
For a SATA device, connect to the SATA_B connector on the system
board. See Figure 6-2 for the location of the connector.
13
Route the interface cable along the interior right wall. See "Cable
Routing."
14
Close the system. See "Closing the System."
15
Reconnect your system and peripherals to their electrical outlets, and turn
on the system.
Removing the Tape Backup Unit
WARNING:
Only trained service technicians are authorized to remove the system
cover and access any of the components inside the system. Before you begin this
procedure, review the safety instructions that came with the system.
1
Turn off the system, including any attached peripherals, and disconnect
the system from its electrical outlet.
2
Open the system. See "Opening the System."
3
For a SATA tape backup unit, disconnect the power and data cables from
the back of the unit.
4
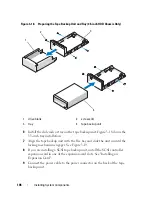
Squeeze the blue release tabs at the back of the mounting tray and push
the tray out of the system. See Figure 3-19.
5
Using a Phillips screwdriver, remove the slide rails or the tray from the tape
backup unit.
6
For a SCSI tape backup unit, disconnect the power and data cables from
the back of the unit.
7
Install the slide rails or the tray to the flex-bay blank.
If replacing the tape backup unit, follow the procedure in "Installing the
Tape Backup Unit."
8
Insert the assembled blank tray into the flex bay and slide the unit in until
the locking mechanism engages.
Summary of Contents for PowerVault NX3000
Page 1: ...Dell PowerVault NX3000 Systems Hardware Owner s Manual ...
Page 180: ...180 Jumpers and Connectors ...
Page 182: ...182 Getting Help ...
Page 192: ...192 Glossary ...
Page 200: ...200 Index ...


