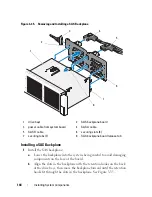
Installing System Components
137
Installing a Processor
WARNING:
Only trained service technicians are authorized to remove the system
cover and access any of the components inside the system. Before you begin this
procedure, review the safety instructions that came with the system.
NOTE:
In a single-processor configuration, the CPU1 socket must be used.
1
If you are adding a second processor for the first time, remove the heat-
sink blank and the processor blank from the vacant processor socket.
Removing the blanks is similar to removing a processor. See "Removing a
Processor."
2
Unpack the new processor.
3
Align the
p
rocessor with the
socket keys on t
he ZIF socket. See
Figure 3-32.
4
I
nstall the processor in the socket.
CAUTION:
Positioning the processor incorrectly can permanently damage the
system board or the processor. Be careful not to bend the pins in the socket.
a
With the release lever on the processor socket in the open position,
a
lign the
p
rocessor with
the
socket
keys
and set the processor lightly
in the socket.
CAUTION:
Do not use force to seat the processor. When the processor is
positioned correctly, it engages easily into the socket.
b
Close the processor shield.
c
R
otate the socket release lever down until it snaps into place.
5
Install the heat sink.
a
Using a clean lint-free cloth, remove the thermal grease from the heat
sink.
CAUTION:
Applying too much thermal grease can result in excess grease coming
in contact with and contaminating the processor socket.
b
Open the grease packet included with your processor kit and apply a
spot of thermal grease equal to the size of a finger nail to the top
center of the new processor.
c
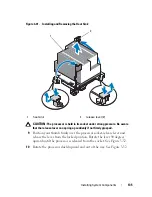
Place the heat sink on the processor. See
Figure 3-31
.
d
Close the heat-sink release levers. See
Figure 3-31
.
6
Replace the cooling shroud. See "Installing the Cooling Shroud."
Summary of Contents for PowerVault NX3000
Page 1: ...Dell PowerVault NX3000 Systems Hardware Owner s Manual ...
Page 180: ...180 Jumpers and Connectors ...
Page 182: ...182 Getting Help ...
Page 192: ...192 Glossary ...
Page 200: ...200 Index ...


