146
Installing System Components
8
Remove the fan bracket. See "Removing the Fan Bracket."
9
Six 3.5-inch hard-drive chassis only:
Remove the SAS backplane. See
"Removing the SAS Backplane."
CAUTION:
To prevent damage to the drives and backplane, you must remove the
SAS drives from the system before removing the backplane.
CAUTION:
You must note the number of each hard drive and temporarily label
them before removal to ensure that you can replace them in the same locations.
a
Remove all hard drives. See "Removing a Hot-Swap Hard Drive."
b
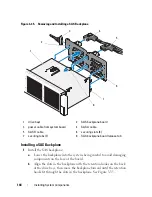
Disconnect the power and interface cables from the SAS backplane.
See Figure 3-35.
c
Pull the blue latch toward the front of the system and slide the
backplane upward.
d
When the backplane cannot slide upward any farther, pull the
backplane toward the back of the system to remove it from the
retention hooks.
e
Lift the board out of the system, being careful to avoid damaging
components on the face of the board.
f
Place the SAS backplane face down on a work surface.
10
Disconnect all cables from the system board.
11
Remove the system board assembly:
a
Pull up the spring-loaded blue retention pin located in the center of
the system board, and then slide the system board assembly toward
the front end of the chassis.
WARNING:
Do not lift the system board by the memory modules latches,
processor heatsink, or any component on the system board.
b
Grasp the system board assembly by the edges of the system board
tray, and lift the assembly from the chassis. See Figure 3-36.
Summary of Contents for PowerVault NX3000
Page 1: ...Dell PowerVault NX3000 Systems Hardware Owner s Manual ...
Page 180: ...180 Jumpers and Connectors ...
Page 182: ...182 Getting Help ...
Page 192: ...192 Glossary ...
Page 200: ...200 Index ...


