background image

Getting Started With Your System

3

Installation and Configuration


WARNING: 

Before performing the following procedure, review the safety 

instructions that came with all Storage Center components.

Unpacking the System


NOTE: 

Unpacking, installing, and deploying your Storage Center may be 

done only by a certified service technician.

Before you begin, make sure the site where you intend to set up and use 
the Storage Center has the following:

Standard power from an independent source or a rack power 
distribution unit with a UPS.

Storage Center with the latest firmware, BIOS, and drivers. Contact 
your supplier for the correct software versions.

Installation Overview

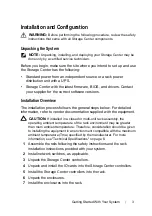
The installation process follows the general steps below. For detailed 
information, refer to vendor documentation supplied with the equipment.


CAUTION: 

If installed in a closed or multi-unit rack assembly, the 

operating ambient temperature of the rack environment may be greater 
than room ambient temperature. Therefore, consideration should be given 
to installing the equipment in an environment compatible with the maximum 
ambient temperature (Tma) specified by the manufacturer. For more 
information, see "Technical Specifications" on page 8.

1

Assemble the rails following the safety instructions and the rack 
installation instructions provided with your system.

2

Install network switches, as applicable.

3

Unpack the Storage Center controllers.

4

Unpack and install the IO cards into the Storage Center controllers. 

5

Install the Storage Center controllers into the rack.

6

Unpack the enclosures.

7

Install the enclosures into the rack. 

Summary of Contents for Storage Center SC200

Page 1: ...Dell SC200 SC220 Storage Enclosures Getting Started With Your System Regulatory Model E03J Regulatory Model E04J ...

Page 2: ...____________________ Information in this document is subject to change without notice 2012 Dell Inc All rights reserved Reproduction of these materials in any manner whatsoever without the written permission of Dell Inc is strictly forbidden Trademarks used in this text Dell and the DELL logo Other trademarks and trade names may be used in this document to refer to either the entities claiming the...

Page 3: ... the general steps below For detailed information refer to vendor documentation supplied with the equipment CAUTION If installed in a closed or multi unit rack assembly the operating ambient temperature of the rack environment may be greater than room ambient temperature Therefore consideration should be given to installing the equipment in an environment compatible with the maximum ambient temper...

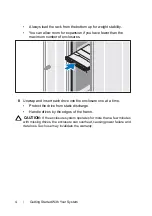
Page 4: ...ximum number of enclosures 8 Unwrap and insert each drive into the enclosure one at a time Protect the drive from static discharge Handle drives by the edges of the frame CAUTION If the enclosure system operates for more than a few minutes with missing drives the enclosure can overheat causing power failure and data loss Such use may invalidate the warranty ...

Page 5: ... the power switch is in the OFF position before connecting the power cables 2 Connect the enclosure power cables to the rack power Securing the Power Cables 1 Bend the power cables as shown in the illustration and secure the cables firmly to the bracket using the strap provided ...

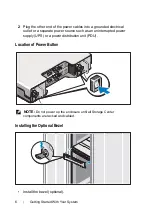
Page 6: ...electrical outlet or a separate power source such as an uninterrupted power supply UPS or a power distribution unit PDU Location of Power Button NOTE Do not power up the enclosure until all Storage Center components are racked and cabled Installing the Optional Bezel Install the bezel optional ...

Page 7: ... The rack documentation included with your rack solution describes how to install your system into a rack The Storage Center Connectivity Guide provides information about cabling all Storage Center hardware components The Storage Center System Setup Guide provides instructions for configuring a new Storage Center using the System Manager Setup Wizard The Storage Center System Manager Administrator...

Page 8: ...ply voltage 100 240 V CA Frequency 50 60 Hz Current consumption 8 6 A Drives SAS hard drives SC200 Up to 12 3 5 inch SAS hot swappable hard drives 6 0 Gbps SC220 Up to 24 2 5 inch SAS hot swappable hard drives 6 0 Gbps Enclosure Management Modules EMMs EMMs Two hot swappable modules with temperature sensors and an audio alarm Connectivity Configurations Storage Center supports up to 168 drives in ...

Page 9: ...ors SAS A and B connectors for connection to the controller and for expansion to an additional enclosure NOTE SAS connectors are SFF 8086 SFF 8088 compliant Serial connector One 6 pin UART mini DIN connector NOTE For engineering use only LED Indicators Front panel One two color LED indicator for system status One single color LED indicators for power status Hard drive carrier One single color acti...

Page 10: ...em ambient operating range the inrush current may reach 55 A per power supply for 10 ms or less Available Hard Drive Power Per Slot Supported hard drive power consumption continuous SC200 Up to 1 16 A at 5 V Up to 1 6 A at 12 V SC220 Up to 1 2 A at 5 V Up to 0 5 A at 12 V EMM Power Per Slot Maximum power consumed by EMM SC200 11 W at 12 V SC220 14 W at 12 V Maximum available power 100 W at 12 V Ma...

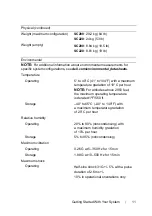
Page 11: ...emperature gradation of 10 C per hour NOTE For altitudes above 2950 feet the maximum operating temperature is derated 1ºF 550 ft Storage 40 to 65 C 40 to 149 F with a maximum temperature gradation of 20 C per hour Relative humidity Operating 20 to 80 noncondensing with a maximum humidity gradation of 10 per hour Storage 5 to 95 noncondensing Maximum vibration Operating 0 26 G at 5 350 Hz for 15 mi...

Page 12: ...27G with a velocity change of 235 in sec all sides Altitude Operating 16 to 3048 m 50 to 10 000 ft NOTE For altitudes above 2950 feet the maximum operating temperature is derated 1ºF 550 ft Storage 16 to 10 600 m 50 to 35 000 ft Airborne Contaminant Level Class G2 or lower as defined by ISA S71 04 1985 Environmental continued ...

Page 13: ......

Page 14: ...www dell com support dell com ...

Reviews: