Setting Up the Monitor
|
31
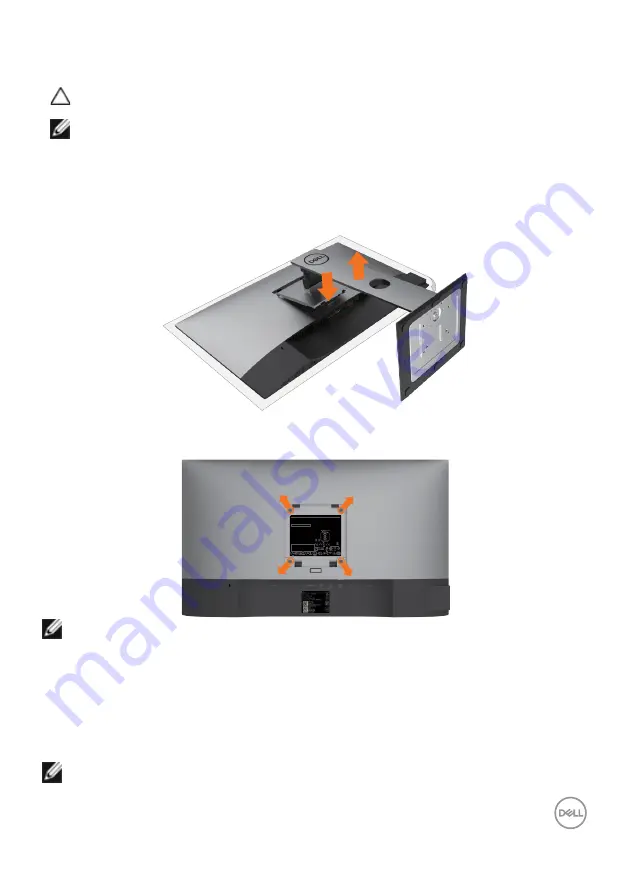
Removing the Monitor Stand
CAUTION:
To prevent scratches on the LCD screen while removing the
stand,
make sure that the monitor is placed on a soft, clean surface.
NOTE:
The procedure below is applicable for the default stand. If you purchased
any other stand, see the documentation shipped with the stand to set it up.
To remove the stand:
1
Place the monitor on a soft cloth or cushion.
2
Press and hold the stand-release button.
3
Lift the stand up and away from the monitor.
2
3
Wall Mounting (Optional)
DELL U2419HC
Flat Panel Monitor / Monitor Plano Panel / Moniteur à écran plat /
液晶顯示器
Model No. / N° de Modelo / Numéro de modèle /
型號
:
U2419HCt
Input Rating / Entrada / Daya Tegangan / Tension d’entrée: 100-240V ~ 50/60Hz 1.6 A
輸入電源
:
交流電壓
100-240
伏特
,
1.5
安培
,
50/60
赫茲
Удельная
мощность
рабочего
режима
- X,XXX
Вт
/
см
Потребляемая
мощность
изделием
в
режиме
ожидания
-X,XX
Вт
Потребляемая
мощность
изделием
в
выключенном
режиме
- X,XX
Вт
2
Made in China / Fabricado en China / Fabriqués en Chine /
Сделано
в
Китае /
製造地:中國
警語:使用過度恐傷害視力
신청인:
Wistron Corporation (For Korea)
Wistron InfoComm (Zhongshan) Corporation Linhai Branch
제조자:
Wistron InfoComm (Zhongshan) Corporation Linhai Branch
A/S
연락처
:
080-854-0066
제조국
:
중국
CAN ICES-3 (B)/NMB-3(B)
Apparatet må tilkoples jordet stikkontakt.
Apparaten skall anslutas till jordat uttag.
Apparatets stikprop skal tilsluttes en stikkontakt med jord,
som giver forbindelse til stikproppens jord.
Laite on liitettävä suojakoskettimilla varustettuun pistorasiaan.
Consumo de energía en operación XX.X Wh
This equipment complies with part 15 of the FCC Rules.
Operation is subject to the following two conditions:
(1) This equipment may not cause harmful interference, and
(2) this equipment must accept any interference received,
including interference that may cause undesired operation.
ID XXXXXXXXXX
ID XXXXXXXXXX
X X X X X X - X X
XXXXX
Address for EU Only:
Raheen Business Park
Limerick Ireland
www.dell.com/regulatory_compliance
XXXXXXXX-XXXXX
R-REM-WT1-U2419HCt
И005-18
NOTE:
Use M4 x 10 mm screws to connect the monitor to the wall-mounting kit.
Refer to the instructions that come with the VESA-compatible wall mounting kit.
1
Place the monitor on a soft cloth or cushion on a stable, flat table.
2
Remove the stand.
3
Use a Phillips crosshead screwdriver to remove the four screws securing the
plastic cover.
4
Attach the mounting bracket from the wall mounting kit to the monitor.
5
Mount the monitor on the wall by following the instructions that comes with the
wall mounting kit.
NOTE:
For use only with UL or CSA or GS-listed wall mount bracket with minimum
weight/load bearing capacity of 3.37 kg (U2419HC)/4.19 kg (U2719DC).


