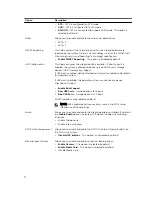
Table 3. Security
Option
Description
Admin Password
This field lets you set, change, or delete the administrator (admin)
password (sometimes called the setup password). The admin password
enables several security features.
The drive does not have a password set by default.
• Enter the old password
• Enter the new password
• Confirm the new password
The successful changes in the password will take effect immediately.
NOTE: If you delete the admin password, the system password also
gets deleted. You can also use the admin password to delete the HDD
password. You cannot set an admin password if a system password or
an HDD password is already set. You must set the admin password
first, if you want to use the admin password with a system password
and/or HDD password.
System Password
Allows you to set, change, or delete the computer password (previously
called the primary password).
The drive does not have a password set by default.
• Enter the old password
• Enter the new password
• Confirm the new password
The successful changes in the password will take effect immediately.
Internal HDD-0 Password
Allows you to set, change, or delete the password on the computer's
internal hard disk drive (HDD). Successful changes to this password take
effect immediately.
The drive does not have a password set by default.
• Enter the old password
• Enter the new password
• Confirm the new password
Strong Password
This field enforces strong passwords.
Enable strong password
- This option is disabled by default.
Password Configuration
This field controls the minimum and maximum number of characters
allowed for the admin and system passwords.
The minimum number of characters are 4 and maximum number of
characters are 32 for both admin and system passwords.
• Admin Password Min
• Admin Password Max
• System Password Min
• System Password Max
73
Summary of Contents for vostro 23-3340
Page 1: ...Dell Vostro 23 3340 Owner s Manual Regulatory Model W10C Regulatory Type W10C001 ...
Page 7: ...System Setup Options 70 Flashing the BIOS 80 5 Specifications 81 6 Contacting Dell 84 ...
Page 63: ...20 Replace the memory module s 21 Replace the back cover 22 Replace the stand assembly 63 ...

