background image

Boot Sequence

Boot Sequence allows you to bypass the System Setup–defined boot device order and boot directly to a specific device (for
example: optical drive or hard drive). During the Power-on Self Test (POST), when the Dell logo appears, you can:

Access System Setup by pressing F2 key

Bring up the one-time boot menu by pressing F12 key

The one-time boot menu displays the devices that you can boot from including the diagnostic option. The boot menu options
are:

Removable Drive (if available)

STXXXX Drive (if available)

NOTE:

 XXX denotes the SATA drive number.

Optical Drive (if available)

SATA Hard Drive (if available)

Diagnostics

The boot sequence screen also displays the option to access the System Setup screen.

System setup options

NOTE:

 Depending on your computer and its installed devices, the items listed in this section may or may not appear.

Table 25. System setup options—Main menu 

Main

System Time

Displays the current time in hh:mm:ss format.

System Date

Displays the current date in mm/dd/yyyy format.

BIOS Version

Displays the BIOS version.

Product Name

Displays the model number of your computer.

Service Tag

Displays the service tag of your computer.

Asset Tag

Displays the asset tag of your computer.

CPU Type

Displays the processor type.

CPU Speed

Displays the processor speed.

CPU ID

Displays the processor identification code.

CPU Cache

L1 Cache

Displays the processor L1 cache size.

L2 Cache

Displays the processor L2 cache size.

L3 Cache

Displays the processor L3 cache size.

First HDD

Displays the type of hard drive installed.

M.2 PCIe SSD

Display the M.2 PCIe SSD device information of the
computer.

AC Adapter Type

Displays the type of AC adapter.

System Memory

Displays the size of memory installed.

Memory Speed

Displays the speed of memory.

Keyboard Type

Displays the type of keyboard installed on the computer.

System setup

25

Summary of Contents for Vostro 3405

Page 1: ...Vostro 3405 Setup and specifications guide 1 Regulatory Model P132G Regulatory Type P132G002 May 2020 Rev A00 ...

Page 2: ...ential damage to hardware or loss of data and tells you how to avoid the problem WARNING A WARNING indicates a potential for property damage personal injury or death 2020 Dell Inc or its subsidiaries All rights reserved Dell EMC and other trademarks are trademarks of Dell Inc or its subsidiaries Other trademarks may be trademarks of their respective owners ...

Page 3: ...ential damage to hardware or loss of data and tells you how to avoid the problem WARNING A WARNING indicates a potential for property damage personal injury or death 2020 Dell Inc or its subsidiaries All rights reserved Dell EMC and other trademarks are trademarks of Dell Inc or its subsidiaries Other trademarks may be trademarks of their respective owners ...

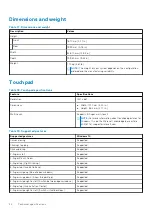
Page 4: ... connectors 15 System board connectors 16 Storage 16 Media card reader 17 Audio 17 Video 17 Camera 17 Communications 18 Battery 18 Power adapter 19 Dimensions and weight 20 Touchpad 20 Display 21 Keyboard 21 Fingerprint reader in Power Button 22 Sensor and control specifications 22 Computer environment 22 Chapter 5 Software 23 Downloading Windows drivers 23 Chapter 6 System setup 24 BIOS overview ...

Page 5: ...up password 28 Assigning a system setup password 29 Deleting or changing an existing system setup password 29 Clearing BIOS System Setup and System passwords 30 Chapter 7 Getting help 31 Contacting Dell 31 Contents 5 ...

Page 6: ...to a secured wireless network enter the password for the wireless network access when prompted If connected to the internet sign in with or create a Microsoft account If not connected to the internet create an offline account On the Support and Protection screen enter your contact details 3 Locate and use Dell apps from the Windows Start menu Recommended Table 1 Locate Dell apps Dell apps Details ...

Page 7: ...your computer with critical fixes and important device drivers as they become available Dell Digital Delivery Download software applications including software that is purchased but not preinstalled on your computer 4 Create recovery drive for Windows NOTE It is recommended to create a recovery drive to troubleshoot and fix problems that may occur with Windows For more information see Create a USB...

Page 8: ...h drive to your computer 2 In Windows search type Recovery 3 In the search results click Create a recovery drive The User Account Control window is displayed 4 Click Yes to continue The Recovery Drive window is displayed 5 Select Back up system files to the recovery drive and click Next 6 Select the USB flash drive and click Next A message appears indicating that all data in the USB flash drive wi...

Page 9: ...Chassis overview Topics Display view Left view Right view Palmrest view Bottom view Keyboard shortcuts Display view 1 RGB camera 2 Camera Status Light 3 Microphones 4 LCD panel 3 Chassis overview 9 ...

Page 10: ...Diagnostics LED LIght 3 HDMI port 4 Network port 5 USB Type A 3 2 Gen 1 port 6 USB Type A 3 2 Gen 1 port 7 Universal Audio Jack Right view 1 SD card reader 2 USB Type A 2 0 Gen 1 Charging port 3 Wedge shaped lock slot 10 Chassis overview ...

Page 11: ...Palmrest view 1 Power button with optional fingerprint reader 2 Keyboard 3 Touchpad Chassis overview 11 ...

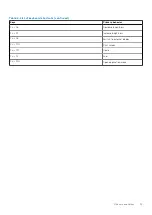
Page 12: ...yboard language configuration Keys that are used for shortcuts remain the same across all language configurations Table 2 List of keyboard shortcuts Keys Primary behavior Fn Esc Toggle Fn key lock Fn F1 Mute audio Fn F2 Decrease volume Fn F3 Increase volume Fn F4 Play Pause Fn F5 Turn on off keyboard backlight 12 Chassis overview ...

Page 13: ...ard shortcuts continued Keys Primary behavior Fn F6 Decrease brightness Fn F7 Increase brightness Fn F8 Switch to external display Fn F10 Print screen Fn F11 Home Fn 12 End Fn Ctrl Open application menu Chassis overview 13 ...

Page 14: ...ons and weight Touchpad Display Keyboard Fingerprint reader in Power Button Sensor and control specifications Computer environment Processors Table 3 Processors Description Values Processors AMD Athlon Silver 3050U AMD Athlon Gold 3150U AMD Ryzen 3 3250U AMD Ryzen 5 3450U AMD Ryzen 5 3500U AMD Ryzen 7 3700U Wattage 15 W 15 W 15 W 15 W 15 W 15 W Core count 2 2 2 4 4 4 Thread count 2 4 4 8 8 8 Speed...

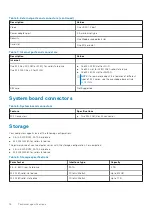
Page 15: ...peed 2400 MHz Maximum memory 16 GB Minimum memory 4 GB Configurations supported 4 GB 1 x 4 GB DDR4 2400MHz SO DIMM 8 GB 2 x 4 GB DDR4 2400MHz SO DIMM 8 GB 1 x 8 GB DDR4 2400MHz SO DIMM 12 GB 1x8 GB 1x4 GB DDR4 2400MHz SO DIMM 16 GB 2 x 8 GB DDR4 2400MHz SO DIMM 16 GB 1 x 16 GB DDR4 2400MHz SO DIMM Ports and connectors Table 6 External ports and connectors Description Values External Network One RJ...

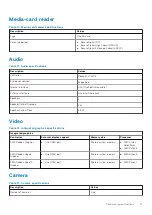
Page 16: ... the knowledge base article SLN301626 SIM card Not Supported System board connectors Table 8 System board connectors Feature Specifications M 2 Connectors Two M 2 2280 Key M connector Storage Your computer supports one of the following configurations 2 5 in 5400 RPM SATA hard drive M 2 2230 2280 for solid state drive The primary drive of your computer varies with the storage configuration For comp...

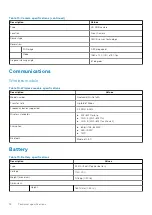
Page 17: ...interface Universal Audio Jack Speakers 2 Speaker Output Average 2 W Speaker Output Peak 2 5 W Video Table 12 Integrated graphics specifications Integrated graphics Controller External display support Memory size Processor AMD Radeon Graphics One HDMI port Shared system memory AMD Athlon Gold Silver AMD Ryzen 3 AMD Radeon Vega 8 Graphics One HDMI port Shared system memory AMD Ryzen 5 AMD Radeon Ve...

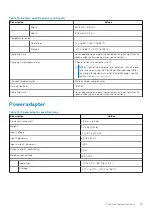
Page 18: ...specifications Description Values Model number Qualcomm QCA61x4A Transfer rate Up to 867 Mbps Frequency bands supported 2 4 GHz 5 GHz Wireless standards WiFi 802 11a b g Wi Fi 4 Wi Fi 802 11n Wi Fi 5 Wi Fi 802 11ac Wave 2 Encryption 64 bit 128 bit WEP AES CCMP TKIP Bluetooth Bluetooth 5 0 Battery Table 15 Battery specifications Description Values Type 42 Whr 3 cell Polymer battery Voltage 11 40 VD...

Page 19: ... application For more information on the Dell Power Manager see Me and My Dell on www dell com Life span approximate 300 discharge charge cycles Coin cell battery CR2032 Operating time Varies depending on operating conditions and can significantly reduce under certain power intensive conditions Power adapter Table 16 Power adapter specifications Description Values Diameter connector 2 9 mm x 5 4 m...

Page 20: ... more information about touchpad gestures for Windows 10 see the Microsoft knowledge base article 4027871 at support microsoft com Table 19 Supported gestures Supported gestures Windows 10 Cursor moving Supported Clicking tapping Supported Click and drag Supported 2 finger scroll Supported 2 finger Pinch Zoom Supported 2 finger tap Right Clicking Supported 3 finger tap Invoke Cortana Supported 3 f...

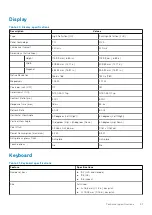
Page 21: ...Gamut CG NTSC 45 Typ NTSC 45 Typ Contrast Ratio min 400 1 500 1 Response Time max 16 ms 35 ms Refresh Rate 60 Hz 60 Hz Horizontal View Angle 40 degrees Left Right 80 degrees Left Right Vertical View Angle 10 degrees Up 30 degrees Down 80 degrees Up Down Pixel Pitch 0 2265 x 0 2265 mm 0 161 x 0 161 mm Power Consumption maximum 3 2 W 3 5 W Anti glare vs glossy finish Anti glare Anti glare Touch opti...

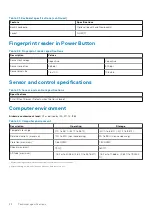
Page 22: ...sor Detects when the lid is closed Computer environment Airborne contaminant level G1 as defined by ISA S71 04 1985 Table 24 Computer environment Description Operating Storage Temperature range 0 C to 35 C 32 F to 95 F 40 C to 65 C 40 F to 149 F Relative humidity maximum 10 to 90 non condensing 0 to 95 non condensing Vibration maximum 0 66 GRMS 1 30 GRMS Shock maximum 110 G 160 G Altitude maximum ...

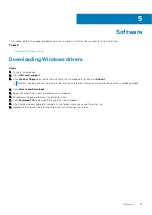
Page 23: ...lick Submit NOTE If you do not have the Service Tag use the auto detect feature or manually browse for your notebook model 4 Click Drivers and Downloads 5 Select the operating system installed on your notebook 6 Scroll down the page and select the driver to install 7 Click Download File to download the driver for your notebook 8 After the download is complete navigate to the folder where you saved...

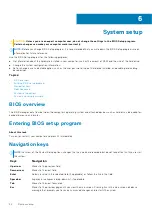
Page 24: ...equence System setup options System and setup password BIOS overview The BIOS manages data flow between the computer s operating system and attached devices such as hard disk video adapter keyboard mouse and printer Entering BIOS setup program About this task Turn on or restart your computer and press F2 immediately Navigation keys NOTE For most of the System Setup options changes that you make ar...

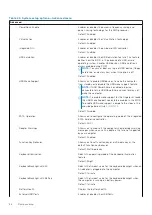
Page 25: ...ion may or may not appear Table 25 System setup options Main menu Main System Time Displays the current time in hh mm ss format System Date Displays the current date in mm dd yyyy format BIOS Version Displays the BIOS version Product Name Displays the model number of your computer Service Tag Displays the service tag of your computer Asset Tag Displays the asset tag of your computer CPU Type Displ...

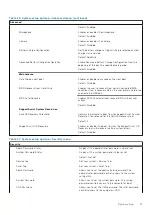
Page 26: ...le wake support for the fingerprint reader the USB Wake Support needs to be enabled in the BIOS To enable USB wake support complete the steps in the knowledge base article SLN321473 Default Disabled SATA Operation Allows you to configure the operating mode of the integrated SATA hard drive controller Default AHCI Adapter Warnings Allows you to choose if the computer should display warning messages...

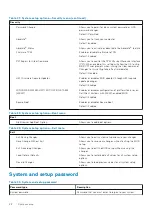
Page 27: ...user actions Default Disabled SupportAssist System Resolution Auto OS Recovery Threshold Controls the automatic boot flow for SupportAssist System Resolution Console and for the Dell OS Recovery tool Default 2 SupportAssist OS Recovery Enables or disables the boot flow for the SupportAssist OS Recovery tool in the even of certain system errors Default Disabled Table 27 System setup options Securit...

Page 28: ...SMM SECURITY MITIGATIONS TABLE WSMT Enables or disables configuration of platform features on Dell Client Systems with WSMT enabled BIOS Default Enabled Secure Boot Enables or disables Secure Boot Default Enabled Table 28 System setup options Boot menu Boot File Browser Add Boot Option Allows you to add boot options Table 29 System setup options Exit menu Exit Exit Saving Changes Allows you to exi...

Page 29: ...o 32 characters The password can contain the numbers 0 through 9 Only lower case letters are valid upper case letters are not valid Only the following special characters are valid Space 3 Type the system password that you entered earlier in the Confirm new password field and click OK 4 Press F10 to save the changes The computer restarts Deleting or changing an existing system setup password Prereq...

Page 30: ...m passwords About this task To clear the system or BIOS passwords contact Dell technical support as described at www dell com contactdell NOTE For information on how to reset Windows or application passwords refer to the documentation accompanying Windows or your application 30 System setup ...

Page 31: ... and telephone based support and service options Availability varies by country and product and some services may not be available in your area To contact Dell for sales technical support or customer service issues Steps 1 Go to Dell com support 2 Select your support category 3 Verify your country or region in the Choose a Country Region drop down list at the bottom of the page 4 Select the approp...

Reviews: