Before
You
Begin |
7
Before You Begin
Turn Off Your Computer and Connected Devices
CAUTION: To avoid losing data, save and close all open files and exit all open
programs before you turn off your computer.
1
Save and close all open files and exit all open programs.
2
Follow the instructions to shut down your computer based on the operating system
installed on your computer.
•
Windows 8:
Move your mouse-pointer to the upper-right or lower-right corner of the
screen to open the Charms sidebar, and then click
Settings
→
Power
→
Shut down
.
•
Windows 7:
Click
Start
and
click
Shut down
.
Microsoft Windows shuts down and then the computer turns off.
NOTE:
If you are using a different operating system, see the documentation
of your operating system for shut-down instructions.
3
Disconnect your computer and all attached devices from their electrical outlets.
4
Disconnect all telephone cables, network cables, and attached devices from
your computer.
5
Slide and hold the power switch for 5 seconds, after the computer is unplugged, to
ground the system board.
Safety Instructions
Use the following safety guidelines to protect your computer from potential damage and
ensure your personal safety.
WARNING: Before working inside your computer, read the safety
information that shipped with your computer. For additional safety best
practices information, see the Regulatory Compliance Homepage at
dell.com/regulatory_compliance.
WARNING: Disconnect all power sources before opening the computer cover or
panels. After you finish working inside the computer, replace all covers, panels,
and screws before connecting to the power source.
CAUTION: To avoid damaging the computer, ensure that the work surface is flat
and clean.
CAUTION: To avoid damaging the components and cards, handle them by their
edges and avoid touching pins and contacts.
book.book Page 7 Tuesday, October 23, 2012 12:44 AM
Summary of Contents for XPS 12
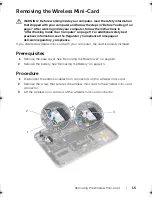
Page 16: ...16 Removing the Wireless Mini Card 1 antenna cables 2 2 wireless mini card 3 screw ...
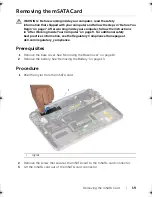
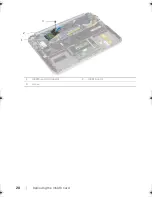
Page 20: ...20 Removing the mSATA Card 1 mSATA card connector 2 mSATA card 3 screw 3 2 1 ...
Page 45: ...Removing the Display Assembly 45 1 display hinges 2 1 ...
Page 51: ...Removing the Camera Module 51 1 screws 2 2 camera cable connector 3 camera module ...
Page 53: ...Replacing the Camera Module 53 ...
Page 58: ...58 Removing the Display Panel 2 Peel off the display cable from the display panel ...
Page 60: ...60 Removing the Display Panel ...


