Optical Drive
37
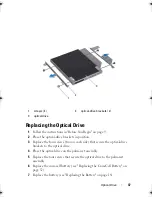
Replacing the Optical Drive
1
Follow the instructions in "Before You Begin" on page 9.
2
Place the optical-drive brackets in position.
3
Replace the four screws (two on each side) that secure the optical-drive
brackets to the optical drive.
4
Place the optical drive on the palm-rest assembly.
5
Replace the four screws that secure the optical drive to the palm-rest
assembly.
6
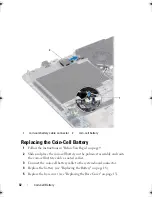
Replace the coin-cell battery (see "Replacing the Coin-Cell Battery" on
page 32).
7
Replace the battery (see "Replacing the Battery" on page 18).
1
screws
(
4
)
2
optical-drive brackets
(
2
)
3
optical drive
2
3
1
book.book Page 37 Friday, February 21, 2014 12:07 PM
Summary of Contents for XPS L511z
Page 1: ...Dell XPS L511z Service Manual Regulatory model P12F series Regulatory type P12F001 ...
Page 8: ...8 Contents ...
Page 12: ...12 Before You Begin ...
Page 16: ...16 Base Cover ...
Page 22: ...22 Memory Module s Click Start Control Panel System and Security System ...
Page 34: ...34 Coin Cell Battery ...
Page 42: ...42 AC Adapter Connector ...
Page 46: ...46 Power Button Board ...
Page 50: ...50 Audio Board ...
Page 54: ...54 Battery Status Light Board ...
Page 60: ...60 Heat Sink ...
Page 66: ...66 System Board ...
Page 72: ...72 Keyboard ...
Page 76: ...76 Speakers ...
Page 80: ...80 Palm Rest Assembly ...
Page 90: ...90 Display ...
Page 94: ...94 Camera Module ...

