background image


display 


For more information about your display, see 

Using the Display


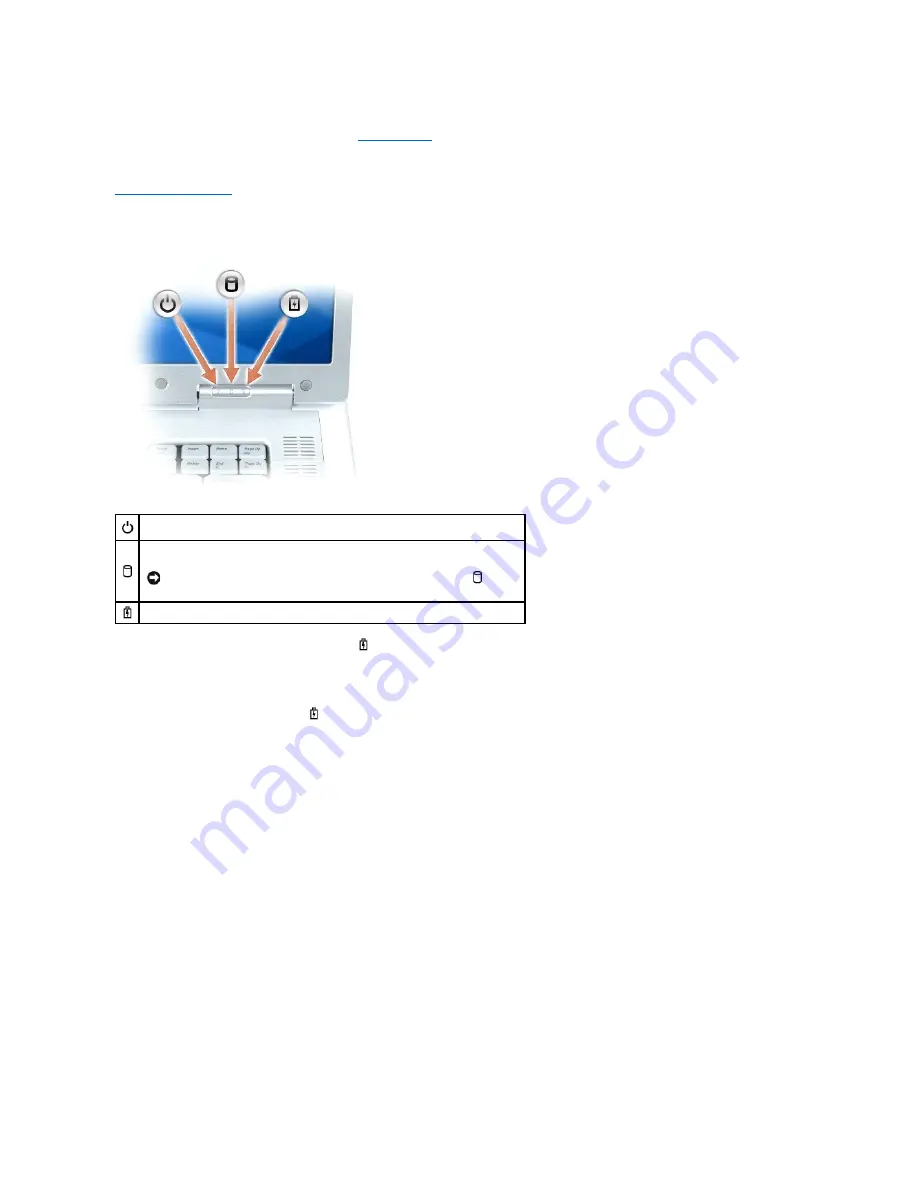
power button 


Press to turn on the computer or to enter or exit a power management mode. For more information on power management modes, see 

Power Management Modes


device status lights


If the computer is connected to an electrical outlet, the 

 light operates as follows: 

l


Solid green: The battery is charging. 


l


Flashing green: The battery is almost fully charged. 


If the computer is running on a battery, the 

 light operates as follows: 

l


Off: The battery is adequately charged (or the computer is turned off). 


l


Flashing orange: The battery charge is low. 


l


Solid orange: The battery charge is critically low. 


touch pad 


Provides the functionality of a mouse. 


touch pad scroll zone 


Provides the functionality of the scroll button on a mouse. A vertical scroll zone is located on the right side of the touch pad. A horizontal scroll zone is located 
on the bottom of the touch pad. 


media control buttons 


Control CD, DVD, and Media Player playback. 


Turns on when you turn on the computer, and blinks when the computer is in a power 
management mode.  


Turns on when the computer reads or writes data. 


NOTICE: 

To avoid loss of data, never turn off the computer while the 

 light is 

flashing. 

  Turns on steadily or blinks to indicate battery charge status. 

Summary of Contents for XPS M1710

Page 1: ...ex Latitude PowerEdge PowerConnect PowerVault PowerApp Dell TravelLite ExpressCharge Dell MediaDirect Strike Zone Wi Fi Catcher and XPS are trademarks of Dell Inc Intel is a registered trademarks and Core is a trademark of Intel Corporation Microsoft Outlook and Windows are registered trademarks of Microsoft Corporation Bluetooth is a registered trademark owned by Bluetooth SIG Inc and is used by ...

Page 2: ...ows Help and Support Center 2 Under Pick a Task click Use Tools to view your computer information and diagnose problems 3 Under My Computer Information select Hardware From the My Computer Information Hardware screen you can view the type of video controller installed in your computer as well as the other hardware components Front View display latches Keeps the display closed display latch release...

Page 3: ...he computer is turned off l Flashing orange The battery charge is low l Solid orange The battery charge is critically low touch pad Provides the functionality of a mouse touch pad scroll zone Provides the functionality of the scroll button on a mouse A vertical scroll zone is located on the right side of the touch pad A horizontal scroll zone is located on the bottom of the touch pad media control...

Page 4: ...e Microsoft Windows logo key For information on supported keyboard shortcuts see Key Combinations Dell MediaDirect button Press the Dell MediaDirect button to launch Dell MediaDirect or Microsoft Windows Media Center Edition See Using Dell Media Experience and Dell MediaDirect keyboard and wireless status lights The lights located above the keyboard indicate the following 1 touch pad scroll zone M...

Page 5: ... function is enabled Turns on when wireless networking is enabled To quickly enable or disable wireless networking press Fn F2 Turns on when a card with Bluetooth wireless technology is enabled NOTE The card with Bluetooth wireless technology is an optional feature so the light turns on only if you ordered the card with your computer For more information see the documentation that came with your c...

Page 6: ...s 5 in 1media memory card reader Provides a fast and convenient way to view and share digital photos music and videos stored on a media memory card The 5 in 1 media memory card reader reads the following digital media memory cards Secure Digital SD card SDIO MultiMediaCard MMC Memory Stick Memory Stick PRO xD Picture Card audio connectors 1 smart card slot 4 IEEE 1394 connector 7 air vent 2 hard d...

Page 7: ...umulate in the air vents Do not store your computer in a low airflow environment such as a closed briefcase while it is running Restricting the airflow can damage the computer or cause a fire Connects your computer to a TV Also connects digital audio capable devices using the TV digital audio adapter cable NOTICE The network connector is slightly larger than the modem connector To avoid damaging t...

Page 8: ...l DVI compatible monitor such as a flat panel monitor With an adapter cable you can also connect an external VGA compatible monitor to the DVI connector Connects an external VGA compatible monitor CAUTION The AC adapter works with electrical outlets worldwide However power connectors and power strips vary among countries Using an incompatible cable or improperly connecting the cable to the power s...

Page 9: ...perating system or programs are installed air vent The computer uses fan s to create airflow through the vent s which prevents the computer from overheating Mini Card modem cover Covers the compartment that contains the Mini Card and the modem For more information see Mini Card and Modem memory module cover Covers the compartment that contains the memory modules For more information see Memory opt...

Page 10: ...docking device connector Lets you attach your computer to a docking device See the documentation that came with your docking device for more information Back to Contents Page ...

Page 11: ...m tells you how to control system setup with key functions Use these keys to select a category modify its settings or exit system setup Commonly Used Options Certain options require that you reboot the computer for new settings to take effect Changing the Boot Sequence The boot sequence or boot order tells the computer where to look to find the software needed to start the operating system You can...

Page 12: ...t order is restored Cleaning Your Computer Computer Keyboard and Display l Use a can of compressed air to remove dust from between the keys on the keyboard and to remove any dirt or lint from the display l Moisten a soft lint free cloth with either water or a display cleaner Do not use alcohol or an ammonia based cleaner Wipe the display gently working from the center to the edges until it is clea...

Page 13: ...rference by one or more of the following measures l Reorient the receiving antenna l Relocate the system with respect to the receiver l Move the system away from the receiver l Plug the system into a different outlet so that the system and the receiver are on different branch circuits If necessary consult a representative of Dell Inc or an experienced radio television technician for additional sug...

Page 14: ...ever Dell also extends a parts replacement program to cover all nonstandard third party hardware components integrated through CFI for the duration of the computer s service contract Definition of Dell Installed Software and Peripherals Dell installed software includes the operating system and some of the software programs that are installed on the computer during the manufacturing process Microso...

Page 15: ...computer see the Product Information Guide or separate paper warranty document that shipped with your computer NOTE Because the battery may not be fully charged use the AC adapter to connect your new computer to an electrical outlet the first time you use the computer For best results operate the computer with the AC adapter until the battery is fully charged To view battery charge status click th...

Page 16: ...ttery charge is approximately 90 percent depleted You can change the settings for the battery alarms in QuickSet or the Power Options Properties window See Configuring Power Management Settings for information about accessing QuickSet or the Power Options Properties window Conserving Battery Power Perform the following actions to conserve battery power l Connect the computer to an electrical outle...

Page 17: ...kSet Power Management Wizard double click the icon in the taskbar For more information about QuickSet click the Help button in the Power Management Wizard l To access the Power Options Properties window click the Start button Control Panel Power Options For information on any field in the Power Options Properties window click the question mark icon on the title bar and then click on the area where...

Page 18: ...long storage period recharge the battery fully before you use it For more information see Charging the Battery Back to Contents Page CAUTION Before performing these procedures turn off the computer disconnect the AC adapter from the electrical outlet and the computer disconnect the modem from the wall connector and computer and remove any other external cables from the computer NOTICE You must rem...

Page 19: ...card ExpressCards are generally marked with a symbol such as a triangle or an arrow or a label to indicate which end to insert into the slot The cards are keyed to prevent incorrect insertion If card orientation is not clear see the documentation that came with the card Supported and Unsupported Card Comparison The ExpressCard slot of your computer is designed to support only ExpressCards To insta...

Page 20: ... provides a fast and convenient way to view and share digital photos music and videos stored on a media memory card The 5 in 1 media memory card reader reads the following media memory cards l Secure Digital SD card SDIO l MultiMediaCard MMC l Memory Stick l Memory Stick PRO l xD Picture Card 1 ExpressCard NOTICE Use the ExpressCard configuration utility click the icon in the taskbar to select a c...

Page 21: ... processor under the gold contact pad The combination of the small size and integrated circuits make smart cards valuable tools for security data storage and special programs Using smart cards can improve system security by combining something a user has the smart card with something only the user should know a PIN to provide more secure user authentication than passwords alone Installing a Smart ...

Page 22: ... its connector The smart card will protrude approximately 1 2 inch from the slot If you encounter too much resistance do not force the card Check the card orientation and try again Back to Contents Page 1 gold contact pad 2 smart card top 1 smart card slot 2 smart card 3 ExpressCard slot ...

Page 23: ...s_latin_services dell com E mail for desktop and portable computers la techsupport dell com E mail for servers and EMC storage products la_enterprise dell com Customer Care toll free 0 800 444 0730 Technical Support toll free 0 800 444 0733 Technical Support Services toll free 0 800 444 0724 Sales 0 810 444 3355 Aruba General Support toll free 800 1578 Australia Sydney International Access Code 00...

Page 24: ...800 805 7541 Chile Santiago Country Code 56 City Code 2 Sales and Customer Support toll free 1230 020 4823 China Xiamen Country Code 86 City Code 592 Technical Support website support dell com cn Technical Support E mail cn_support dell com Customer Care E mail customer_cn dell com Technical Support Fax 592 818 1350 Technical Support Dell Dimension and Inspiron toll free 800 858 2968 Technical Sup...

Page 25: ...table computers only 0825 387 129 Technical Support for all other Dell computers 0825 387 270 Customer Care 0825 823 833 Switchboard 0825 004 700 Switchboard calls from outside of France 04 99 75 40 00 Sales 0825 004 700 Fax 0825 004 701 Fax calls from outside of France 04 99 75 40 01 Corporate Technical Support 0825 004 719 Customer Care 0825 338 339 Switchboard 01 55 94 71 00 Sales 01 55 94 71 0...

Page 26: ...reland Sales 01 204 4444 U K Sales dial within U K only 0870 907 4000 Fax Sales Fax 01 204 0103 Switchboard 01 204 4444 Italy Milan International Access Code 00 Country Code 39 City Code 02 Website support euro dell com Home and Small Business Technical Support 02 577 826 90 Customer Care 02 696 821 14 Fax 02 696 821 13 Switchboard 02 696 821 12 Corporate Technical Support 02 577 826 90 Customer C...

Page 27: ... com Technical Support Dell Precision OptiPlex and Latitude toll free 1 800 880 193 Technical Support Dimension Inspiron and Electronics and Accessories toll free 1 800 881 306 Technical Support PowerApp PowerEdge PowerConnect and PowerVault toll free 1800 881 386 Customer Care toll free 1800 881 306 option 6 Transaction Sales toll free 1 800 888 202 Corporate Sales toll free 1 800 888 213 Mexico ...

Page 28: ... Vincent and the Grenadines General Support toll free 1 877 270 4609 Singapore Singapore International Access Code 005 Country Code 65 Website support ap dell com Technical Support Dimension Inspiron and Electronics and Accessories toll free 1800 394 7430 Technical Support OptiPlex Latitude and Dell Precision toll free 1800 394 7488 Technical Support PowerApp PowerEdge PowerConnect and PowerVault ...

Page 29: ...stomer Care toll free 00801 60 1250 option 5 Transaction Sales toll free 00801 65 1228 Corporate Sales toll free 00801 651 227 Thailand International Access Code 001 Country Code 66 Website support ap dell com Technical Support OptiPlex Latitude and Dell Precision toll free 1800 0060 07 Technical Support PowerApp PowerEdge PowerConnect and PowerVault toll free 1800 0600 09 Customer Care toll free ...

Page 30: ...iness Customer Service and Support toll free 1 800 456 3355 Employee Purchase Program EPP Customers toll free 1 800 695 8133 Printers and Projectors Support toll free 1 877 459 7298 Public government education and healthcare Customer Service and Support toll free 1 800 456 3355 Employee Purchase Program EPP Customers toll free 1 800 695 8133 Dell Sales toll free 1 800 289 3355 or toll free 1 800 8...

Page 31: ...nd the external device simultaneously Setting Display Resolution To display a program at a specific resolution both the graphics card and the display must support the program and the necessary video drivers must be installed If you choose a resolution or color palette that is higher than the display supports the settings adjust automatically to the closest supported values 1 Click the Start button...

Page 32: ...r You can use the CD to install drivers see Manually Reinstalling Drivers or to run the Dell Diagnostics see Dell Diagnostics Readme files may be included on your CD to provide last minute updates about technical changes to your computer or advanced technical reference material for technicians or experienced users NOTE Drivers and documentation updates can be found at support dell com l Warranty i...

Page 33: ...nu click All 4 Select the operating system and operating system language for your computer and click Submit 5 Under Select a Device scroll to System and Configuration Utilities and click Dell Notebook System Software l Software upgrades and troubleshooting hints l Frequently asked questions hot topics and general health of your computing environment Dell Support Utility The Dell Support Utility is...

Page 34: ...Back to Contents Page ...

Page 35: ...ttery powers the computer BIOS basic input output system A program or utility that serves as an interface between the computer hardware and the operating system Unless you understand what effect these settings have on the computer do not change them Also referred to as system setup bit The smallest unit of data interpreted by your computer Bluetooth wireless technology A wireless technology standa...

Page 36: ...iver DIN connector A round six pin connector that conforms to DIN Deutsche Industrie Norm standards it is typically used to connect PS 2 keyboard or mouse cable connectors disk striping A technique for spreading data over multiple disk drives Disk striping can speed up operations that retrieve data from disk storage Computers that use disk striping generally allow the user to select the data unit ...

Page 37: ...heit A temperature measurement scale where 32 is the freezing point and 212 is the boiling point of water FCC Federal Communications Commission A U S agency responsible for enforcing communications related regulations that state how much radiation computers and other electronic equipment can emit floppy An electromagnetic form of storage media Also known as a floppy diskette or a floppy disk flopp...

Page 38: ...s for infrared communications IRQ interrupt request An electronic pathway assigned to a specific device so that the device can communicate with the processor Each device connection must be assigned an IRQ Although two devices can share the same IRQ assignment you cannot operate both devices simultaneously ISP Internet service provider A company that allows you to access its host server to connect ...

Page 39: ...such as date time and other system setup options that you can set O optical drive A drive that uses optical technology to read or write data from CDs DVDs or DVD RWs Example of optical drives include CD drives DVD drives CD RW drives and CD RW DVD combo drives P parallel connector An I O port often used to connect a parallel printer to your computer Also referred to as an LPT port partition A phys...

Page 40: ...omputers that can often be used for troubleshooting problems S ScanDisk A Microsoft utility that checks files folders and the hard disk s surface for errors ScanDisk often runs when you restart the computer after it has stopped responding SDRAM synchronous dynamic random access memory A type of DRAM that is synchronized with the optimal clock speed of the processor serial connector An I O port oft...

Page 41: ...uch as a USB compatible keyboard mouse joystick scanner set of speakers printer broadband devices DSL and cable modems imaging devices or storage devices Devices are plugged directly in to a 4 pin socket on your computer or in to a multi port hub that plugs in to your computer USB devices can be connected and disconnected while the computer is turned on and they can also be daisy chained together ...

Page 42: ...de area network A wireless high speed data network using cellular technology and covering a much larger geographic area than WLAN WXGA wide aspect extended graphics array A video standard for video cards and controllers that supports resolutions up to 1280 x 800 X XGA extended graphics array A video standard for video cards and controllers that supports resolutions up to 1024 x 768 Z ZIF zero inse...

Page 43: ...support dell com Select your region on the WELCOME TO DELL SUPPORT page and fill in the requested details to access help tools and information You can contact Dell electronically using the following addresses l World Wide Web www dell com www dell com ap Asian Pacific countries only www dell com jp Japan only www euro dell com Europe only www dell com la Latin American countries www dell ca Canada...

Page 44: ... problem with your order such as missing parts wrong parts or incorrect billing contact Dell for customer assistance Have your invoice or packing slip handy when you call For the telephone number to call see the contact numbers for your region Product Information If you need information about additional products available from Dell or if you would like to place an order visit the Dell website at w...

Page 45: ...y CAUTION Before working inside your computer read the safety instructions in your Product Information Guide Diagnostics Checklist Name Date Address Phone number Service Tag bar code on the back of the computer Express Service Code Return Material Authorization Number if provided by Dell support technician Operating system and version Devices Expansion cards Are you connected to a network Yes No N...

Page 46: ...tery CD or DVD Tray Display Functions Ctrl Shift Esc Opens the Task Manager window Fn F3 Displays the Dell QuickSet Battery Meter For more information about the Battery Meter see Dell QuickSet Battery Meter Fn F10 Ejects the tray out of the drive if Dell QuickSet is installed For more information about Dell QuickSet see Dell QuickSet Features Fn F8 Displays a list of icons representing all current...

Page 47: ...the touch pad or use your thumb to press the left touch pad button twice arrow key Fn F2 Enables and disables wireless networking and Bluetooth wireless technology Fn Esc Activates a power management mode You can reprogram this keyboard shortcut to activate a different power management mode using the Advanced tab in the Power Options Properties window See Power Management Modes Fn F1 Puts the syst...

Page 48: ... click Printers and Other Hardware and then click Mouse For information about the Control Panel see the Windows Help and Support Center To access the Help and Support Center see Windows Help and Support Center 2 In the Mouse Properties window click the Touch Pad tab to adjust touch pad settings 3 Click OK to save the settings and close the window Back to Contents Page NOTE The scroll zones may not...

Page 49: ...puter Adjusting the Volume To adjust the speaker volume when playing a CD or DVD use the media control buttons on the front of the computer NOTICE Do not press down on the CD or DVD tray when you open or close it Keep the tray closed when you are not using the drive NOTICE Do not move the computer when you are playing CDs or DVDs 1 CD DVD tray NOTE If you use a CD DVD drive that shipped with anoth...

Page 50: ...disable the Volume Meter on the screen When the Volume Meter is enabled adjust the volume with the volume control buttons or by pressing the following key combinations l Press Fn PageUp to increase the volume l Press Fn PageDn to decrease the volume l Press Fn End to mute the volume For more information about QuickSet right click the icon in the taskbar and click Help Adjusting the Picture If an e...

Page 51: ...h you have inserted your source CD or DVD and click the Disc Copy button The computer copies the data from the source CD or DVD to the blank CD or DVD Once you have finished copying the source CD or DVD the CD or DVD that you have created automatically ejects Using Blank CDs and DVDs CD RW drives can write to CD recording media only including high speed CD RW while DVD writable drives can write to...

Page 52: ... accessing and playing digital media such as music and videos l Dell MediaDirect which is an instant on multimedia playback mode for digital media Press the Dell MediaDirect button located on the hinge cover to launch either Dell Media Experience or Dell MediaDirect If the Computer Is On or in Standby Mode If you press the Dell MediaDirect button while the computer is on or in standby mode either ...

Page 53: ...o a TV or audio device it is recommended that you connect video and audio cables to your computer in one of the following combinations l S video and standard audio l Composite video and standard audio 1 Dell MediaDirect button NOTE Video and audio cables for connecting your computer to a TV or other audio device may not be included with your computer Cables and TV digital audio adapter cables are ...

Page 54: ...the S video input connector on your TV 4 Plug the single connector end of the audio cable into the headphone connector on your computer 5 Plug the two RCA connectors on the other end of the audio cable into the audio input connectors on your TV or other audio device 6 Turn on the TV and any audio device that you connected if applicable and then turn on the computer 7 See Enabling the Display Setti...

Page 55: ...he composite video adapter cable 6 Plug the other end of the S PDIF digital audio cable into the audio input connector on your TV or audio device 7 Turn on the TV turn on any audio device that you connected if applicable and then turn on the computer 8 See Enabling the Display Settings for a TV in Microsoft Windows XP to ensure that the computer recognizes and works properly with the TV Composite ...

Page 56: ...dphone connector on the computer 6 Plug the two RCA connectors on the other end of the audio cable in to the audio input connectors on your TV or other audio device 7 Turn on the TV turn on any audio device that you connected if applicable and then turn on the computer 8 See Enabling the Display Settings for a TV in Microsoft Windows XP to ensure that the computer recognizes and works properly wit...

Page 57: ...tor on the composite video adapter 6 Plug the other end of the digital audio cable into the S PDIF input connector on your TV or other audio device 7 Turn on the TV turn on any audio device that you connected if applicable and then turn on the computer 8 See Enabling the Display Settings for a TV in Microsoft Windows XP to ensure that the computer recognizes and works properly with the TV Componen...

Page 58: ...blue colors of the cable match the colors of the TV input connectors 5 Plug the single connector end of the audio cable into the headphone connector on the computer 6 Plug the two RCA connectors on the other end of the audio cable into the audio input connectors on your TV or audio device 7 Turn on the TV turn on any audio device that you connected if applicable and then turn on the computer 8 See...

Page 59: ...the TV Make sure that the red green and blue colors of the cable match the colors of the TV input connectors 5 Plug one end of the S PDIF digital audio cable into the S PDIF audio connector on the component video adapter 6 Plug the other end of the digital audio cable into the S PDIF input connector on your TV or other audio device 7 Turn on the TV turn on any audio device that you connected if ap...

Page 60: ... area 2 Click the Options menu and then click Advanced Controls 3 Click Advanced 4 Click S PDIF Interface 5 Click Close 6 Click OK Setting Up the Cyberlink CL Headphones If your computer has a DVD drive you can enable digital audio for DVD playback 1 Click Start and point to All Programs and click PowerDVD to launch the Cyberlink PowerDVD program 2 Insert a DVD into the DVD drive If the DVD begins...

Page 61: ... or multiple displays ensuring that the display settings are correct for your selection Back to Contents Page NOTE To ensure that the display options appear correctly connect the TV to the computer before you enable the display settings NOTE To determine the type of video card installed in your computer see the Windows Help and Support Center To access the Help and Support Center click Start Help ...

Page 62: ...ff after the operating system shutdown process finishes 2 Ensure that the computer and any attached devices are turned off If your computer and attached devices did not automatically turn off when you shut down your operating system press and hold the power button for at least 8 to 10 seconds until the computer turns off Before Working Inside Your Computer Use the following safety guidelines to he...

Page 63: ...all jack NOTICE To avoid damaging the system board you must remove the battery before you service the computer 1 battery bay latch release 2 battery CAUTION If you remove the hard drive from the computer when the drive is hot do not touch the metal housing of the hard drive CAUTION Before you begin any of the procedures in the section follow the safety instructions in the Product Information Guide...

Page 64: ... You can increase your computer memory by installing memory modules on the system board See Specifications for information on the memory supported by your computer Install only memory modules that are intended for your computer 1 hard drive screws 2 2 hard drive NOTICE When the hard drive is not in the computer store it in protective antistatic packaging See Protecting Against Electrostatic Discha...

Page 65: ...ks into place If you do not feel the click remove the module and reinstall it CAUTION Before you begin any of the procedures in this section follow the safety instructions in the Product Information Guide NOTICE To avoid electrostatic discharge ground yourself by using a wrist grounding strap or by periodically touching an unpainted metal surface such as a connector on the back of the computer NOT...

Page 66: ...dentation and lift the cover to remove it 4 Remove the existing modem a Remove the screw securing the modem to the system board and set it aside b Pull straight up on the attached pull tab to lift the modem out of its connector on the system board and disconnect the modem cable NOTICE If the cover is difficult to close remove the module and reinstall it Forcing the cover to close may damage your c...

Page 67: ...er the cover at the indentation and lift the cover to remove it 1 modem 2 modem pull tab 3 modem cable 4 modem screw 5 modem connector on system board NOTICE The connectors are keyed to ensure correct insertion If you feel resistance check the connectors and realign the card CAUTION Before you begin any of the procedures in this section follow the safety instructions in the Product Information Gui...

Page 68: ...or 5 Install the replacement Mini Card a Align the Mini Card with the connector at a 45 degree angle and press the Mini Card down into the securing clips until the card clicks into place 1 antenna cables 2 2 Mini Card 3 Mini Card connector 1 securing clips 2 Mini Card NOTICE The connectors are keyed to ensure correct insertion If you feel resistance check the connectors and realign the card 1 secu...

Page 69: ...aps into place Keyboard NOTE If your computer has a gray cable connect it to the connector with the gray triangle if one is available on your card CAUTION Before you begin any of the procedures in this section follow the safety instructions in the Product Information Guide NOTICE To avoid electrostatic discharge ground yourself by using a wrist grounding strap or by periodically touching an unpain...

Page 70: ...ell battery compartment and lift the battery NOTICE To avoid damaging the system board you must remove the battery before you begin working inside the computer NOTICE The key caps on the keyboard are fragile easily dislodged and time consuming to replace Be careful when removing and handling the keyboard 1 keyboard 2 keyboard screws 2 3 keyboard cable 4 keyboard connector latch 5 keyboard tabs NOT...

Page 71: ...push it to the side to release the drive from the bay 5 Slide the drive out of the bay To reinstall the optical drive slide the drive into the drive bay and snap it into place Then replace the optical drive security screw Internal Card With Bluetooth Wireless Technology 1 coin cell battery 2 release latch 3 battery cable connector CAUTION Before you begin any of the procedures in this section foll...

Page 72: ...ve it from the computer 5 To replace the card connect the card to the cable and then carefully insert it into the compartment 6 Replace the card cover and tighten the screw 7 Replace the battery Back to Contents Page NOTICE To avoid electrostatic discharge ground yourself by using a wrist grounding strap or by periodically touching an unpainted metal surface such as a connector on the back of the ...

Page 73: ...play l System information Depending on what you want to do in Dell QuickSet you can start it by either clicking double clicking or right clicking the QuickSet icon in the Microsoft Windows taskbar The taskbar is located in the lower right corner of your screen For more information about QuickSet right click the QuickSet icon and select Help Back to Contents Page NOTE This feature may not be availa...

Page 74: ...watching you when you type your password To add or change passwords access User Accounts from the Control Panel If you forget any of your passwords contact Dell see Contacting Dell For your protection Dell technical support staff will ask you for proof of your identity to ensure that only an authorized person can use the computer Computer Tracking Software Computer tracking software may enable you...

Page 75: ... phone number of the law enforcement agency to which you reported the missing computer If possible give the name of the investigating officer The Dell customer service representative will log your report under the computer Service Tag and record the computer as missing or stolen If someone calls Dell for technical assistance and gives your Service Tag the computer is identified automatically as mi...

Page 76: ... Double click the ISP icon on the Microsoft Windows desktop 3 Follow the instructions on the screen to complete the setup If you do not have an ISP icon on your desktop or if you want to set up an Internet connection with a different ISP 1 Save and close any open files and exit any open programs 2 Click the Start button and click Internet Explorer The New Connection Wizard appears 3 Click Connect ...

Page 77: ...the wizard from the Windows XP CD and click Next 6 When the Now go to your old computer screen appears go to your old or source computer Do not click Next at this time Copy Data From the Old Computer 1 On the old computer insert the Windows XP Operating System CD 2 On the Welcome to Microsoft Windows XP screen click Perform additional tasks 3 Under What do you want to do click Transfer files and s...

Page 78: ...th for fastwiz on the appropriate removable media and click OK 4 On the Files and Settings Transfer Wizard welcome screen click Next 5 On the Which computer is this screen click Old Computer and click Next 6 On the Select a transfer method screen click the transfer method you prefer 7 On the What do you want to transfer screen select the items you want to transfer and click Next After the informat...

Page 79: ... connectors fit only one way 3 Turn on the printer and then turn on the computer If the Add New Hardware Wizard window appears click Cancel 4 Install the printer driver if necessary See the documentation that came with your printer Power Protection Devices Several devices are available to protect against power fluctuations and failures l Surge protectors l Line conditioners l Uninterruptible power...

Page 80: ...pproved by Underwriters Laboratories UL Back to Contents Page NOTICE Most surge protectors do not protect against power fluctuations or power interruptions caused by nearby lightning strikes When lightning occurs in your area disconnect the telephone line from the telephone wall jack and disconnect your computer from the electrical outlet NOTICE Not all surge protectors offer network adapter prote...

Page 81: ...essCards It does NOT support PC Cards ExpressCard connector one ExpressCard slot 54 mm 1 5 V and 3 3 V Cards supported ExpressCard 34 34 mm and ExpressCard 54 54 mm ExpressCard connector size 26 pins Memory Memory module connector two user accessible SODIMM connectors Memory module capacities 256 MB 512 MB 1 GB and 2 GB Memory type 1 8 V SODIMM DDR II supports DDR II up to 667 MHz Minimum memory 5...

Page 82: ... determine the configuration of your computer see Determining Your Computer s Configuration Video controller NVIDIA GeForce Go 7900 GS Video type 256 bit hardware accelerated Data bus PCI Express Video memory 256 MB LCD interface LVDS TV support NTSC or PAL in S video component and composite modes Video controller NVIDIA GeForce Go 7900 GTX Video type 256 bit hardware accelerated Data bus PCI Expr...

Page 83: ...ctangle Battery Type 9 cell smart lithium ion Dimensions Depth 88 5 mm 3 48 inches Height 21 5 mm 0 83 inch Width 139 0 mm 5 47 inches Weight 0 40 kg 0 88 lb 9 cell Voltage 10 8 VDC Charge time approximate Computer off 2 hours at 100 in 2 hours 1 hour at 80 in 1 hour Operating time Battery operating time varies depending on operating conditions and can be significantly reduced under certain power ...

Page 84: ...ysical Height 42 4 mm 1 7 inches Width 394 mm 15 5 inches Depth 287 mm 11 3 inches Weight with 9 cell battery and optical drive 3 99 kg 8 8 lb Environmental Temperature range Operating 0 to 35 C 32 to 95 F Storage 40 to 65 C 40 to 149 F Relative humidity Operating 10 to 90 noncondensing Storage 5 to 95 noncondensing Maximum vibration using a random vibration spectrum that simulates user environmen...

Page 85: ... a trademark of Intel Corporation Microsoft Outlook and Windows are registered trademarks of Microsoft Corporation Bluetooth is a registered trademark owned by Bluetooth SIG Inc and is used by Dell under license EMC is a registered trademark of EMC Corporation IBM is a registered trademark of International Business Machines Corporation ENERGY STAR is a registered trademark of the U S Environmental...

Page 86: ...such as extreme temperatures and overexposure to sunlight dirt dust or liquids l Pack the computer so that it does not slide around in the trunk of your car or in an overhead storage compartment Travel Tips l Consider disabling wireless activity on your computer to maximize battery operating time To disable wireless activity press Fn F2 l Consider changing your power management options see Configu...

Page 87: ...g the airplane verify that using a computer is permitted Some airlines forbid the use of electronic devices during flight All airlines forbid the use of electronic devices during takeoff and landing Back to Contents Page ...

Page 88: ...If you experience a problem with your computer perform the checks in Lockups and Software Problems and run the Dell Diagnostics before you contact Dell for technical assistance Start the Dell Diagnostics from either your hard drive or from the Drivers and Utilities CD also known as the ResourceCD Starting the Dell Diagnostics From Your Hard Drive The Dell Diagnostics is located on a hidden diagnos...

Page 89: ...ions are listed select the version appropriate for your computer 7 When the Dell Diagnostics Main Menu appears select the test you want to run Dell Diagnostics Main Menu 1 After the Dell Diagnostics loads and the Main Menu screen appears click the button for the option you want 2 If a problem is encountered during a test a message appears with an error code and a description of the problem Write d...

Page 90: ...ight click the icon to perform the following tasks l Check your computing environment l View the Dell Support Utility settings l Access the help file for the Dell Support Utility l View frequently asked questions l Learn more about the Dell Support Utility l Turn the Dell Support Utility off Double Clicking the Dell Support Icon Double click the icon to manually check your computing environment vi...

Page 91: ... the stream is interrupted an error occurs Try closing all programs before you write to the CD DVD RW Turn off Standby mode in Windows before writing to a CD DVD RW disc See Standby Mode or search for the keyword standby in the Windows Help and Support Center for information on power management modes Change the write speed to a slower rate See the help files for your CD or DVD creation software If...

Page 92: ...line l Verify that the telephone line is connected to the jack on the modem The jack has either a green label or a connector shaped icon next to it l Ensure that you hear a click when you insert the telephone line connector into the modem l Disconnect the telephone line from the modem and connect it to a telephone Listen for a dial tone l If you have other telephone devices sharing the line such a...

Page 93: ...rch for the keyword spyware Error Messages If the message is not listed see the documentation for the operating system or the program that was running when the message appeared Auxiliary device failure The touch pad track stick or external mouse may be faulty For an external mouse check the cable connection Enable the Pointing Device option in the system setup program If the problem persists conta...

Page 94: ...k Drive tests in the Dell Diagnostics See Dell Diagnostics Hard disk drive controller failure 0 The hard drive does not respond to commands from the computer Shut down the computer remove the hard drive see Hard Drive and boot the computer from a CD Then shut down the computer reinstall the hard drive and restart the computer If the problem persists try another drive Run the Hard Disk Drive tests ...

Page 95: ... are attempting to run is conflicting with the operating system another program or a utility Shut down the computer wait 30 seconds and then restart it Try to run the program again If the error message still appears see the software documentation Memory data line failure at address read value expecting value A memory module may be faulty or improperly seated Reinstall the memory modules see Memory...

Page 96: ...t Center for instructions If a large number of sectors are defective back up the data if possible and then reformat the hard drive Seek error The operating system cannot find a specific track on the hard drive Shutdown failure A chip on the system board may be malfunctioning Run the System Set tests in the Dell Diagnostics See Dell Diagnostics Time of day clock lost power System configuration sett...

Page 97: ...E 1394 device is properly inserted into the connector Keyboard Problems External Keyboard Problems Check the keyboard cable Shut down the computer Disconnect the keyboard cable and check it for damage and firmly reconnect the cable If you are using a keyboard extension cable disconnect it and connect the keyboard directly to the computer Check the external keyboard 1 Shut down the computer wait 1 ...

Page 98: ... Unexpected Characters Disable the numeric keypad Press Num Lk to disable the numeric keypad if numbers are displayed instead of letters Verify that the numbers lock light is not lit Lockups and Software Problems The Computer Does Not Start Up Ensure that the AC adapter is firmly connected to the computer and to the electrical outlet The Computer Stops Responding Turn the computer off If you are u...

Page 99: ...f you purchased a DVD drive with your computer this software should already be installed Video Quality problems Turn off the Use Hardware Acceleration option This feature takes advantage of the special processing in some graphics cards to reduce processor requirements when playing DVDs and certain types of video files Cannot play some media files Because Dell MediaDirect provides access to media f...

Page 100: ...ccessfully the error condition is related to a software problem Memory Problems If you receive an insufficient memory message l Save and close any open files and exit any open programs you are not using to see if that resolves the problem l See the software documentation for minimum memory requirements If necessary install additional memory See Memory l Reseat the memory modules to ensure that you...

Page 101: ...l strength is adequate Restart the Dell wireless utility or contact your Mobile Broadband network provider l Check your WWAN service Contact your Mobile Broadband network service provider to verify coverage plan and supported services Activate your Mobile Broadband card Before you connect to the Internet you must activate the Mobile Broadband service through your cellular service provider For inst...

Page 102: ...ll Check the battery temperature If the battery temperature is below 0 C 32 F the computer will not start up Test the electrical outlet Ensure that the electrical outlet is working by testing it with another device such as a lamp Check the AC adapter Check the AC adapter cable connections If the AC adapter has a light ensure that the light is on Connect the computer directly to an electrical outle...

Page 103: ... See the printer documentation for cable connection information l Ensure that the printer cables are securely connected to the printer and the computer Test the electrical outlet Ensure that the electrical outlet is working by testing it with another device such as a lamp Verify that the printer is recognized by Windows 1 Click the Start button click Control Panel and then click Printers and Other...

Page 104: ...egrated Speakers Adjust the Windows volume control Double click the speaker icon in the lower right corner of your screen Ensure that the volume is turned up and that the sound is not muted Adjust the volume bass or treble controls to eliminate distortion Adjust the volume using keyboard shortcuts Press Fn End to disable mute or reenable the integrated speakers Reinstall the sound audio driver See...

Page 105: ...r icon in the lower right corner of your screen Ensure that the volume is turned up and that the sound is not muted Touch Pad or Mouse Problems Check the touch pad settings 1 Click the Start button click Control Panel and then click Printers and Other Hardware 2 Click Mouse 3 Try adjusting the settings Check the mouse cable Shut down the computer Disconnect the mouse cable check it for damage and ...

Page 106: ... Adjust the power properties Search for the keyword standby in the Windows Help and Support Center Switch the video image If your computer is attached to an external monitor press Fn F8 to switch the video image to the display If the Display Is Difficult to Read Adjust the brightness Press Fn and the up or down arrow key Move the external subwoofer away from the computer or monitor If your externa...

Page 107: ... A driver acts like a translator between the device and any other programs that use the device Each device has its own set of specialized commands that only its driver recognizes Dell ships your computer to you with required drivers already installed no further installation or configuration is needed Many drivers such as the keyboard driver come with your Microsoft Windows operating system You may...

Page 108: ...at you run the CD it might prompt you to install setup files Click OK and follow the instructions on the screen to continue 3 From the Language drop down menu in the toolbar select your preferred language for the driver or utility if available A welcome screen appears 4 Click Next The CD automatically scans your hardware to detect drivers and utilities used by your computer 5 After the CD complete...

Page 109: ...ring Your Operating System You can restore your operating system in the following ways l Microsoft Windows XP System Restore returns your computer to an earlier operating state without affecting data files Use System Restore as the first solution for restoring your operating system and preserving data files For instructions see Using Microsoft Windows XP System Restore l If you received an Operati...

Page 110: ...ast System Restore 1 Click the Start button point to Programs Accessories System Tools and then click System Restore 2 Click Undo my last restoration and click Next Enabling System Restore If you reinstall Windows XP with less than 200 MB of free hard disk space available System Restore is automatically disabled To see if System Restore is enabled 1 Click the Start button and click Control Panel 2...

Page 111: ... the instructions on the screen to complete the reinstallation 9 When the operating system reinstallation completes reinstall drivers and application programs as necessary See Reinstalling Drivers and Utilities Back to Contents Page NOTE The Drivers and Utilities CD contains drivers that were installed during assembly of the computer Use the Drivers and Utilities CD to load any required drivers De...

Page 112: ... a network wall connector Network Setup Wizard The Microsoft Windows XP operating system provides a Network Setup Wizard to guide you through the process of sharing files printers or an Internet connection between computers in a home or small office 1 Click the Start button point to All Programs Accessories Communications and then click Network Setup Wizard 2 On the welcome screen click Next 3 Cli...

Page 113: ...etwork card If Wireless Network Connection appears you have a wireless network card To view detailed information about the wireless network card 1 Right click Wireless Network Connection 2 Click Properties The Wireless Network Connection Properties window appears The wireless network card s name and model number are listed on the General tab Order Confirmation for Your Computer The order confirmat...

Page 114: ...cting to a network The software is already installed Determining the Wireless Network Device Manager Depending on the software installed on your computer different wireless configuration utilities may manage your network devices l Your wireless network card s client utility l The Windows XP operating system To determine which wireless configuration utility is managing your wireless network card 1 ...

Page 115: ...d how to access the Dell QuickSet Help file see Dell QuickSet Features Mobile Broadband or Wireless Wide Area Network Much like a WLAN a Mobile Broadband network also known as a WWAN is a series of interconnected computers that communicate with each other through wireless technology However a Mobile Broadband network uses cellular technology and therefore provides Internet access in the same varie...

Page 116: ... connection with the utility OR 1 Click the Start button point to All Programs Dell Wireless 2 Click Dell Wireless Broadband and follow the instructions on the screen Internet Connection Firewall The Internet Connection Firewall provides basic protection from unauthorized access to the computer while the computer is connected to the Internet The firewall is automatically enabled when you run the N...

Reviews: