background image

Using Your XPS 10 Tablet


|

    27

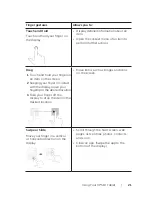
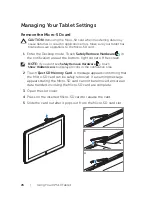
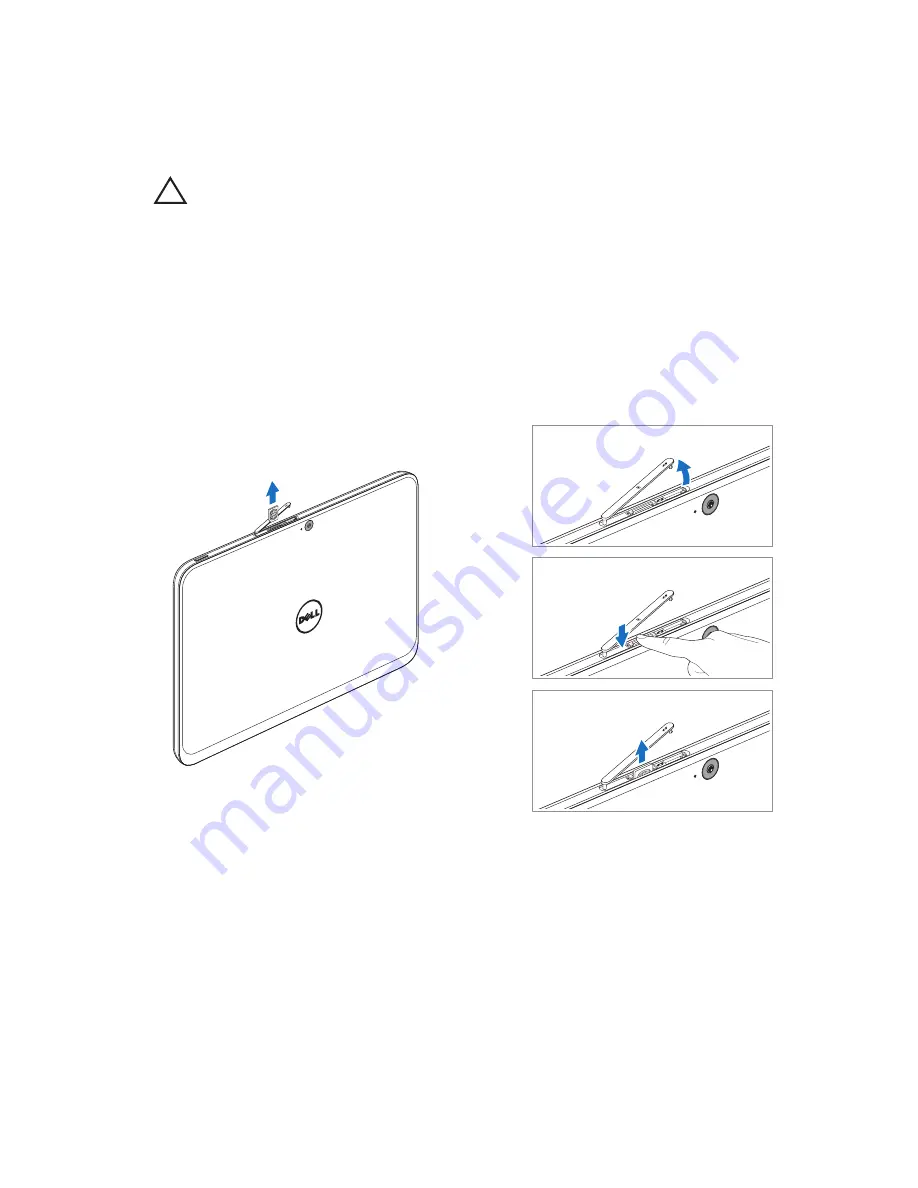
Remove the Micro-SIM card

CAUTION: 

Removing the Micro-SIM card when the tablet is on may 

cause data loss or damage the card. Make sure your tablet is turned off 
or the network connections are disabled.

Turn off your tablet. For more information on turning off your 

tablet, see 

Turning Off Your Tablet

.

Open the slot cover.

Press on the inserted Micro-SIM card to release the card.

Slide the card out after it pops out from the Micro-SIM card slot.

2

3

4

Summary of Contents for XPS10

Page 1: ...XPS 10 Tablet User s Manual ...

Page 2: ...ted which may be registered in certain jurisdictions Microsoft Windows Excel Powerpoint and Internet Explorer are either trademarks or registered trademarks of Microsoft Corporation in the United States and or other countries Bluetooth is a registered trademark owned by Bluetooth SIG Inc and is used by Dell under license April 2013 Rev A00 Federal Communications Commission FCC Statement This table...

Page 3: ... from liquid intrusion Do not use damaged equipment including exposed frayed or damaged power cords Do not push any objects into the air vents or openings of your equipment Doing so can cause fire or electric shock by shorting out interior components Do not allow your tablet or adapter to operate with the base resting directly on exposed skin for extended periods of time The surface temperature of...

Page 4: ...ell ENERGY STAR power management features save energy by allowing computers to enter a very low power sleep mode when not in use for a specified period of time These power management features are activated on all ENERGY STAR qualified computers The power management features are preset to allow the tablet and screen to power down sleep after the following periods of inactivity The tablet and screen...

Page 5: ...blet Ready for Use 13 Charging the tablet 14 Turning On Your Tablet 16 Turning Off Your Tablet 17 Turning Off the Screen 17 Inserting a Micro SD card 18 Inserting a Micro SIM card 19 Using Your XPS 10 Tablet 4 20 Screen Orientation 20 Gestures 20 The Windows RT Start Screen 23 Using Headphones 25 Managing Your Tablet Settings 26 ...

Page 6: ...atures 34 Docking Your Tablet to the Keyboard Dock 36 Undocking Your Tablet from the Keyboard Dock 38 Charging the tablet and dock 39 Cleaning Your Tablet 7 42 Troubleshooting 8 43 Contacting Dell 9 47 Locating Your Service Tag and 10 Express Service Code 48 Specifications 11 49 Glossary 12 51 Index 13 55 ...

Page 7: ... 23 4 6 5 9 8 7 Feature Functionality Ambient light sensor 1 Automatically adjusts the brightness of the display s backlight based on surrounding light levels Camera status light 2 Indicates the camera activity Front facing camera 3 Capture a front view picture or record videos Make video calls with web applications such as Skype ...

Page 8: ...e touchscreen display on or off Battery status light 8 Indicates the battery charge status Touchscreen display 9 Touch the display to use on screen controls including buttons menu items and the on screen keyboard 10Windows button Press to open the Windows Start screen Press for quick access to the most recently used application or most recently viewed screen NOTE The default resolution of the fron...

Page 9: ...crease the volume Volume down button 3 Press to decrease volume by one level Press and hold to continuously decrease the volume Speaker 4 Provides audio output for video and music playback Removable docking port cover 5 Protects the docking port Remove the cover to connect a Dell mobile keyboard dock sold separately Power adapter docking port 6 Connect the supplied power adapter to provide power t...

Page 10: ...synchronizing data music photos videos contacts and so on Connect USB cable to trickle charge the battery Capable of providing up to 1 amp power Removable docking port cover 8 Protects the docking port Remove the cover to connect a Dell mobile keyboard dock sold separately Speaker 9 Provides audio output for video and music playback ...

Page 11: ...tion of the rear camera is approximately 0 9 MP 16 9 If you change the camera resolution the setting will be remembered by Windows NOTE The rear camera supports continuous auto focus but does not support zoom face tracking or touch to focus Auto focus may be disabled by default but can be enabled in camera settings ...

Page 12: ...cro USB to standard USB conversion cable Provides connection between your tablet and USB devices NOTE This conversion cable is not compatible with high power USB devices like hard drives or CD ROMs Mini HDMI to HDMI cable Provides connection between your tablet and devices supporting audio video signals in HDMI format NOTE The Mini HDMI to HDMI cable is shipped with XPS 10 mobile keyboard dock sol...

Page 13: ...use WARNING Before you begin any of the procedures in this section read the safety information that shipped with your tablet For additional best practices information see www dell com regulatory_compliance Getting Your Tablet Ready for Use Connect the AC power adapter and power cable Connect the supplied power cable into the supplied power 1 adapter ...

Page 14: ...ur tablet NOTE The battery is not fully charged when you unpack your tablet Connect the power adapter to the 40 pin power adapter port on 1 the tablet Connect the power adapter to an electrical outlet and charge the 2 tablet until the battery is fully charged NOTE The tablet battery requires about 4 hours to fully charge NOTE You can also trickle charge the tablet via USB connection The battery re...

Page 15: ...ing but does not yet have enough charge to power up If the power button is pressed during this state the LED will be momentarily off Continue to trickle charge or attach the AC adapter to power up immediately NOTE You can check exact battery charge level by booting to the operating system Battery icon displayed on the screen Battery icon Description Battery is fully charged Battery is charging wit...

Page 16: ...lock screen image is displayed swipe your finger from the bottom of the display to switch to the login screen and then enter password to log in to Windows The tablet is ready for use when the Windows Start screen is displayed NOTE If the login screen is not enabled in Windows RT you will be taken directly from the lock screen to the Start screen NOTE The lock screen is only displayed when returnin...

Page 17: ... 1 Touch 2 Settings Power Shut down to turn off the tablet Turning Off the Screen Using power button Press the Power and Sleep Wake button to turn off the screen Using Charms Swipe from the right edge of the display to access Charms 1 Touch 2 Settings Power Sleep to turn off the screen NOTE If your tablet is in a sleep state tablet is on but screen is off press the Power and Sleep Wake button or W...

Page 18: ...serting a Micro SD card 1 2 3 Open the slot cover 1 Follow the illustration to insert the Micro SD card into the 2 Micro SD card slot Close the slot cover 3 For more information on removing the Micro SD card see Remove the Micro SD card ...

Page 19: ...the Micro SIM card into the 2 Micro SIM card slot Close the slot cover 3 CAUTION Inserting an incompatible SIM card such as a Nano SIM card into the Micro SIM card slot may damage the card or the tablet and may corrupt data stored on the card For more information on removing the Micro SIM card see Remove the Micro SIM card ...

Page 20: ... screen orientation Swipe from the right edge of the display to access Charms 1 Touch 2 Settings Screen Touch 3 toggle to lock the screen orientation or touch toggle to unlock the screen orientation Gestures Your tablet has a multi touch display You can touch the screen to operate the tablet Finger gestures Allows you to Touch Tap gently on the display with your fingertip Select items on the scree...

Page 21: ...tem on the screen Keeping your finger in contact 2 with the display move your fingertip to the desired location Take your finger off the 3 display to drop the item in the desired location Move items such as images and icons on the screen Swipe or Slide Move your finger in a vertical or horizontal direction on the display Scroll through the Start screen web pages lists entries photos contacts and s...

Page 22: ... fingers apart Enlarge the view of an image or web page Zoom out Touch the display with two fingers and then move the fingers closer Reduce the view of an image or web page Rotate Touch the display with two or more fingers and then move the fingers in a clockwise or counter clockwise arc Rotate an object by 90 degrees ...

Page 23: ...s you direct access to your most recently used applications Emails photos music videos contacts Facebook Twitter updates and frequently viewed websites You can pin desired or favorite apps as Live Tiles to customize the Start screen You also can personalize the Start screen by setting your favorite picture as the wallpaper NOTE Live Tiles can be added or removed by using Pin or Unpin options How t...

Page 24: ...same as Windows button Swipe right Swiping in quickly from the left edge of the display switches the currently running apps Swiping slowly from the left edge to the right edge of the display reveals thumbnails of the open apps Swiping in and out on the left edge of the display brings up a list of the most recently used applications Swipe up down Swiping in from the bottom or top edge of the displa...

Page 25: ...rphones in your ears and adjust the volume level to a 2 comfortable level NOTE When you connect an audio device to the 3 5 mm audio jack the integrated speakers on your tablet are muted automatically CAUTION To prevent damage to the headphones when disconnecting it from the tablet pull the connector and not the cable NOTE It is recommended that turn down the volume level before plugging the headph...

Page 26: ...t the bottom right corner of the screen NOTE If you don t see Safely Remove Hardware touch Show Hidden Icons to display all icons in the notification area Touch 2 Eject SD Memory Card A message appears confirming that the Micro SD card can be safely removed If a warning message appears stating the Micro SD card cannot be removed ensure all data transfers involving the Micro SD card are complete Op...

Page 27: ...ge the card Make sure your tablet is turned off or the network connections are disabled Turn off your tablet For more information on turning off your 1 tablet see Turning Off Your Tablet Open the slot cover 2 Press on the inserted Micro SIM card to release the card 3 Slide the card out after it pops out from the Micro SIM card slot 4 2 3 4 ...

Page 28: ...urn Wi Fi on or off Connecting to a network Swipe from the right edge of the display to access Charms 1 Touch 2 Settings Available Select an available network Connect Mobile broadband setting Turning On Off mobile broadband Swipe from the right edge of the display to access Charms 1 Touch 2 Settings Change PC settings Wireless Swipe 3 Mobile broadband icon left or right to turn mobile broadband on...

Page 29: ... will be shown once the mobile 4 broadband network is enabled NOTE You can choose the option Connect automatically to connect the mobile broadband automatically NOTE Your tablet will automatically prioritize Wi Fi networks over mobile broadband networks when both are available If your tablet is connected to the mobile broadband and one of saved Wi Fi connections comes within range it will disconne...

Page 30: ...ated data usage to show or hide your data usage Touch o o Set as metered connection Non metered connection to set a particular connection as a metered non metered connection Touch o o View connection properties to view your connected mobile broadband properties NOTE If the option Set as metered connection is enabled Windows Update will not download updates automatically unless it is a high priorit...

Page 31: ...ier to get a Personal Unblocking Key PUK to unlock the SIM card NOTE Before you contact your carrier have your IMEI number ready For more information on checking your IMEI number of the SIM card see AT T hardware information Refresh your tablet Refreshing your tablet will restore the system to original factory settings without deleting any of your personal files installed apps from Windows Store o...

Page 32: ...on music pictures files and so on Ensure that you back up all the required data before you proceed Recover your tablet If your tablet will not boot into Windows RT you may need to perform recovery procedures Turn off your tablet For more information on turning off your 1 tablet see Turning Off Your Tablet Press and hold the 2 Volume up button and then press the Power and Sleep Wake button to turn ...

Page 33: ...s NOTE You need a wireless connection for both your computer and tablet Go to Charms then click 1 Settings PC Settings Users Switch to a Microsoft account to switch your computer local account to your Microsoft account An new option will be added to 2 PC Settings called Sync your settings Click 3 Settings PC Settings More PC Settings Sync your settings to show all kind of toggles for synchronizing...

Page 34: ...Connect a Dell tablet Tablet release latch 2 Release the tablet from the keyboard dock Docking connector 3 Connect the power adapter docking port on the tablet Docking latch 4 Connect a Dell tablet USB 2 0 port 5 Connect USB devices such as flash memory Mini HDMI port 6 Connect devices supporting audio video signals in HDMI format Touchpad and 7 touchpad buttons Allows you to move the mouse pointe...

Page 35: ...d screen Caps lock light 9 Indicates that caps lock is active Battery charge light 10 Indicates the battery charge status Power adapter port 11 Connect the supplied power adapter to provide power to the tablet and dock and charge the battery USB 2 0 port 12 Connect USB devices such as flash memory NOTE The keyboard dock is sold separately and is not shipped with the tablet Regulatory model K05M ...

Page 36: ...port covers from the tablet 1 Align the power adapter docking port on the tablet with the 40 pin 2 docking connector on the keyboard dock Or center the Windows button to the painted line on the front of the hinge holder NOTE The hinge holder can be rotated manually to a better position for easy docking ...

Page 37: ...n 3 the tablet is correctly connected the tablet release latch on the dock will move to the Locked position NOTE When the connection is made you need to manually turn the on screen keyboard off if it is displayed on the screen NOTE You can reinstall the docking port covers when the tablet is not docked ...

Page 38: ...t from the Keyboard Dock Slide and hold the tablet release latch to the 1 Unlock position Lift the tablet from the keyboard dock 2 2 1 1 2 NOTE The release latch will automatically move to the Locked position once the tablet is removed from the keyboard dock ...

Page 39: ...r cables may cause severe damage to your tablet and dock Connect the power adapter to the 40 pin power adapter port on 1 your keyboard dock Connect the power adapter to an electrical outlet and charge the 2 tablet and dock until the battery is fully charged NOTE The dock battery requires about 4 hours to fully charge For more information on the tablet battery charging time see Charging the tablet ...

Page 40: ...ge light located on the left side of the keyboard dock LED behavior Description Solid white color on Battery is charging with AC Off Battery is not charging either no AC is connected or battery is fully charged For more information on checking the tablet battery status see tablet battery charge status ...

Page 41: ...but the dock has battery capacity Tablet functions are supported by the dock battery Tablet will use the last 5 of its own battery after the dock battery runs out Dock uses its own battery to support the dock functions e g speakers USB and HDMI etc Power adapter is not 4 connected The tablet has battery capacity but the dock has NO battery capacity Tablet uses its own battery to support the tablet...

Page 42: ... installed Micro SD and Micro SIM card For more 3 information on removing the Micro SD card and Micro SIM card see Remove the Micro SD card and Remove the Micro SIM card Moisten a soft lint free cloth with either water or a display 4 cleaner and wipe the surface of the tablet until it is clean Do not allow water from the cloth to seep down to the tablet ports and the surrounding Windows button NOT...

Page 43: ... is below 0 C or higher than 35 C Charge the battery in an ambient temperature between 0 C to 35 C The battery or power adapter is damaged Contact a Dell authorized reseller to replace the battery or power adapter Battery drains quickly even when the tablet is in Standby mode If the tablet is not in the range of a network it can connect to the tablet continues to send out signals to locate a base ...

Page 44: ...tton for 11 seconds to perform a hard shut down Tablet is not responding or behaving unexpectedly Reboot the tablet 1 See Turning Off Your Tablet and Turning On Your Tablet Refresh the tablet See 2 Reset your tablet Contact Dell s 3 support service Go to support dell com or dell com ContactDell Tablet cannot boot into Windows Boot from Windows recovery See Recover your tablet Software or feature i...

Page 45: ...less connection Check if the wireless 1 radio is on See Wi Fi setting Try to get closer to the 2 wireless access point Reset the wireless 3 router if using a private network open the browser to view the landing page if using a public network No mobile broadband connection Check if the mobile 1 broadband is on See Turning On Off mobile broadband Move your tablet to 2 a different location for better...

Page 46: ...i 2 Slow Internet connections The signal strength is not strong enough Move your tablet to a different location for better signal reception Slow mobile broadband connections The tablet may not connect to LTE or HSPA 4G but connects to HSDPA 3G Move your tablet back to a location where you previously connected to a 4G network Mobile broadband does not auto connect Mobile broadband option Connect au...

Page 47: ...talog Dell provides several online and telephone based support and service options Availability varies by country and product and some services may not be available in your area To contact Dell for sales technical support or customer service issues Go to 1 dell com ContactDell Select your country or region 2 Select the appropriate service or support link based on your 3 requirement Choose the meth...

Page 48: ... your tablet you may contact DELL for additional technical assistance NOTE Before you call have your Express Service Code ready The code helps Dell s automated support telephone system direct your call more efficiently You may also be asked for your Service Tag The Service Tag and Express Service Code for your tablet can be found on a label at the bottom right of the tablet back cover ...

Page 49: ...y maximum Operating 10 to 90 noncondensing Non operating 5 to 95 noncondensing Maximum vibration using a random vibration spectrum that simulates user environment Operating 20 GRMS 0 66 GRMS tablet dock Non operating 1 30 GRMS Maximum shock Operating 60 G 140 G tablet dock Non operating 120 G 163 G tablet dock Altitude maximum unpressurized Operating 15 2 to 3048 m 50 to 10 000 ft Storage 15 2 to ...

Page 50: ...nectors Audio One microphone stereo headphone speakers port Micro SD card One micro SD card slot Micro SIM card One micro SIM card slot Dock One 40 pin power adapter docking port USB One micro USB port AC Adapter Input voltage 100 240 VAC Input current maximum 1 0 A Input frequency 50 60 Hz Output power 30 W Output current 1 54A 1 58A Rated output voltage 19 5 VDC 19 VDC Temperature range Operatin...

Page 51: ...ture that helps to control the display brightness C Charms a Microsoft Windows 8 Windows RT term for the icons that appear when you swipe from the right edge of the display It provides quick access to the commonly system commands including search share Start devices and settings options D Device Hardware such as a disk drive printer or keyboard that is installed in or connected to your tablet E Em...

Page 52: ...vides the docking feature to adapt your tablet to a laptop workspace M Micro SD micro Secure Digital a smaller size of SD which is a removable flash memory card used for storing information in portable devices such as mobile phones digital cameras and tablet computers The standard size of SD is 32 x 24 x 2 1 mm and Micro SD is 15 x 11 x 1 mm Micro SIM micro Subscriber Identity Module a micro sized...

Page 53: ...ck access to frequently used programs files folders and drives When you place a shortcut on your Windows Start screen the home screen of Windows RT is made up of Live Tiles and touch the tile you can open its corresponding folder or file without having to find it first Shortcut tiles do not change the location of files Sleep mode A power management mode that shuts down all unnecessary computer ope...

Page 54: ...background pattern or picture on the Windows desktop Wi Fi A technology as a synonym for WLAN wireless local area network connects to the Internet when within range of a wireless network WXGA wide aspect extended graphics array A video standard for video cards and controllers that supports resolutions up to 1280 x 800 ...

Page 55: ...e up down 9 Windows 8 C Charging Keyboard dock 39 Tablet 14 Charms 24 Connection Mobile broadband 29 Wi Fi 28 G Gestures Drag 21 Rotate 22 Swipe or Slide 21 Touch 20 Touch and Hold 21 Zoom in 22 Zoom out 22 K Keyboard Dock Charge 39 Docking tablet 36 Overview 34 Undocking tablet 38 L Lock screen 16 Login screen 16 M Micro SD card Insert 18 Remove 26 Micro SIM card Insert 19 Remove 27 Mobile broadb...

Page 56: ...tag Locating 48 Start icon Function 24 Synchronize with computer 33 T Tablet Charge 14 Overview 7 Refresh 31 Reset 32 Setting 13 Turn off 17 Turn on 16 Touchscreen Display Orientation 20 Turn off on 17 Troubleshooting Battery 43 Network 45 System 44 Touchscreen 45 W Wi Fi setting 28 Windows button Function 8 Location 7 Windows Start screen 23 ...

Reviews: