background image

Site preparations

The Z9100–ON is suitable for installation as part of a common bond network (CBN).
You can install the system in:

Network telecommunication facilities

Data centers

Other locations where the National Electric Code (NEC) applies

For more information about Z9100–ON specifications, see 

Specifications

.

NOTE: 

Install the Z9100–ON system into a rack or cabinet before installing the components.


Topics:

Site selection

Cabinet placement

Rack mounting

Z9100–ON ground

Fans and airflow

Power

Storing components

Site selection

Install Dell equipment in restricted access areas.

A restricted access area is one in which service personnel can only gain access using a special tool, lock, key or other means of security and 
access is controlled by the authority responsible for the location.
Ensure that the area where you install your Z9100–ON system meets the following safety requirements:

Near an adequate power source. Connect the system to the appropriate branch circuit protection as defined by your local electrical 

codes.

Environmental—switch location—temperature range is from 32° to 113°F (from 0° to 45°C).

Ambient—switch operating—temperature range is from 10° to 35°C (from 50° to 95°F).

Relative humidity is from 5 to 85 percent noncondensing.

In a dry, clean, well-ventilated and temperature-controlled room, away from heat sources such as hot air vents or direct sunlight.

Away from sources of severe electromagnetic noise.

Positioned in a rack or cabinet, or on a desktop with adequate space in the front, back, and sides for proper ventilation and access.

Cabinet placement

Install the Z9100–ON only in indoor cabinets designed for use in a controlled environment.

Do not install the Z9100–ON in outside cabinets. For cabinet placement requirements, see 

Site Selection

.

3

Site preparations

13
Summary of Contents for Z9100-ON

Page 1: ...Dell Z9100 Open Networking ON Installation Guide January 2017 ...

Page 2: ...e to hardware or loss of data and tells you how to avoid the problem WARNING A WARNING indicates a potential for property damage personal injury or death Copyright 2017 Dell Inc or its subsidiaries All rights reserved Dell EMC and other trademarks are trademarks of Dell Inc or its subsidiaries Other trademarks may be trademarks of their respective owners 2017 01 Rev A02 ...

Page 3: ...binations 14 Power 14 Storing components 14 4 NEBS compliance 16 Important information 16 NEBS compliant ground installation 16 5 Z9100 ON installation 19 Unpack the Z9100 ON 19 Rack or cabinet hardware installation 19 Rack mount safety considerations 20 ReadyRails installation 20 Two post flush mount configuration 21 Two post center mount configuration 21 Four post threaded configuration 22 Z9100...

Page 4: ...Example of the Grub bootloaderExample of ONIE 36 System check 37 9 Dell support 38 10 Specifications 40 Chassis physical design 40 IEEE standards 41 Agency compliance 42 USA Federal Communications Commission FCC statement 42 European Union EMC Directive Conformance statement 42 Japan VCCI Compliance for Class A Equipment 43 Korean certification of compliance 43 Safety Standards and Compliance Agen...

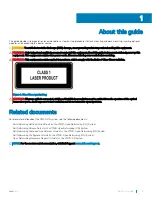
Page 5: ...adiation Figure 1 Class 1 laser product tag WARNING When no cable is connected visible and invisible laser radiation may be emitted from the aperture of the optical transceiver ports Avoid exposure to laser radiation and do not stare into open apertures Related documents For more information about the Z9100 ON system see the following documents Dell Networking Getting Started Guide for the Z9100 O...

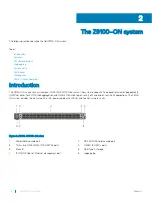
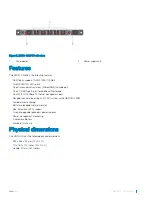
Page 6: ... quad form factor pluggable 28 QSFP28 optics for 40 100 GbE aggregation and 10 25 40 50 GbE top of rack ToR and end of row EoR applications The Z9100 ON system includes two hot swap AC or DC power supply units PSUs and five hot swap fan units Figure 2 Z9100 ON I O side view 1 MicroUSB B console port 2 RS 232 RJ45 serial console port 3 Thirty two 10 25 40 50 100 QSFP28 ports 4 1000M 10G SFP ports 5...

Page 7: ... One 10 100 1000BaseT Ethernet management port Rangeley central processing unit CPU system with 8GB DDR III RAM Temperature monitoring Software readable thermal monitor Real time clock RTC support Two hot pluggable redundant power supplies Power management monitoring Five removable fans Standard 1U chassis Physical dimensions The Z9100 ON has the following physical dimensions 434 x 462 x 44 mm W x...

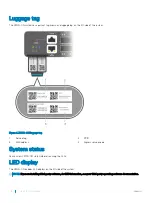
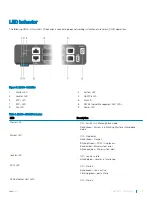
Page 8: ...ice tag 2 PPID 3 MAC address 4 Express service code System status You can view Z9100 ON status information using the LEDs LED display The Z9100 ON includes LED displays on the I O side of the system NOTE If you are installing third party software for LED information see your third party operating software documentation 8 The Z9100 ON system ...

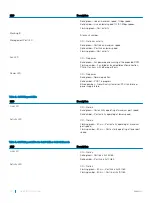
Page 9: ...able 1 Z9100 ON LED behavior LED Description Master LED Off Switch is in Stacking Slave mode Solid Green System is in Stacking Master or Standalone mode System LED Off No power Solid Green Normal Blinking Green POST is in process Solid amber Major system error Blinking amber Minor system alert Locator LED Off Locator is idle Blinking blue Locator is functioning SFP LED Off No link Solid green Link...

Page 10: ...l operation Solid amber POST in progress Blinking amber Noncritical system error PSU fan failure or power supply failure Table 2 QSFP28 port LEDs LED Description Link LED Off No link Solid green Port activity operating at maximum port speed Solid amber Port activity operating at lower speed Activity LED Off No link Flashing green 30 ms Port activity operating at maximum port speed Flashing amber 3...

Page 11: ...to each of the chassis AC or DC power supplies ReadyRail mounting brackets for rack installation included Screws for rack installation 1 and 2 Phillips screw drivers not included Ground cable screws for L bracket included Copper and fiber cables Other optional components are Ground cable screw M3 or M4 depending on your system Extra mounting brackets Z9100 ON configurations You can order the Z9100...

Page 12: ...U side to the I O side reverse airflow AC or DC power supply with airflow from the I O side to the PSU side normal airflow AC or DC power supply with airflow from the PSU side to the I O side reverse airflow 12 The Z9100 ON system ...

Page 13: ...re that the area where you install your Z9100 ON system meets the following safety requirements Near an adequate power source Connect the system to the appropriate branch circuit protection as defined by your local electrical codes Environmental switch location temperature range is from 32 to 113 F from 0 to 45 C Ambient switch operating temperature range is from 10 to 35 C from 50 to 95 F Relativ...

Page 14: ... suitable to support your site s ventilation Use a single type of airflow fan in your system Do not mix reverse and normal air flows in a single Z9100 ON chassis For proper ventilation position the Z9100 ON in an equipment rack or cabinet with a minimum of 5 inches 12 7 cm of clearance around the exhaust vents Power To connect the chassis to the applicable power source use the appropriate power co...

Page 15: ...are mishandled Always wear an ESD preventive wrist or heel ground strap when handling the Z9100 ON and its accessories After you remove the original packaging place the Z9100 ON and its components on an anti static surface Site preparations 15 ...

Page 16: ...ined personnel are allowed access Install and connect your system to the common bonding network CBN You can also install and connect your system to the central office Connect the battery returns of your system as DC I Ground your system using a copper ground conductor Clean and coat all bare grounding connection points on your system with an antioxidant solution before making connections Bring all...

Page 17: ...ve the bracket assembly from the shipping bag 3 Clean the bracket and lug surfaces thoroughly and apply an anti oxidant solution to the mating surfaces 4 Using the two removed screws attach the GND lug bracket assembly to your chassis as shown Torque the M3 screws to 4 5 in lbs Figure 7 Attach the GND lug assembly NEBS compliance 17 ...

Page 18: ...Figure 8 GND lug assembly attached 5 Install your chassis into your rack using the Z9100 ON Installation instructions 6 Attach the chassis ground using the Ground cable instructions 18 NEBS compliance ...

Page 19: ...OTE Before unpacking the system inspect the container and immediately report any evidence of damage When unpacking the Z9100 ON switch make sure that the following items are included One Z9100 ON switch One RJ 45 to DB 9 female cable Two sets of rail kits no tools required Two PSUs Five fan units Two country and region specific AC or DC power cords Dell Networking Getting Started Guide for the Z91...

Page 20: ...e 45 C maximum ambient temperature of the switch Reduced air flow Install the equipment in the rack so that the amount of airflow required for safe operation of the equipment is not compromised Reliable earthing Maintain reliable earthing of rack mounted equipment Pay particular attention to the supply connections other than the direct connections to the branch circuit for example use of power str...

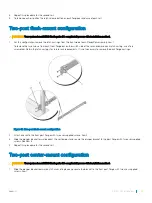
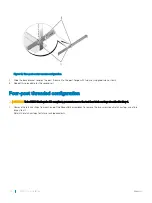
Page 21: ...atch castings for future rack requirements It is not necessary to remove the back flange castings Figure 10 Two post flush mount configuration 2 Attach one rail to the front post flange with two user supplied screws item 2 3 Slide the plunger bracket forward against the vertical post and secure the plunger bracket to the post flange with two user supplied screws See item 3 4 Repeat this procedure ...

Page 22: ...for the second rail Four post threaded configuration CAUTION To be NEBS Earthquake Z4 compliant you must remove the tool less latch castings described in Step 1 1 Remove the latch castings from each end of the ReadyRails assemblies To remove the two screws each latch casting use a Torx driver item 1 Retain the latch castings for future rack requirements 22 Z9100 ON installation ...

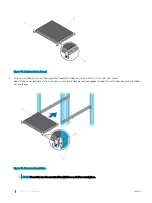
Page 23: ...and center configurations The following is an example of a front rack configuration For the 1U two post flush and center configurations slide the system into the rails in the same manner as the four post configurations 1U front rack installation Configure the rails that are attached to the system 1 Attach the inner chassis member switch rails to the Z9100 ON system Item 3 shows the detail for the ...

Page 24: ... until it is flush with front of rack About three inches before you fully insert your system the rail locking feature engages to keep the switch from inadvertently sliding out and falling Figure 14 Front rack installation NOTE Do not the use the mounted ReadyRails as a shelf or a workplace 24 Z9100 ON installation ...

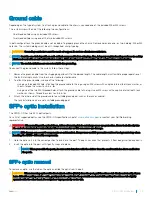
Page 25: ...und cable to the lug Use an M4 screw with a captive internal tooth lock washer as shown Torque the screw to 5 6 in lbs 3 Attach the other end of the ground cable to a suitable ground point such as the rack or cabinet The rack installation ears are not a suitable grounding point SFP optic installation The Z9100 ON has two SFP optical ports For a list of supported optics see the Z9100 ON specificati...

Page 26: ... the system Supply power to the Z9100 ON after it is mounted in a rack or cabinet Dell recommends re inspecting your system before powering it up Verify the following The equipment is properly secured to the rack and properly grounded recommended The equipment rack is properly mounted and grounded recommended The ambient temperature around the unit which may be higher than the room temperature is ...

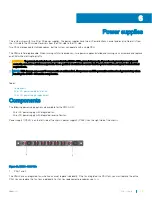
Page 27: ...hat the power cables meet your local electrical requirements NOTE ESD damage can occur if components are mishandled Always wear an ESD preventive wrist or heel ground strap when handling the Z9100 ON and its components Topics Components AC or DC power supply installation AC or DC power supply replacement Components The following power supply options are available for the Z9100 ON AC or DC power su...

Page 28: ...he power connector is on the right side of the PSU 1 Remove the PSU blank from the Z9100 ON 2 Remove the PSU from the electro static bag 3 Insert the PSU into the switch PSU slot Insert the PSU exposed PCB edge connector first The PSU slot is keyed so that you can only fully insert the PSU in one orientation When you install the PSU correctly it snaps into place and is flushed with the back of the...

Page 29: ...d 1 Ground nut 2 Washer 3 Lock washer 4 Ground cable 5 Device grounding rod To connect a DC PSU to the site s DC power source follow these steps 1 Strip 1 2 inches of insulation from each of the power connector s wires RTN and 48V as shown 2 Insert each of the power connector s bare wire lengths into the wiring block Insert RTN into one hole and 48V into the other hole as shown Power supplies 29 ...

Page 30: ...the power connector s clamps After engaging the orange tab pull the power connector from the DC PSU socket AC or DC power supply replacement CAUTION Disconnect the power cord before removing the power supplies Also disconnect all power cords before servicing NOTE The PSU slides into the slot smoothly Do not force a PSU into a slot as this action may damage the PSU or the Z9100 ON chassis NOTE If a...

Page 31: ...PSU Reversed airflow is from the PSU to the I O panel Environmental factors can decrease the amount of time required between fan replacements Check the environmental factors regularly An increase in temperature and particulate matter in the air might affect performance for example new equipment installation CAUTION Check the fans at six month intervals and replace them as necessary Regularly monit...

Page 32: ...e required between air filter replacements Check the environmental factors regularly An increase in temperature and or particulate matter in the air might affect performance CAUTION Check the fan air filters at six month intervals and replace them as necessary To accurately determine air filter replacement intervals regularly monitor the speeds of the cooling fans An increase in overall fan speed ...

Page 33: ... Slide the existing filter upwards to remove it from the module 4 Replace the filter with a new filter of the same size 5 Repeat for the remaining modules that need the filter replaced After Z9100 ON installation After you have securely installed and powered on the Z9100 ON to configure your system see your third party ONIE compatible OS documentation or the Dell OS documentation Fans 33 ...

Page 34: ...the required 115200 baud rate NOTE Before starting be sure that your PC has a 9 pin serial port and that you have a terminal emulation program already installed and running on the PC NOTE If your PC s serial port cannot accept a female DB 9 connector use a DB 9 male to male adaptor 1 Install the provided RJ 45 connector side of the provided cable into the Z9100 ON console port 2 Install the DB 9 f...

Page 35: ...100 ON 4 Power on the Z9100 ON 5 Install the necessary USB device drivers To download the drivers go to www dell com support For assistance contact Dell Networking Technical Support 6 Open your terminal software emulation program to access the Z9100 ON 7 Confirm that the terminal settings on your terminal software emulation program are as follows 115200 baud rate No parity 8 data bits 1 stop bit N...

Page 36: ...s through a power on self test POST POST runs every time the switch is initialized and checks the hardware components to determine if the switch is fully operational before booting After POST the system uses the Grub bootloader To select an entry use the up and down arrow keys Press Enter to select an OS or enter e to edit the commands before booting Enter c for a command line The selected entry r...

Page 37: ...ysinfo command Run the onie sysinfo command at the ONIE prompt ONIE onie sysinfo x86_64 dell_z9100_c2538 r0 ONIE onie sysinfo c Machine arch x86_64 ONIE onie sysinfo v ONIE Version programmed 3 23 1 0 ONIE ONIE uname a Linux onie 3 2 35 onie 1 SMP Tue Dec 9 17 08 16 PST 2014 x86_64 GNU Linux ONIE ONIE lspci 00 00 0 Class 0600 8086 1f0c 00 01 0 Class 0604 8086 1f10 00 02 0 Class 0604 8086 1f11 00 0...

Page 38: ... web page and select your country from the drop down menu To obtain product specific information enter the 7 character service tag known as a luggage tag or 11 digit express service code of your switch and click Submit To view the chassis service tag or express service code pull out the tag or enter the show chassis command from the CLI The service tag is one the I O side bottom left of the system...

Page 39: ...Figure 23 Z9100 ON luggage tag 1 Service tag 2 PPID 3 MAC address 4 Express service code Dell support 39 ...

Page 40: ...ommunications Commission FCC statement European Union EMC Directive Conformance statement Japan VCCI Compliance for Class A Equipment Korean certification of compliance Safety Standards and Compliance Agency certifications Electromagnetic Compatibility EMC Product recycling and disposal Chassis physical design Table 7 Chassis physical design Parameter Specifications Height 1 72 inches 44 mm Width ...

Page 41: ...240 VAC 50 60 Hz PSU maximum power capability 606 Watts Typical power consumption 288 Watts Table 10 DC power requirements Parameter Specifications Minimum and maximum input voltage range 48 60V DC 32A Max Input power at full load 40 5 V 970 W 48 V 930 W 60 V 950 W without fan 40 5 V 980 W 48 V 940 W 60 V 960 W with fan Input current at full load 40 5V 23 8A 48V 19 0A 60V 15 6A without fan 40 5V 2...

Page 42: ...perate the equipment This device complies with Part 15 of the FCC Rules Operation is subject to the following two conditions 1 this device may not cause harmful interference and 2 this device must accept any interference received including interference that may cause undesired operation Figure 24 Canadian Department of Communication statement European Union EMC Directive Conformance statement This...

Page 43: ...terference by Information Technology Equipment VCCI If this equipment is used in a domestic environment radio disturbance may arise When such trouble occurs the user may be required to take corrective actions WARNING Use the AC power cords with Dell Networking equipment only Do not use Dell Force10 AC power cords with any unauthorized hardware Figure 26 Japan warning label Korean certification of ...

Page 44: ...Fibre Communication Systems FDA Regulation 21CFR 1040 10 and 1040 11 IEC 60950 1 2nd Ed including all National Deviations and Group Differences Electromagnetic Compatibility EMC Emissions International CISPR 22 2006 Class A Australia New Zealand AS NZS CISPR 22 2009 Class A Canada ICES 003 Issue 4 Class A Europe EN55022 2006 CISPR 22 2006 Class A Japan VCCI V 3 2011 04 Class A USA FCC CFR47 Part 1...

Page 45: ...le throughout the European Union This label is applied to various products to indicate that the product is not to be thrown away but rather reclaimed upon end of life per this Directive Figure 29 The European WEEE symbol In accordance with the European WEEE Directive electrical and electronic equipment EEE is to be collected separately and to be reused recycled or recovered at end of life Users of...

Reviews: