background image

10

OPERATING YOUR HEATER


11 

                 Or   


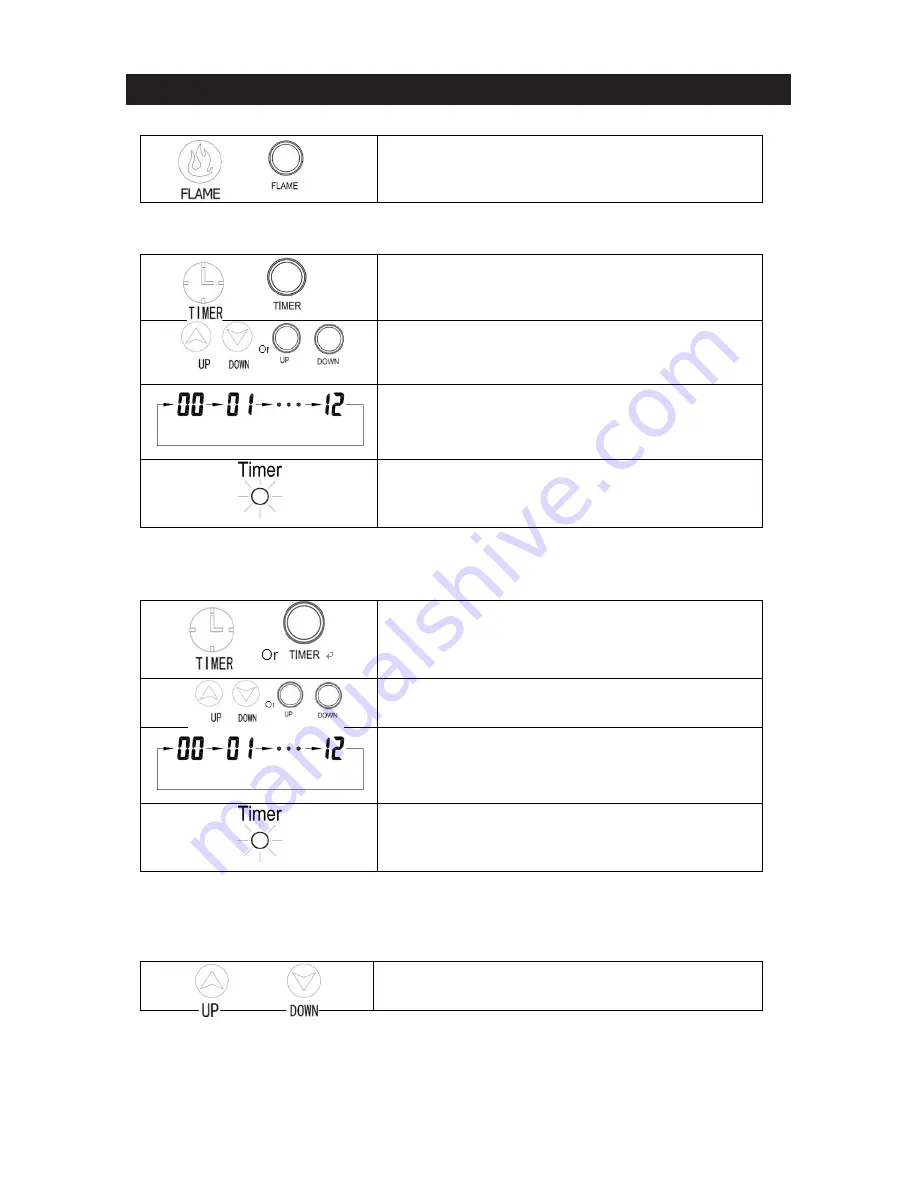
Adjust the brightness of the flame and turn off


4.

 Setting timer-power- off 


Caution! ONLY under power-on mode can you set timer-power-off function. 

          Or 


When starting the unit, press the timer button on the 

control panel. 


Adjust the time by pressing the arrows on the control panel 

or remote control. 


Digital display turns set temperature to time value for the 

timer. Press the timer button more than once, the value will 

vary from 0 to 12hr (1 hr interval) in circulation. 


The light is on when timer –power-off is set.


5

Setting timer-power-on 


Caution! ONLY under power-off mode can you set timer-power-on function. 


Under power-off, press the timer button  on the control 

panel. 


Adjust the time by pressing the arrows on the control panel 

or remote control. 


Digital display indicates time value for the timer. Press the 

timer button more than once, the value will vary from 0 to 

12hr (1 hr interval) in circulation. 


The light is on when timer –power-on is set.


6

Setting electro lock 

      Function of electro lock can avoid misoperation from children. Locking can be set in both 

power-on and power-off modes. 


And   


Press Temp Up and Temp Down buttons once for 3 

seconds. Locking is fulfilled when a buzzer rings. When 

Adjust the brightness of the flame and turn off

When starting the unit, press the timer button on the 
control panel.

Adjust the time by pressing the arrows on the control 
panel or remote control.

Digital display turns set temperature to time value for the 
timer. Press the timer button more than once, the value 
will vary from 0 to 12hr (1 hr interval) in circulation.

The light is on when timer –power-off is set.

Under power-off, press the timer button on the control 
panel.

Adjust the time by pressing the arrows on the control 
panel or remote control.

Digital display indicates time value for the timer. Press the 
timer button more than once, the value will vary from 0 to 
12hr (1 hr interval) in circulation.

The light is on when timer –power-on is set.

04.  SETTING TIMER-POWER- OFF

Caution! ONLY under power-on mode can you set timer-power-off function.

05.  SETTING TIMER-POWER-ON

Caution! ONLY under power-off mode can you set timer-power-on function.

06. SETTING ELECTRO LOCK

Function of electro lock can avoid misoperation from children. Locking can be set in both power-on 
and power-off modes.

Press Temp Up and Temp Down buttons once for 3 
seconds. Locking is fulfilled when a buzzer rings. When

Summary of Contents for 1500W STOVE HEATER

Page 1: ...ING READ THIS INSTRUCTION MANUAL CAREFULLY BEFORE USE www dellaproductsusa com 909 344 2588 Electric Fireplace Stove with Heater OWNER S MANUAL Item 050 HA 50095 Model No FP203R T3 PLEASE SAVE THESE INSTRUCTIONS WARNING READ THIS OWNER S MANUAL CAREFULLY BEFORE USE ...

Page 2: ...w product Please take a few moments to thoroughly read the instructions and familiarize yourself with all the operational aspects of your new heater IMPORTANT INSTRUCTIONS SPECIFICATIONS OVERHEAT SAFETY FEATURE IN THE BOX PREPARATION ASSEMBLY INSTRUCTIONS PRODUCT DIAGRAM AUTOMATIC CUT OFF OPERATING YOUR HEATER MAINTENANCE WARRANTY PLEASE LIKE COMMENT AND SUBSCRIBE 03 04 04 04 04 05 06 07 07 08 09 ...

Page 3: ...lo cations NEVER locate heater where it may fall into a bathtub or other water container To protect against electrical hazards DO NOT immerse in water or other liquids 08 DO NOT touch the control panel or plug with a wet hand 09 DO NOT run cord under carpeting DO NOT cover cord with throw rugs runners or similar coverings Arrange cord away from traffic area and where it will not be tripped over 10...

Page 4: ... personnel should perform all servicing only 22 Connect to properly grounded outlets only 23 Save these instructions SPECIFICATIONS OVERHEAT SAFETY FEATURE This heater is equipped with a overheat safety feature When the heaters internal components reach a certain temperature that could cause overheat and possible fire the heater will automat ically shut off IN THE BOX ELECTRIC STOVE LEG 4pcs SCREW...

Page 5: ...SE FIT BETWEEN THE OUTLET AND THE PLUG MAY CAUSE OVERHEATING OF THE PLUG IF THIS OCCURS TRY INSERTING THE PLUG INTO A DIFFERENT OUTLET CONTACT A QUALIFIED ELECTRI CIAN TO INSPECT THE ORIGINAL OUTLET FOR DAMAGE 4 Tools Required for Assembly not included Phillips screwdriver ASSEMBLY INSTRUCTIONS Lay stove upside down on a padded surface with the underside accessible Attach leg to stove by inserting...

Page 6: ...6 PRODUCT DIAGRAM 6 Carbon bed Display window Power switch Handle Air outlet Remote control ...

Page 7: ... After 5 seconds the display window automatic blanking press any key to the window auto matically display except for the power button 8 1 Power indication light After electrifying show red press the power button to display the red light and flame open 2 Power button Powers the display on and off 3 Flame light 4 Flame light button Adjust the brightness of the flame 5 Timer light 6 Timer button User...

Page 8: ...omatically display except for the power button PREPARATION Place the heater on a firm level surface and plug into a grounded 120V 60Hz power outlet And turn on the power switch in the rear of the unit Only operate heater in upright position with caster wheels attached Power button Powers the display on and off Flame light button Adjust the brightness of the flame Heater button Set up the heater mo...

Page 9: ... turn off the heat 2 Setting room temperature Or Adjust the thermostat by pressing the arrows on the control panel or remote control Set temperature indication varies from 59 to 86 Once you have chosen the desired temperature the heater will remain on until the room temperature increases to the temperature on the digital display The heater will cycle on and off to maintain the desired room tempera...

Page 10: ...wer off modes And Press Temp Up and Temp Down buttons once for 3 seconds Locking is fulfilled when a buzzer rings When Adjust the brightness of the flame and turn off When starting the unit press the timer button on the control panel Adjust the time by pressing the arrows on the control panel or remote control Digital display turns set temperature to time value for the timer Press the timer button...

Page 11: ...ns once for 3 seconds Release is fulfilled when a buzzer rings Lock indication disappears Control panel and remote control return to function locked control panel and remote control failed to function MAINTENANCE 1 Glass Information Under no circumstances should this product be operated with missing or broken glass Do not strike or slam the glass Do not use abrasive cleaners to clean the glass Rep...

Page 12: ...OUR BRAND 12 ...

Page 13: ...n is authorized to assume for DELLA any additional liability or responsibility in connection with DELLAs merchandise except as described above Implied warranties or merchant ability and fitness of the merchandise are limited to a period of one 1 year from the date of purchase In no event shall DELLA be liable for indirect con sequential or incidental damages of any kind The following examples are ...

Page 14: ... WARNING READ THIS INSTRUCTION MANUAL CAREFULLY BEFORE USE www dellaproductsusa com 909 344 2588 ...

Reviews: