background image

DESCRIPTION

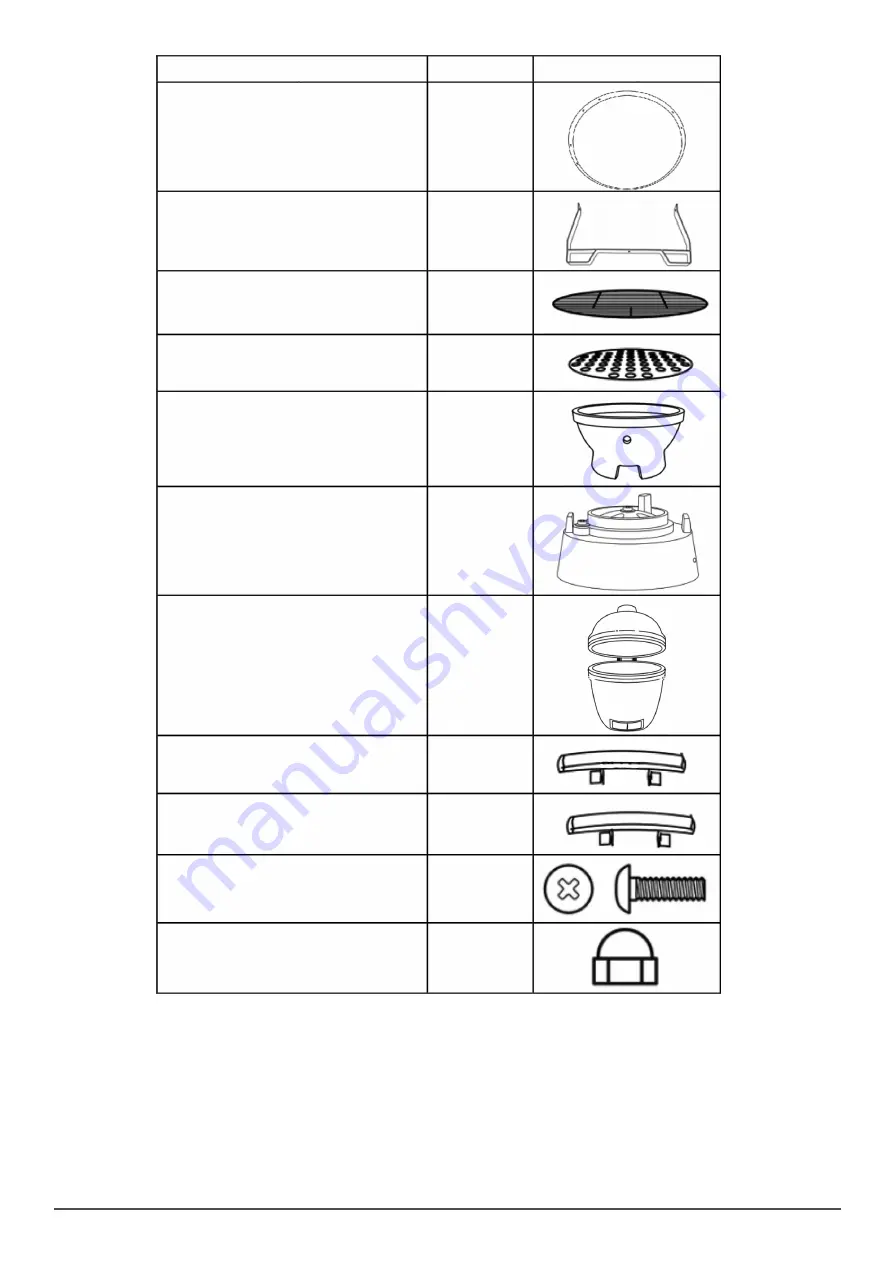
1

IMAGE

Grill frame mounting ring

2

Grill frame foot stand

1

Cooking grill

1

Fire bowl charcoal plate

1

Ceramic Fire bowl

1

Chimney/Top regulator vent

1

Kamado grill main body

1

Grill main body lid handle

2

Grill frame carry handles

14

M6 x 16mm bolts

8

M6 dome nuts

Assembly

• 

Please read the assembly instructions carefully and follow the safety precautions. Allow sufficient time for assembly. Before starting assembly, 

clear an area measuring approximately two to three square metres. Remove the item from the packaging and lay out all of the parts and any 

necessary tools so that they are within easy reach. 

• 

Only tighten all of the screw connections firmly when you have finished assembly or are instructed to within the manual. Otherwise this can result 

in misalignment and tension in components.

•  Step 1

•  Stand the two grill frame foot stands up and across each other, pass a bolt down through the lined up holes in the centre and loosely spin on a 

dome nut. See Fig. 1.

3

www.dellonda.co.uk

Summary of Contents for Deluxe Kamado

Page 1: ... Manufactured to a high standard this product will if used according to these instructions and properly maintained give you years of trouble free performance DG158 Issue 1 12 10 21 www dellonda co uk Dellonda Deluxe Kamado BBQ Grill Oven Smoker Ceramic 16 40cm ...

Page 2: ...ly injury or death DO NOT use petrol alcohol or other highly volatile substances to ignite the fuel DO NOT add charcoal igniting liquid or power soaked charcoal to hot or warm charcoal Keep the area around the grill free of flammable fumes and liquids such as petrol alcohol flammable materials etc Use the grill only after all parts have been assembled This grill must be mounted correctly according...

Page 3: ...Contents 2 www dellonda co uk Chimney Top regulator vent Thermometer Grill lid handle Cooking grill Charcoal plate Ceramic fire box Stand frame Stand frame handles ...

Page 4: ...ssembly Before starting assembly clear an area measuring approximately two to three square metres Remove the item from the packaging and lay out all of the parts and any necessary tools so that they are within easy reach Only tighten all of the screw connections firmly when you have finished assembly or are instructed to within the manual Otherwise this can result in misalignment and tension in co...

Page 5: ...e bowl See Fig 2 Fig 2 Cooking grill Charcoal plate Ceramic firebox Main grill Step 3 Using the nuts and bolts provided offer up and bolt on the main grill lid handle tighten down with the M6 dome nuts See Fig 3 Step 4 Carefully lift two people may be required and place the assembled Kamado grill into the completed frame stand lift and turn the unit to orientate the grill in the base frame with th...

Page 6: ...e the lid to allow the temperature within the grill to rise ensure the air vents top and bottom are initially open you can now begin to regulate the flow of air through the grill and so the temperature Try not to add fuel to the grill during cooking as this will alter the temperature dramatically and affect the evenness and length of the cooking process For the best results we recommend you use na...

Page 7: ...OT move or stoke the coals once lit Open the bottom vent fully and leave the lid open for about 10 minutes to build a small bed of hot embers Monitor the ceramic charcoal barbecue until it has risen to the desired temperature Leave the bottom vent slightly open Close the top vent and continue to check the temperature for a few more minutes Using heat resistant gloves sprinkle the wood chips in a c...

Page 8: ...mic body Spiders web pattern in the face of the ceramic is different to a crack in the ceramic This crazing does not affect the performance of the grill and is part of the curing process Environment Protection and Waste Protection and Electrical Equipment Regulations WEEE Recycle unwanted packaging materials When this product is no longer required or has reached the end of it s useful life please ...

Reviews: