background image

Installation

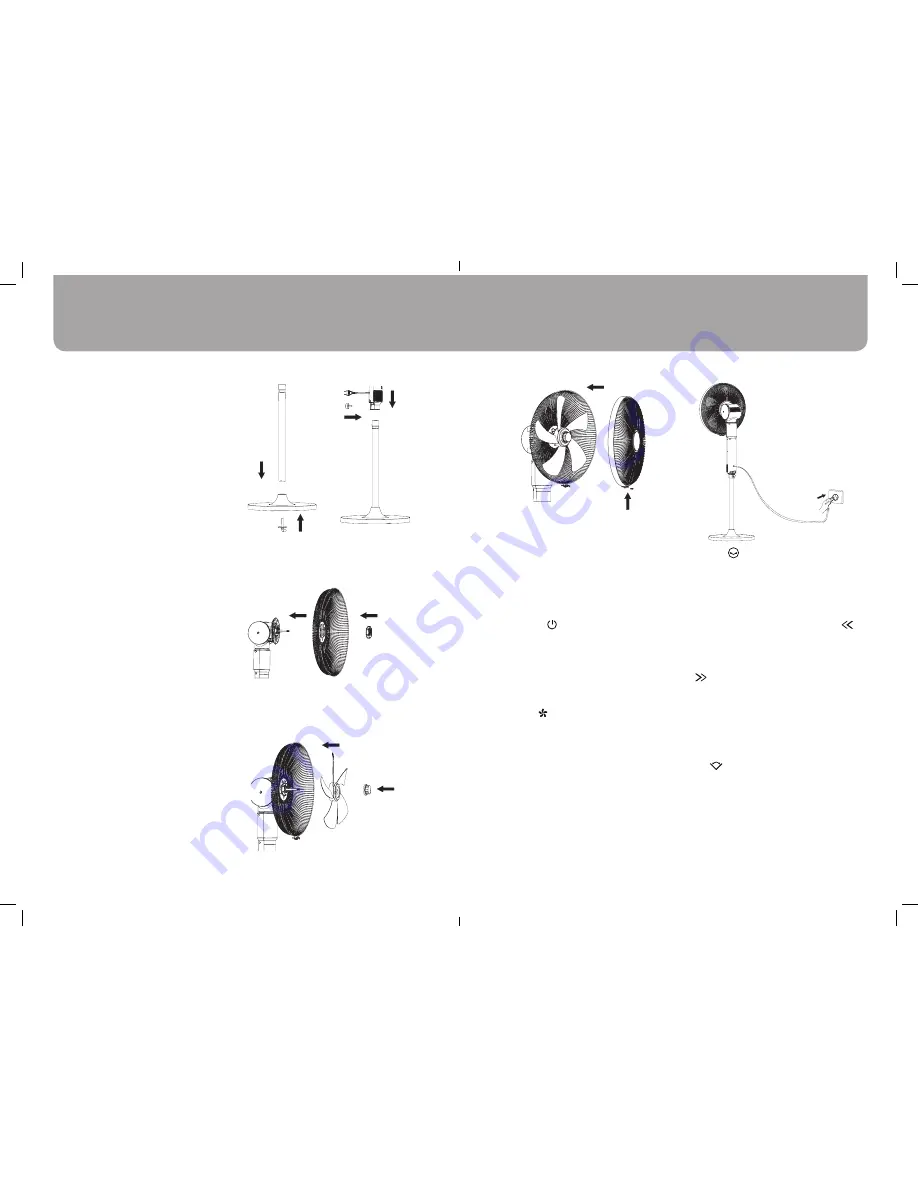
1. Take out parts for assembling: checking  
  whether the manual, remote control,  
  spare parts are all packed.
2. Assemble the fan as showing and  
  indication below,
  2.1. Put the column through the hole of  
  base, and fix tightly by screw 
  (Figure 1).
  2.2 Put the fan body on the column,  
  and fix by the nut (Figure 2).
  2.3. Put the rear grill on the rear cover  
  of motor, ally at the hole on the grill, and  
  fix by the grill nut. (Figure 3)
  2.4. Fit the fan blade on the motor axes,  
  tightly fixing by blade screw.  


  (Figure 4)
  2.5. Assemble grill ring and front grill  
  up together with the rear grill, and tight  
  the grill ring with the lock on the bottom.  
  (Figure 5)
  2.6. After assembled, plug in power  
  and use it as the manual (Figure 6)

Installation & Operation Instruction

Figure 1

Figure 3

Figure 4

Figure 2

Figure 5

Figure 6

Operation Instruction

All functions can be operated by pressing 
the buttons on the control panel or using 
the remote control.
1. ON/ OFF
  When first plug in, the fan will "beep"  
  twice, then the fan is in standby mode.
  You may turn on the fan and start  
 setting.
2. SPEED
  Press "SPEED" button to set the fan  
  speed and LED lights will change  
 accordingly.

3. SWING
  3.1. Manually Vertical oscillation: -10°,  
  0°, 10°, 20°, 30°, 40°, 50°, 60°, 70°, 80°,  
  90° can be adjusted by user.
  3.2. Keep pressing the left button,     
  the fan will turn counter clockwise;  
  likewise keep pressing the right button,
       the fan will turn clockwise. When  
  the fan reaches the desired direction,  
  release the button and you may  
  set the horizontal oscillation angles.
  3.3. Horizontal oscillation angle can be  
  set       in 0°, 60°, 90°, 180°, 360° and  
 LED light will change accordingly.

Page 8

Page 9

Summary of Contents for DEAPF40.BK

Page 1: ...4 012 857 P O Box 4540 Casula Mall NSW 2170 Distributed by De Longhi New Zealand Ltd NZBN 9429035952824 P O Box 58 056 Botany MANUKAU 2163 is a registered Trademark of De Longhi Australia Pty Ltd ABN 49 104 012 857 2017 De Longhi Australia Pty Ltd 5712410101 1 360 Oscillation Axial Pedestal Fan USER GUIDE Please read this user guide carefully and retain for future reference Model DEAPF40 BK DEAPF4...

Page 2: ...nce If the supply cord is damaged it must be replaced by the manufacturer or its service agent or a similarly qualified person in order to avoid a hazard Ensure that the fan is switched off from the supply mains before removing guard for cleaning Misuse of your appliance can result in injury FOR EUROPEAN MARKET ONLY This appliance shall not be used by children Keep the appliance and its cord out o...

Page 3: ...ircuit and damage the fan Do not leave the fan unattended Please turn the fan off when you go out Do not pull the power cord to unplug the fan it will damage the cord Safety Guidelines Service and Customer Care If the cord is damaged it must for safety reasons be replaced by DeLonghi or an authorized DeLonghi repairer If you experience any problems with the operation of your appliance before reque...

Page 4: ...8 Stand fixing screw 9 Stand post 10 Base fixing screw 1 2 3 4 6 5 7 8 9 10 Display panel Remote control panel Control panel Normal Low Nature Medium Sleep Fan speed On Off Fan speed Mode Swing Timer Right Oscillation angles Mode Swing Timer Oscillation angles Right Left On Off High Swing Timer Display Page 6 Page 7 ...

Page 5: ...gure 6 Installation Operation Instruction Figure 1 Figure 3 Figure 4 Figure 2 Figure 5 Figure 6 Operation Instruction All functions can be operated by pressing the buttons on the control panel or using the remote control 1 ON OFF When first plug in the fan will beep twice then the fan is in standby mode You may turn on the fan and start setting 2 SPEED Press SPEED button to set the fan speed and L...

Page 6: ...d showed as following drawings 4 3 Sleep mode Choice of high and medium fan speed High Start with 30 minutes Nature mode high waveform pattern then 30 minutes Nature mode medium waveform pattern then continue with Nature mode low waveform pattern Medium Start with 30 minutes Nature mode medium waveform pattern and then continue with Nature mode low waveform pattern LOW Nature mode low waveform pat...

Page 7: ...ires two or more independent and simultaneous actions to remove its cover press and pull out the battery compartment on the back of remote control install the button cell CR2032 3V according to the positive and negative sign and close the compartment Align the remote control with the receiver on the fan to operate Clean Maintenance Clean 1 Suggested to clean the dust from the fan once a month 2 Al...

Page 8: ...è danneggiato procedere alla sua sostituzione contattando il produttore un rappresentante di zona o una persona qualificata Assicurarsi che il ventilatore sia staccato dalla rete elettrica prima di rimuovere la griglia di protezione per la pulizia L utilizzo improprio del dispositivo può causare infortuni Soltanto per il mercato europeo Questo dispositivo non deve essere utilizzato da bambini Tene...

Page 9: ...ntilatore nelle vicinanze di vasche da bagno irrigatori o piscine poiché ciò provocherebbe un corto circuito e danneggerebbe il ventilatore Non lasciare mai il ventilatore incustodito Spegnere il ventilatore prima di uscire Non tirare il cavo per staccare la spina dalla presa poiché ciò danneggerà il cavo Istruzioni per la sicurezza Assistenza clienti e riparazioni Se il cavo è danneggiato deve pe...

Page 10: ... Vite di fissaggio della colonna 9 Base d appoggio 10 Vite di fissaggio alla base d appoggio 1 2 3 4 6 5 7 8 9 10 Pannello di controllo Page 6 Sinistro Normale Low Natura Middle Sonno Velocità On Off Velocità Modalità Oscillazione Timer Destro L angolazione di oscillazione Modalità Oscillazione Timer L angolazione di oscillazione Destro Sinistro On Off High Oscillazione Timer Pannello Display Page...

Page 11: ... Figura 6 Istruzioni per l installazione e l uso Figura 1 Figura 3 Figura 4 Figura 2 Figura 5 Figure 6 Istruzioni per l uso Tutte le funzioni possono essere utilizzate premendo i relativi pulsanti sul pannello di controllo oppure tramite il telecomando 1 ON OFF La prima volta che lo collegate alla presa di corrente il ventilatore farà bip due volte e si metterà in modalità Standby Potete accendere...

Page 12: ...seguenti disegni 4 3 Modalità Sonno È possibile scegliere tra le velocità costanti High e Medium High Inizia con 30 minuti di modalità Natura con cadenza ondulata elevata quindi 30 minuti di modalità Natura con cadenza ondulata media quindi procede in modalità Natura con cadenza ondulata bassa Medium Inizia con 30 minuti di modalità Natura con cadenza ondulata media quindi procede in modalità Natu...

Page 13: ...atteria che richiede due o più azioni indipendenti e simultanee per essere aperto Premere ed estrarre lo scomparto della batteria sul retro del telecomando inserire la pila a bottone CR2032 3V rispettando le corrette polarità quindi chiudere lo scomparto Per utilizzare il telecomando allinearlo al ricevitore presente sul ventilatore Pulizia e manutenzione Pulizia 1 Si consiglia di spolverare il ve...

Reviews: