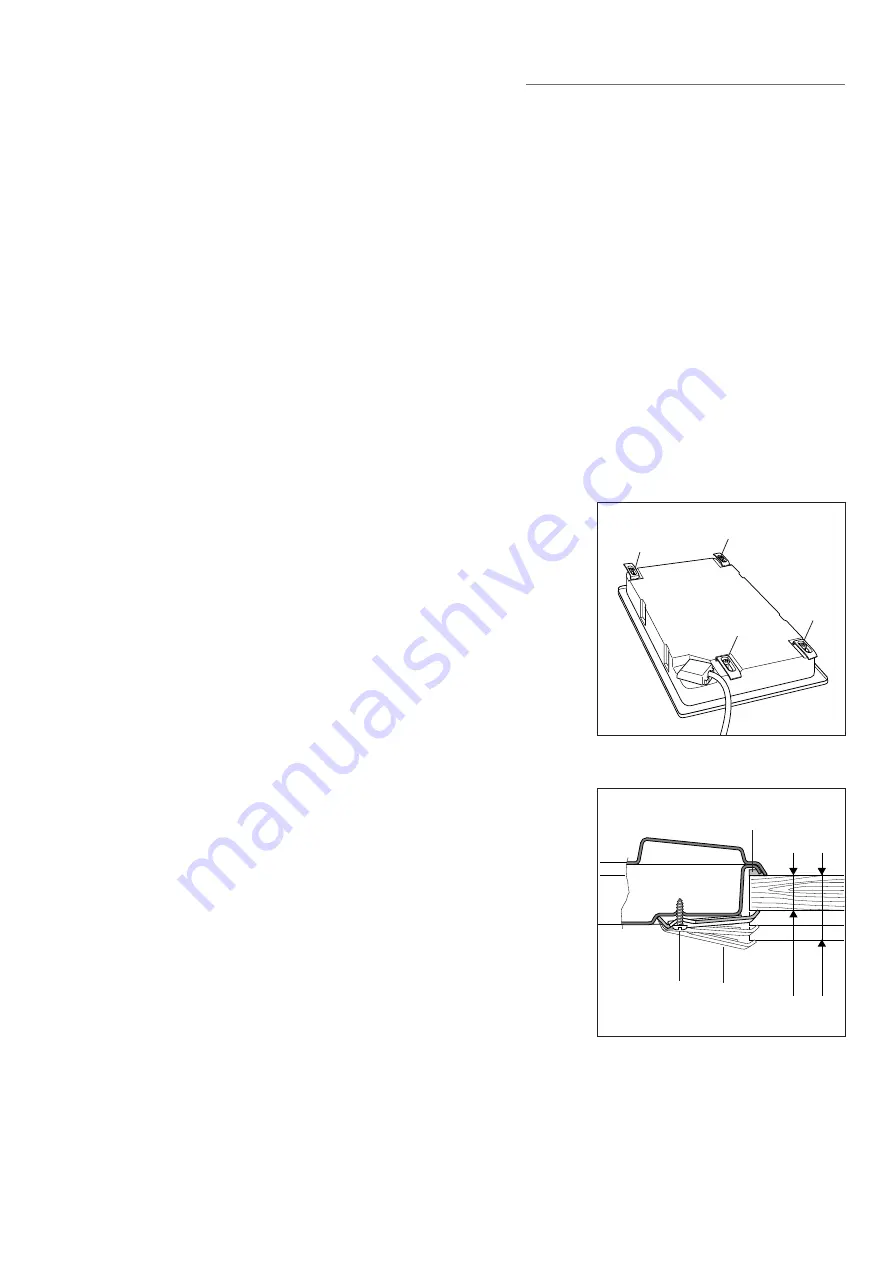
background image

11

Fig. 4.3

A

A

A

A

20

 mm min.

40

 mm max.

B

C

A

Fig. 4.4

FASTENING THE COOKTOP

(fig. 4.3 - 4.4)

Each cooktop is supplied with a set of tabs and screws to fasten it on units with a
working surface from 2 to 4 cm deep. 

The kit includes 4 tabs “A” and 4 self-threading screws “B”.

Cut the unit.

Stretch gasket “C” over the edge of the hole made, being careful to overlay the
junction edges.

Turn  the cooktop over and put tabs “A” into the mountings; only tighten screws
“B” a few turns.
Make sure that the tabs are mounted correctly as shown in the figure.

Put the cooktop into the hole cut into the unit and position it correctly.

Put tabs “A” into place and tighten screws “B” until the cooktop is completely
secured.

PROXIMITY TO SIDE CABINETS

1. The cooktop may be installed directly to existing base cabinets. 24" (610 mm)

minimum deep countertop is required. 

Cooktop dimensions:

- width

= 11” 21/64  (288 mm);

- depth = 20” 1/16

(510 mm).

Cut-out dimensions:

- width

= 10” 5/8 

(270 mm); 

- depth = 19” 9/32   (490 mm). 

To  centre the cooktop on the 24” (610 mm) countertop there must be a distance
of 2” 23/64 (60 mm) between the front side of the cut-out and the front of the
countertop and also between the back side of the cut-out and the back of the
countertop. When the cooktop has been installed there must be a distance of 1”
31/32 (50 mm) between the front side of the cooktop and the front of the
countertop and also between the back side of the cooktop and the back of the
countertop. 

Important:

Base cabinet construction must allow for size of cooktop cut-out.

Gas line opening:

Wall - anywhere 11” 51/64 (300 mm) below underside of countertop;
Cabinet floor - anywhere 3” 1/8 (79.2 mm) from the rear wall.

Grounded outlet:

the electric cord with 3-prong ground plug has a length of 48”

(122 mm). Grounded outlet should be located within 36" (914.4 mm) of right rear
corner of cut-out.

2. The cooktop CANNOT be installed directly adjacent to sidewalls, tall cabinets, tall

appliances, or other side vertical surfaces. There must be a minimum of  4”
(102 mm) side clearance from the cooktop cut-out  to such combustible surface
TO THE RIGHT OR TO THE LEFT above the counter heigh.

IMPORTANT: ONE SIDE (LEFT or RIGHT) ABOVE THE COUNTER HEIGHT
MUST ALWAYS BE KEPT CLEAR.

3. The maximum upper cabinet depth recommended is 13” (330 mm). Wall cabinet

above the cooktop must be a minimum of 30” (762 mm) above the countertop
for a width of minimum 11” 13/32 (290 mm): it has to be centred with the cooktop.
Side wall cabinets above the cooktop must be a minimum of 18” (457 mm) above
the countertop.

4. If cabinet has a drawer, a 4” (102 mm) depth clearance from the top of the

countertop to the top of the drawer (or other obstruction) in base cabinet is
required. The drawer depth may need to be shortened to avoid interfering with
the regulator. 

Summary of Contents for DEGCT212F series

Page 1: ...nces Please ensure that this product is properly grounded The installer should leave these instructions with the consumer who should retain for local inspector s use and for future reference The electrical plug should always be accessible Installation must conform with local codes or in the absence of codes the National Fuel Gas Code ANSIZ223 1 Iatest edition Electrical installation must be in acc...

Page 2: ...e this booklet carefully It may be useful in future either to yourself or to others in the event that doubts should arise relating to its operation This appliance must be used only for the task it has explicitly been designed for that is for cooking foodstuffs Any other form of usage is to be considered as inappropriate and therefore dangerous The manufacturer declines all responsibility in the ev...

Page 3: ...s The appliance should be installed and all the gas electrical connections made by a qualified engineer in compliance with local regulations in force and following the manufacturer s instructions TIPS FOR THE USER During and after use of the cooktop certain parts will become very hot Do not touch hot parts Keep children away from the cooking hob when it is in use After use ensure that the knobs ar...

Page 4: ...nce has a safety valve system fitted the flow of gas will be stopped if and when the flame should accidentally go out features CAUTION If the burner is accidentally extinguished turn the gas off at the control knob and wait at least 1 minute before attempting to relight CAUTION Gas cooktops produce heat and humidity in the environment in which they are installed Ensure that the cooking area is wel...

Page 5: ...s the LO position Other intermediate operating adjustments can be achieved by positioning the indicator between the maximum and minimum aperture positions and never between the maximum aperture and OFF positions N B When the cooktop is not being used set the gas knobs to their OFF posi tions and also close the gas shut off valve placed on the main gas supply line LIGHTING GAS BURNERS with safety v...

Page 6: ... non abrasive products Dry preferably with a chamois leather If acid substances such as lemon juice tomato conserve vinegar etc are left on the enamel for a long time they will etch it making it opaque STAINLESS STEEL ELEMENTS Stainless steel parts must be rinsed with water and dried with a soft and clean cloth or with a chamois leather For difficult dirt use a specific non abrasive product availa...

Page 7: ...ric ignition keep the electrode clean so that the sparks always strike Note To avoid damage to the electric ignition do not use it when the burners are not in place CORRECT REPLACEMENT OF THE BURNERS It is very important to check that the burner flame spreader F and the cap C have been correctly positioned see figs 3 1 and 3 2 Failure to do so can cause serious problems In appliances with electric...

Page 8: ...t alteration services or maintenance can cause injury or property damage Consult a qualified installer service agent or the gas supplier INSTALLATION INSTRUCTIONS TOOLS NEEDED FOR INSTALLATION Screwdriver Wrench T handle wrench Tape measure Angled hexagon key Pencil Adjustable pliers Adjustable wrench ...

Page 9: ...iance before servicing 9 When removing appliance for cleaning and or service A Shut off gas at main supply B Disconnect AC power supply C Disconnect gas line to the inlet pipe D Carefully lift appliance out of cabinet cutout CAUTION Use care in handling 10 Electrical Requirement Electrical installation should comply with national and local codes 11 Air Supply and Ventilation The installer must ref...

Page 10: ...20 1 16 510 mm 2 23 64 60 mm 19 9 32 490 mm 2 23 64 60 mm 24 610 mm 10 5 8 270 mm 20 1 16 510 mm 1 31 32 50 mm 1 31 32 50 mm CUT OUT CUT OUT 2 23 64 60 mm 19 9 32 490 mm 2 23 64 60 mm 24 610 mm 10 5 8 270 mm 20 1 16 510 mm 1 31 32 50 mm 1 31 32 50 mm CUT OUT CUT OUT min 4 102 mm from cut out min 4 102 mm from cut out installation to the cabinet Fig 4 1 BOX DIMENSIONS COOKTOP DIMENSIONS ...

Page 11: ...31 32 50 mm between the front side of the cooktop and the front of the countertop and also between the back side of the cooktop and the back of the countertop Important Base cabinet construction must allow for size of cooktop cut out Gas line opening Wall anywhere 11 51 64 300 mm below underside of countertop Cabinet floor anywhere 3 1 8 79 2 mm from the rear wall Grounded outlet the electric cord...

Page 12: ...oom as the cooktop and should be in a location that allows ease of opening and closing in a position where it can be reached quickly in the event of an emergency Do not block access to the shutoff valve The valve is for turning on or shutting off gas to the appliance 2 Pressure Regulator figures 5 2a 5 2b 5 2c 5 2d a All heavy duty commercial type cooking equipment must have a pressure regulator o...

Page 13: ... not to damage the thread STEP 2 Mount the extension pipe to the elbow connection interposing the gasket supplied and tighten by using a wrench When tightening keep the elbow connection firm i e by using an adjustable pliers or an adjustable wrench pay attention not to damage the thread STEP 3 Mount the 3 8 NPT conical male connector to the pressure regulator and tighten by using a wrench Do not o...

Page 14: ...G cylindrical ISO 228 1 female 3 8 NPT conical male 3 8 NPT female 3 8 NPT female WARNING check the right positioning of the gas regulator The arrow on the back of the gas regulator must be oriented toward the connector Arrow Gasket Extension pipe female pipe fitting Gasket 1 2 G cylindrical ISO 228 1 female 1 2 G cylindrical ISO 228 1 male Gasket Extension pipe Extension pipe female pipe fitting ...

Page 15: ...amount a step down regulator will be required e The appliance its individual shut off valve and pressure regulator must be disconnected from the gas supply piping system during any pressure testing of that system at pressures in excess of 1 2 PSI 3 5 kPa f The appliance must be isolated from the gas supply piping system by closing its individual manual shut off valve during any pressure testing of...

Page 16: ...o the cooktop All strains must be removed from the supply and fuel lines so cooktop will be level and in line Use joint compounds and gaskets that are resistant to action of natural or propane gas on all male pipe threads Do not over tighten gas fitting when attaching to pressure regulator Over tightening may crack regulator 5 Leak Testing IMPORTANT Leak testing of the appliance shall be conducted...

Page 17: ...page 12 If the cooktop has been disconnected and then connected again to the gas supply line repeat the operations indicated in paragraph 5 Leak Testing at page 16 OPERATIONS TO BE PERFORMED WHEN SUBSTITUTING THE INJECTORS Remove the gratings the burner covers and the knobs Using a wrench substitute the nozzle injectors J fig 5 6 with those most suitable for the kind of gas for which it is to be u...

Page 18: ...iance be provided The outlet must be checked by a qualified electrician to see if it is wired with correct polarity This appliance when installed must be electrically grounded in accordance with local codes Recommended ground method For your personal safety this cooktop must be grounded This cooktop is equipped with a 3 prong ground plug To minimize possible shock hazard the cord must be plugged i...

Page 19: ...19 Wiring diagram key A Ignition coil PA Ignition switches group M Terminal block CA Igniter Fig 6 2 N L PA A CA M CA WIRING DIAGRAM ...

Page 20: ...transcription errors in the present booklet The manufacturer reserves the right to make all modifications to its products deemed necessary for manufacture or commercial reasons at any moment and without prior notice without jeopardising the essential functional and safety characteristics of the appliances ...

Reviews: