background image

ECAM37095TI

MILK  RECIPIES    

1

2

3

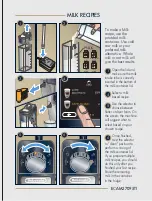
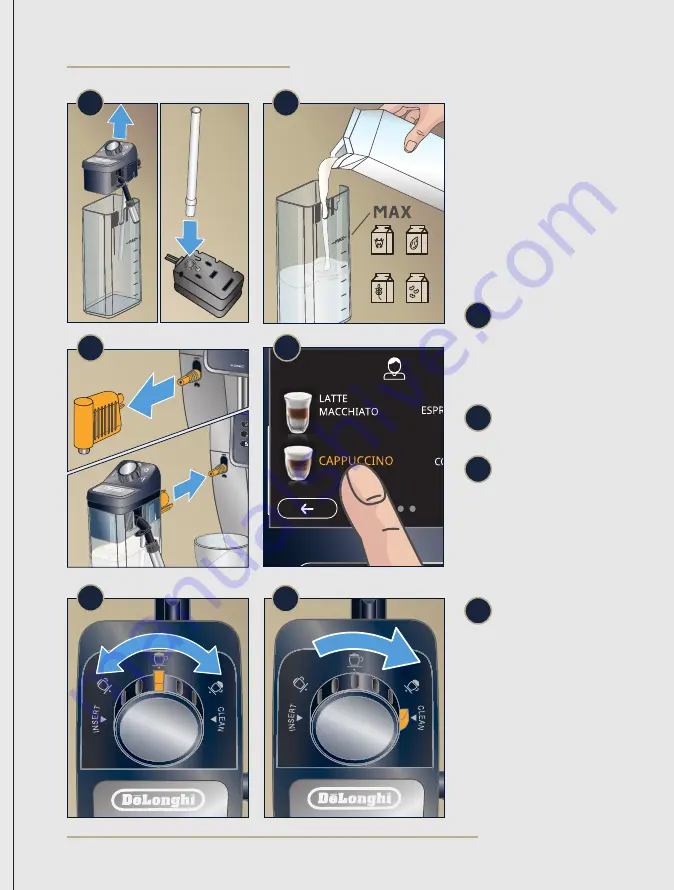
To make a Milk  

recipe, use the  

provided milk

container. Use cold 

cow milk or your 

preferred milk  

alternative. Whole

milk or oat milk will 

give the best results.


Select a milk  


based recipe.


Once finished,  


twist the selector  

to “clean” position to

perform a rinsing of

the milk container lid.

If you prepare multiple 

milk recipes, you should 

do this only after you 

finished your last recipe.

Store the remaning

milk in the container

in the fridge.

6


Open the lid and


make sure the milk

intake tube is correctly

inserted in the bottom of

the milk container lid.

1

4

6

5


Use the selector to


choose between

flatter or dryer foam. On 

the screen, the machine 

will suggest what to  

select based on your  

chosen recipe.

5

COW   

MILK

ALMOND   

MILK

OAT   

MILK

SOY   

MILK

7

4

Summary of Contents for DINAMICA PLUS

Page 1: ...Better Everyday QUICK START GUIDE ECAM37095TI ...

Page 2: ...Automatic Espresso Machine and become De Longhi Club Member Join the De Longhi Club to get more out of your coffee experience RECEIVE 1 ADDITIONAL YEAR OF WARRANTY FOR REGISTERING PRODUCT De Longhi Club Member discount Only members of the Club will receive special offers on coffee accessories ...

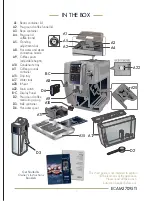
Page 3: ...0 Condensate tray A11 Coffee grounds container A15 Drip tray A17 Water tank A20 Infuser A22 Main switch B C Display Panel D2 Pre ground coffee measuring scoop D3 Milk container D6 Hot water spout Get Started Owner s Instructions Booklets This short guide is not intended to explain all the functions of the appliance Please read all the owner s instruction booklet before use A2 A4 A1 A5 D6 A22 A20 A...

Page 4: ...ng alarm C1 Beverage quantity selection C2 Profile selection C3 Settings menu C4 Exit from the selected function and go back to the main menu C5 My beverages selection menu Unless previously programmed from the settings menu as described in chapter 12 Customizing the beverages the beverage is programmed directly the first time you use the appliance C6 Beverage strength selection B9 B8 B7 B6 B4 B4 ...

Page 5: ...nd settings remotely Remove all stickers and clean all accessories with warm water and mild detergent and dry them Follow the instructions on the display of the machine Priming the machine is only required the first time out of the box 4 5 1 3 The machine will deliver hot water and will shut off automatically once rinsing is complete 6 WATER CIRCUIT EMPTY PRESS OK TO START 6 2 ...

Page 6: ...ys perform a rinsing cycle setting menu rinsing before brewing 2 1 BREW ESPRESSO To brew the perfect espresso set your grinder following the Extraction Guidelines on page 9 2 Select one of the recipes on the touch screen Preparation will start with default strength and quantity which can be changed by customizing your recipes 5 ...

Page 7: ...ing of the milk container lid If you prepare multiple milk recipes you should do this only after you finished your last recipe Store the remaning milk in the container in the fridge 6 Open the lid and make sure the milk intake tube is correctly inserted in the bottom of the milk container lid 1 4 6 5 Use the selector to choose between flatter or dryer foam On the screen the machine will suggest wh...

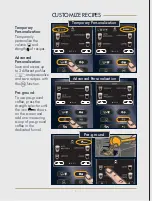
Page 8: ...one measuring scoop of pre ground coffee in the dedicated funnel Temporary Personalization Temporarily personalize the volume and stength of recipes Temporary Personalization Advanced Personalization Save and access up to 3 different profiles and personalize and save recipes with the function Advanced Personalization Pre ground ...

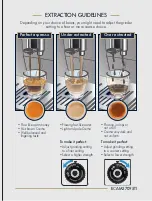
Page 9: ...rown Crema Well balanced and lingering taste Flowing fast like water Light and pale Crema To make it perfect Adjust grinding setting to a finer setting Select a higher strength Flowing in drips or not at all Crema very dark and not uniform To make it perfect Adjust grinding setting to a coarser setting Select a lower strength Perfect espresso Under extracted Over extracted ...

Page 10: ...ray daily and empty coffee ground container when lights come up Remove and clean each part of the milk container lid Follow User Manual section 14 10 3 Once a month clean the inside of the machine Follow User Manual detailed instruction section 14 9 2 1 Promptly descale when indication light comes on Follow user Manual section 15 4 4 ...

Page 11: ...ast a maximum of 3 weeks You can purchase extra fitlers on www delonghi com The type of filter may vary MENU RINSING DESCALE WATER FILTER DRINKS SETTINGS 1 2 3 From the Settings menu select Water fitler and follow the step by step instructions on the screen 2 Be ready with a large container 17fl oz min to collect the water that will be delivered from the water spout during the installation process...

Page 12: ...d the Indicator paper colors and compare with this table Dip the provided Total Hardness Indicator in a glass of water for one second and shake it 1 2 MENU AUTO OFF WATER HARDNESS COFFEE TEMPERATURE ENERGY SAVINGS 3 2 Set water hardness on the machine from Setting Menu Water Hardness Follow instructions on the screen 3 ...

Reviews: