background image

20

2.9 KEEP WARM MODE

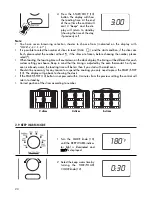
1 Turn the MODE knob (10)

until the KEEP WARM indica-
tor light is illuminated and

118800°°ff

is displayed.

180

°f

2 Select the keep warm time by

turning the TIME/TOAST
COLOR knob (12).

  0:30

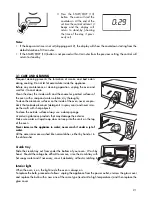
4 Press the START/STOP (13)

button. The display will show
the toasting time. At the end
of the set time the control will
emit 3 “beeps” and the dis-
play will return to stand-by
(showing the time of the day,
if previously set). 

3:00

Note:

• You have seven browning selection shades to choose from (indicated on the display with

color 1 - 2 - 3 - 4 - 5 - 6 - 7

”)

• It is possible to select the number of slices to toast (2-4-6       ) and the start condition; if the slices are

fresh, please select the number without (*), if the slices are frozen, before choosing the number, please
select (*).

• When toasting, the toasting time will count down on the clock display. The timing will be different for each

custom setting you choose. Keep in mind that the timing is adjusted by the oven thermostat. So if your
oven is already warm, the toasting time will be less than if you start with a cold oven.

• Should it be necessary for any reason to suspend the cooking, you only need to press the START/STOP

(13). The display will go back to showing the clock.

• If the START/STOP (13) button is not pressed within 3 minutes from the previous setting, the control will

return to stand-by.

• Correct position of the slices according to number.

2 slices

4 slices

6 slices

Summary of Contents for DO 1289

Page 1: ...isite www delonghiregistration com Visite www delonghi com para ver la lista de centros de servicios cerca nos a usted Solamente en los Estados Unidos y Canada Registra questo prodotto on line per ricevere una copia omaggio della rivista Cook s Illustrated Visita www delonghiregistration com Visita www delonghi com per una lista dei centri di servizio a te piu vicini Solo negli Stati Uniti e Canad...

Page 2: ...d sockets that fit the plug on the appliance The capacity of the extension cord must be greater than or equal to the rated power input of the appliance The length of the power cable for this appliance has been devised so as to avoid the possibility of trip ping on or getting entangled in a long cable If a longer cable is required an extension cord can be used with a rated capacity not below 15 amp...

Page 3: ...SMART COOKIES mode 13 2 4 DEHYDRATOR mode 14 2 5 PIZZA mode 15 2 6 DEFROST mode 17 2 7 BROIL mode 18 2 8 TOAST mode 19 2 9 KEEP WARM mode 20 CHAP 3 CLEANING AND MAINTENANCE 3 1 Care and cleaning 21 1 1 CONTROL PANEL 1 7 6 11 12 13 9 10 8 2 3 4 5 1 Display 2 TOAST pilot light 3 KEEP WARM pilot light 4 FAN BAKE DEFROST pilot light 5 BAKE pilot light 6 BROIL pilot light 7 PIZZA pilot light 8 DEHYD pi...

Page 4: ...lass door C Matte silver crumb tray D Bottom heating element E Top heating element F Interior light G 12 pizza shaped wire rack H Black durastone bake pan I 12 pizza shaped reversible wire rack L Matte silver cookie sheets M Black durastone broil rack N Dehydrator rack O Pizza tray ...

Page 5: ...appliance if it contains hot oil or other hot liquids 13 If the plug heats up contact a qualified electrician 14 Do not use this appliance for purposes other than those it has been designed for 15 Use maximum care when removing the bake pan or throwing out the hot fat 16 Do not use metal sponges to clean the appliance small particles may be detached that cause electric shocks 17 To ensure the safe...

Page 6: ... on two levels at the same time For tips on how to do this refer to page 10 Traditional oven cooking 2 20 00 0 F F 4 45 50 0 F F Ideal for cooking stuf fed vegetables fish and small poultry For details on how to use the accessories refer to the table on page 12 Broiling and top browning Broil function is ideal for all types of tradi tional grilling ham burgers hot dogs kebabs etc Use the top brown...

Page 7: ...pliance has not suffered any damage due to transportation 2 Place the appliance on a flat stable surface out of the reach of children the glass door becomes very hot while the oven is in operation 3 Before using this appliance move it two inches away from the wall or any object on the counter top Remove any object that may have been placed on top of the appliance Do not use on surfaces where heat ...

Page 8: ...laced closer than two inches from the upper heating ele ment The cookie sheets L provided must also be centered on the rack When using both sheets on two wire racks place the reversible wire rack in the upper guide PREHEATING THE OVEN To pre heat the oven press the required function BAKE FAN BAKE and set the desired temperature only for BAKE and FAN BAKE After having pressed START STOP if no durat...

Page 9: ... time set will begin blinking on the display 1 Turn the MODE knob 10 to the desired function BAKE 5 or FAN BAKE DEFROST 4 The display will show the default tempera ture 3 35 50 0 F F f 2 If necessary the desired tem perature can be modified by pressing the TEMP SELECT CLOCK button 11 The available tempera tures are 200 250 275 300 325 350 375 400 425 450 F The display will show the chosen temperat...

Page 10: ...ion turn the bake pans half way around Note the wire racks must be positioned as shown in the figure to the side top heating element bottom heating element Notes If the cooking time is not set skipping point 3 the display will show the countdown starting from the default duration of 30 minutes The oven should always be preheated Wait for the audible signal 3 times 3 short beeps before placing the ...

Page 11: ...djust the time and or temperature for best results Here are some tips for different types of convenience foods If directions call for placing the food container on a metal pan or cookie sheet to avoid spills or to aid even cooking use the bake pan provided Use it or the cookie sheets provided for foods such as rolls cookies turnovers or frozen French fries breaded fish or chicken pieces that are p...

Page 12: ...ed with fork Roast on pan with broiling rack in posi tion 2 skin side up Brush with orange marmalade or honey Turn and brush several times until done Baking Potatoes 1 to 4 large 4 45 50 0 F F 45 50 min or until fork tender Wash and pierce raw potatoes with fork Rub skins with salad oil if desired Bake on wire rack in position 1 Cakes Layer Sheet cake or Loaf cake Pies Fruit 9 inch double crust 3 ...

Page 13: ... heating phase When the oven reaches the ideal baking temperature an audible signal will sound three series of short beeps and the baking time will start flashing Place the cookies in the oven and press START STOP the oven will start the countdown If during the cooking process you wish to increase or decrease within 5 minutes the set time turn the TIME TOAST COLOR knob 12 Only when baking on two l...

Page 14: ...e rack reversed Slices of apples pineapple pears peaches or bananas placed directly on the dehydrator kit will dry in 8 to 14 hours in the gently circulating warm air Time will depend on the moisture in the fruit Herbs can also be dried However the limited quantity of vegetables that can be dried at one time may not be worth your time and attention Consult a book on dehydrating food for specific d...

Page 15: ...ed program see table on the following page by pressing repeately the TEMP SELECT CLOCK button 11 place the pizza in the oven P3 3 Press the START STOP button 13 the display will show the countdown At the end of the set time the control will emit 3 beeps and the display will show the time of the day if previously set 0 21 4 If during the cooking process you wish to increase or decrease within 5 min...

Page 16: ...ary adjust these settings to your individual preferences DISPLAY INDICATION P P1 1 P P2 2 P P3 3 NOTES TIPS Ideal for small frozen pizzas weight 6 5 9 ounce Ideal for medium frozen pizzas weight 9 18 ounce Ideal for big frozen pizzas weight 18 28 ounce P P1 1 Ideal for one fresh pizza 2 2p p1 1 Ideal for two fresh pizzas 2 2P P1 1 Ideal for 2 small frozen pizzas weight 6 5 9 ounce 2 2P P2 2 Ideal ...

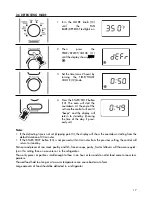
Page 17: ...ly on this setting than on a counter or in the refrigerator Thaw only pieces or portions small enough to thaw in an hour or less and do not let food come to room tem perature Thawed food held too long or at a warm temperature can cause bacteria to form Large amounts of food should be defrosted in a refrigerator 2 Then press the TEMP SELECT CLOCK 11 until the display shows d de ef fr r 3 Set the ti...

Page 18: ...ted if necessary but do not attempt to broil without the rack as fat drip pings can smoke or flame For easier clean up the shallow pan can be lined with foil Be sure not to cover the broiling rack or let foil extend beyond the edges of the pan Be careful when turning food or removing the pan Use potholders and avoid spilling drippings Never cover heating elements with foil To top brown casseroles ...

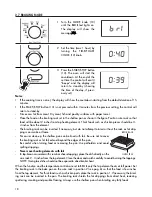
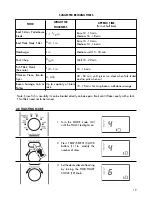
Page 19: ...Medium well 15 18 min Pork Chop 3 4 in Well 18 22 min Fish Fillets Steak See note 1 2 1 in 10 16 min Chicken Piece Broiler fryer 3 4 lb 40 50 min until juices run clear when fork tested and no pink when cut Bacon Sausage Links or Patties Up to capacity of broil rack 10 15 min for crisp bacon well done sausage SUGGESTED BROILING TIMES 2 8 TOASTING MODE 1 Turn the MODE knob 10 until the TOAST led li...

Page 20: ... 2 4 6 and the start condition if the slices are fresh please select the number without if the slices are frozen before choosing the number please select When toasting the toasting time will count down on the clock display The timing will be different for each custom setting you choose Keep in mind that the timing is adjusted by the oven thermostat So if your oven is already warm the toasting time...

Page 21: ...o clean the aluminum surfaces on the inside of the oven never use pro ducts that corrode aluminum detergents in spray cans and never scra pe the walls with sharp objects To clean the outside surface always use a damp sponge Avoid using abrasive products that may damage the exterior Make sure water or liquid soap does not seep into the vents on the top of the oven Never immerse the appliance in wat...

Page 22: ...rising out of any breach of contract or breach of this warranty are not recoverable under this warranty Some states do not allow the exclusion or limitation of incidental or con sequential damage so the above limitation may not apply to you How do you get service If repairs become necessary see contact information below U S Residents Please contact our toll free hotline at 1 800 322 3848 or log on...

Reviews: