Page 18
Page 19
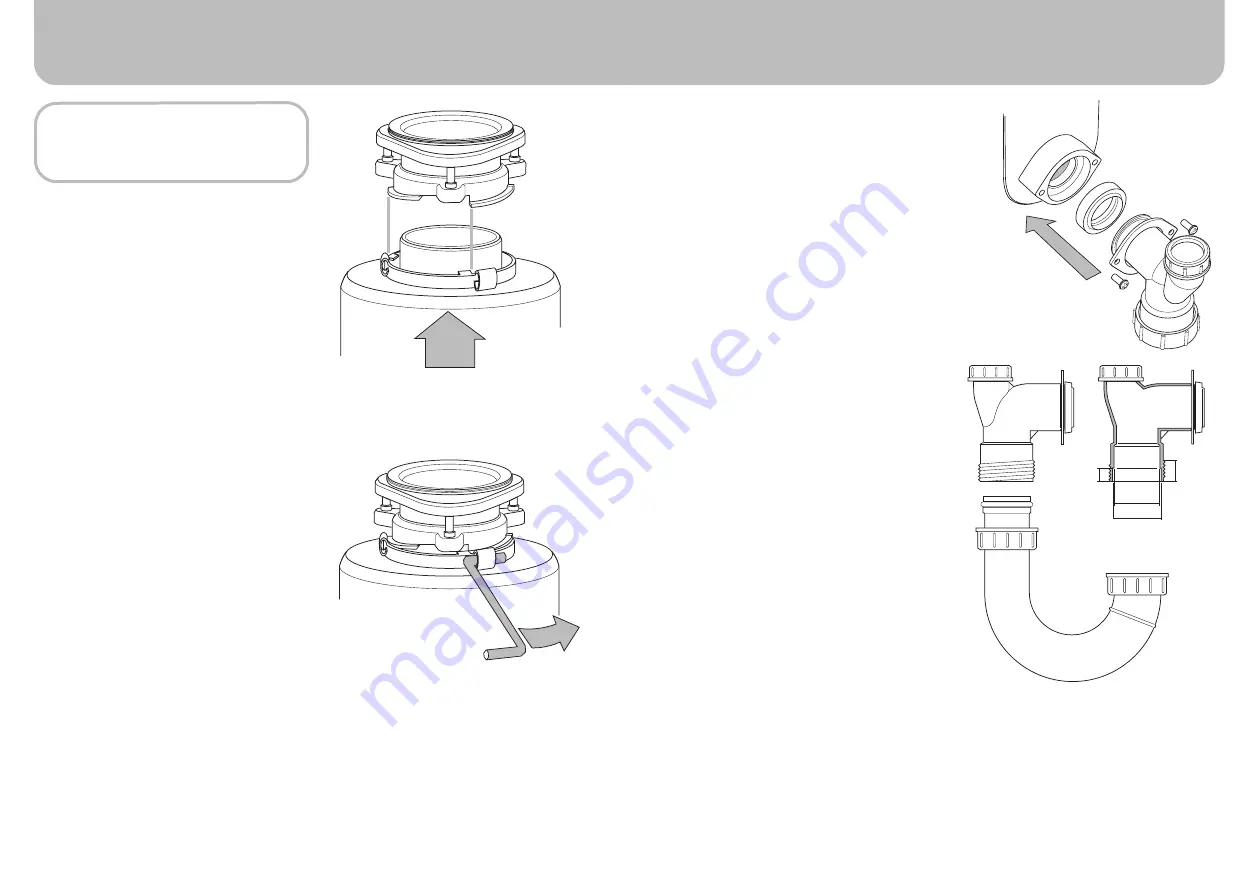
STEP 09
Attach discharge pipe to waste drain
line
Do not use thread sealants or pipe dope; they
may impair or harm the disposer and/or cause
property damage.
Two-bolt discharge pipe installation
If replacing existing disposer, remove and
discard existing discharge pipe and gasket.
(Unit will not seal properly with old discharge
pipe.)
Slide metal flange over discharge pipe.
1.
Insert rubber gasket into discharge outlet.
2.
Secure metal flange and discharge pipe
to disposer with two bolts.
Rotate disposer unit and align discharge
3.
pipe with drain trap. Do not pull or bend
discharge pipe to drain trap. If discharge
pipe is too long, cut off as much of pipe
as necessary with a hacksaw (make sure
cut is straight and clean.) If discharge
pipe is too short, you can purchase an
extension from a hardware store. Note:
Disposer must remain in vertical position
to prevent vibration.
Place trap nut, then beveled washer
4.
(supplied with unit) against bottom of
discharge pipe and hand tighten on drain
trap (Do not over tighten trap nut). If you
have a double sink, use a separate drain
trap for each side.
Lower mounting ring must be securely
5.
locked over mounting flange ridges.
NOTE: If using sink overflow, it should be
connected to the overflow inlet on the tailpipe.
Remove the plug by unscrewing the connector
cap to connect the overflow
NOTE:
Plumbing and drainage installation
of this appliance must comply with AS/NZS
3500.2.
The product and installation of this waste
disposal may require the approval of the
relevant regulators and/or the sewerage
system operator.
WARNING
Do not position your head or body under
disposer, as the unit could fall during
installation.
STEP 08
Connect disposer to mounting
assembly
Position disposer so that the three
1.
mounting tabs are aligned to slide over
slope ring rails.
Lift disposer, insert top end (sink baffle)
2.
into mounting assembly, and turn lower
mounting ring to the right (with wrench
or screwdriver) until mounting tabs slide
completely past locking ridges on the
slope ring rails.
MAKE SURE ALL THREE MOUNTING
TABS ARE LOCKED SECURELY OVER
RIDGES.
Disposer will now hang on its own.
NOTE: Make sure to push sink baffle into
sink opening with “cupped” side up.
Installing Your Waste Disposer
Installing Your Waste Disposer
40.8
36.2
6.3
(min)
12.7
(min)
+.04
-.04
+.0
-.06
Nominal Size 40 Ø
All measurements in mm


