STEP #2
ÉTAPE N°2
PASO #2
A
ÉTAPE N
O
2
PASO #2
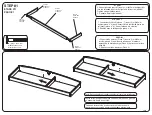
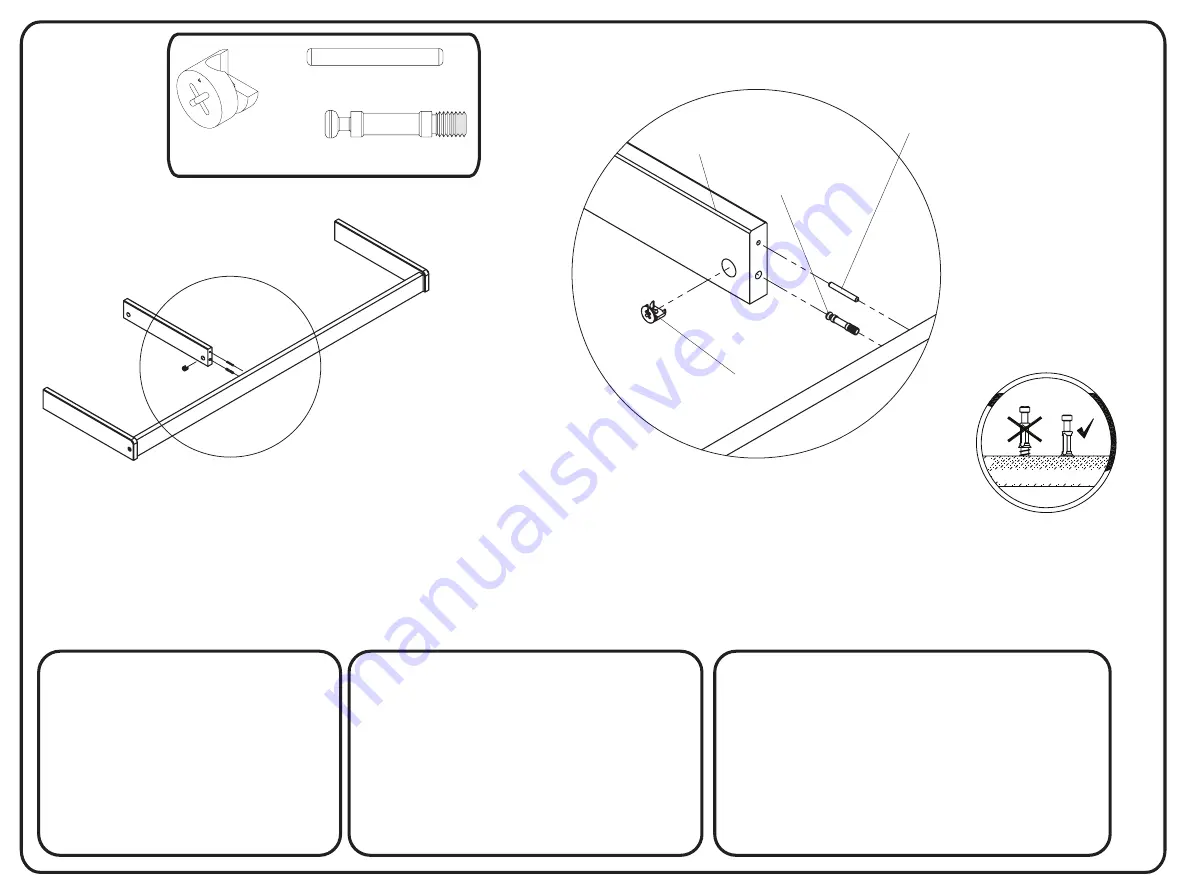
STEP #2
1.Refer to page 5 for instructions on how to use
the cam lock system.
2. Insert (1) cam locks (part #3) into the holes on
the side of the center rail (part #6). Insert Cam
Bolt (Part #2) into Front Rail (Part #9).
3. Line up the cam bolt (part #2) and dowel (part
#4) at the back of the front rail; from step #1 with
the holes in the end of the center rail (part #6).
Insert and turn the cam lock clockwise to tighten
using a phillips screwdriver.
1.Voir à la page 5 pour obtenir des instructions sur la
façon d'utiliser le système de verrouillage à came.
2. Insert (1) serrures (pièce n ° 3) dans les trous sur le
côté de la glissière médiane (pièce n ° 6). Insert le
boulon à came (pièce n ° 2) en rail avant (pièce n ° 9).
3. Alignez le boulon à came (pièce n ° 2) et la broche
(pièce n ° 4) à l'arrière du rail avant; de l'étape n ° 1
avec les trous dans la fin de la glissière médiane (pièce
n ° 6). Insérer et tourner la came de verrouillage dans le
sens horaire pour serrer l'aide d'un tournevis cruciforme.
1.See en la página 5 para obtener instrucciones sobre cómo
utilizar la leva de bloqueo.
2. Inserte (1) cerraduras (Pieza 3) en los orificios en el lado
del carril del centro (Pieza 6). Inserte (1) perno de leva (Pieza
2) barra de carga (Pieza 9).
3. Alinear el perno de leva (Pieza 2) y la pasador (Pieza 4) en
la parte posterior del riel frontal, el paso # 1 con los agujeros
en el extremo del carril centro (punto 6). Inserte y gire la leva
de la derecha para apretar con un destornillador.
PART #3
PIÈCE N
O
3
PIEZA #3
PART #2
PIÈCE N
O
2
PIEZA #2
PART #4
PIÈCE N
O
4
PIEZA #4
PART #6
PIÈCE N
O
6
PIEZA #6
PG#7
#2 - (1) CAM BOLT
(1) GOUJON D’ASSEMBLAGERAPIDE
(1) CERROJO DE LEVA
#4 - (1) M3 x 32mm DOWEL
(1) GOUJONS DE M3 x 32mm
(1) PASADOR M3 x 32mm
#3 - (1) CAM LOCK
(1) VIS D’ASSEMBLAGE RAPIDE
(1) CERRADURA DE LEVA

