background image

ASSEMBLY INSTRUCTIONS • 

INSTRUCTIONS DE MONTAGE • INSTRUCCIONES DE MONTAJE

ASSEMBLY INSTRUCTIONS • 

INSTRUCTIONS DE MONTAGE • INSTRUCCIONES DE MONTAJE

16

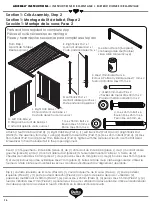
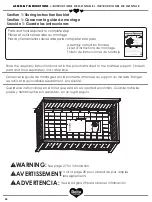
Section 1: Crib Assembly, Step 2  

Section 1: Montage du lit de bébé, Étape 2

Sección 1: Montaje de la cuna, Paso 2

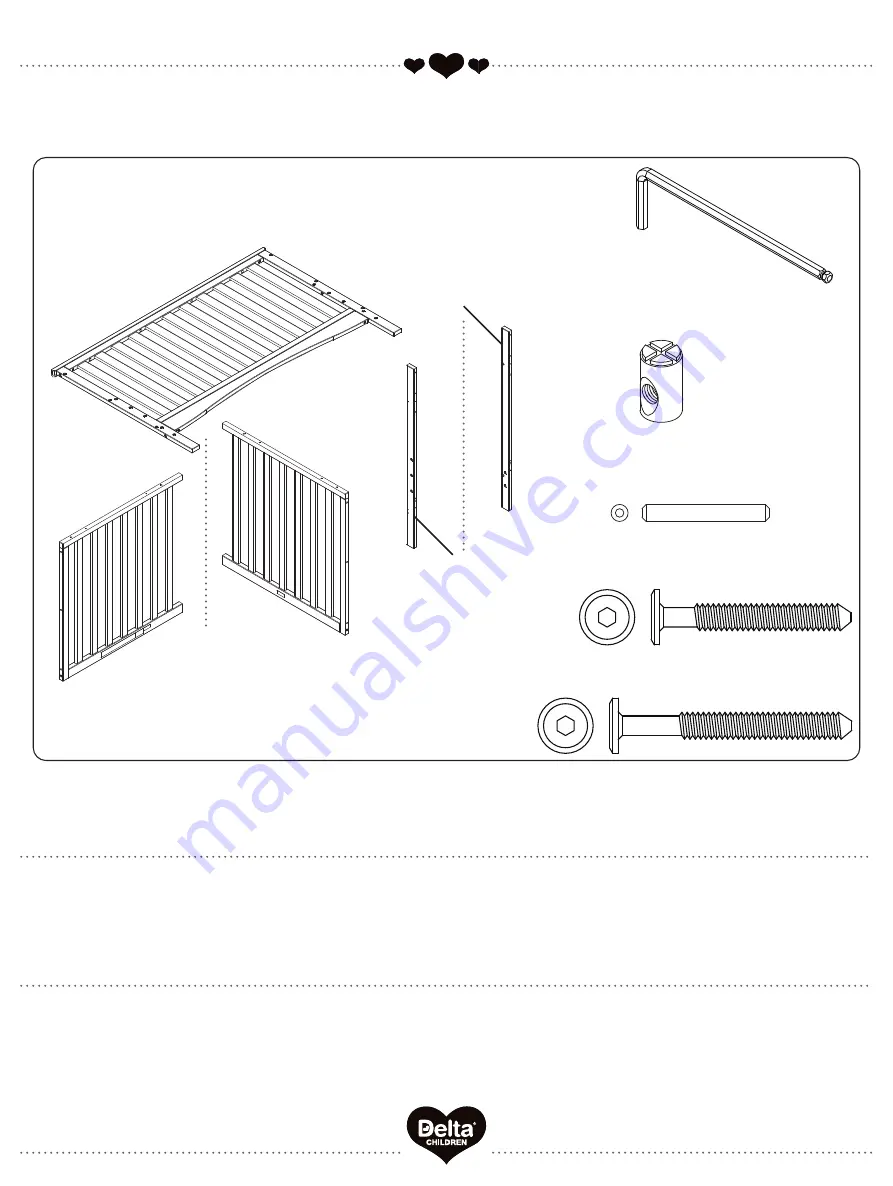
Parts and tools required to complete step

Pièces et outils nécessaires au montage

Piezas y herramientas necesarias para completar este paso

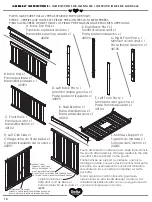
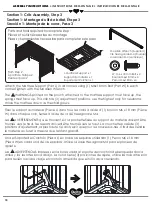
D. Left Back Post x 1

Montant arrière gauche x 1

Poste posterior izquierdo x 1

E. Right Back Post x 1

Montant arrière droit x 1

Poste posterior derecho x 1

J. Right Crib Side x 1

Côté droit du lit de bébé x 1

Costado derecho de la cuna x 1

H. Left Crib Side x 1

Côté gauche du lit de bébé x 1

Costado izquierdo de la cuna x 1 

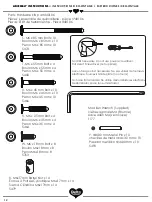
X. M6x17mm Barrel Nut x 4

Écrous À Portée Cylindrique M6x17 mm x 4

Tuerca Cilíndrica M6x17mm x 4

M4 Allen Wrench (Supplied)

clé hexagonale M4 (Fournie)

Llave Allen M4 (se Incluye)

From Step 1

À partir de l’étape 1

Desde el paso 1

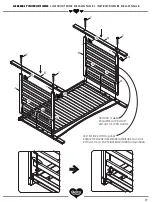
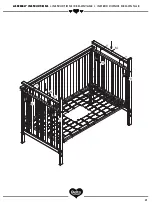
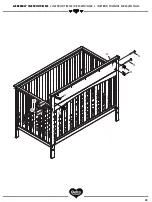
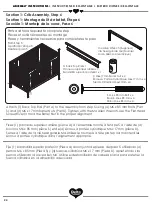
Attach (1) Left Crib Side (Part H), (1) Right Crib Side (Part J), (1) Left Back Post (Part D) and (1) Right Back Post 

(Part E) to the assembly from step 1 using 

(2) Φ4x30 mm Metal Pins (Part Y)

, (6) M6 x 45 mm Bolts (Part U), (4) M6 x 

55 mm Bolts (Part T) and (4) M6x17mm Barrel Nuts (Part X). Tighten with the M4 Allen Wrench. Use the Flat Head 

Screwdriver to hold the Barrel Nut in the proper alignment.

Fixez (1) côté gauche du lit de bébé (pièce H), de (1) côté droit du lit de bébé (pièce J), de (1) montant arrière 

gauche (pièce D) et de (1) montant arrière droit (pièce E) à l’ensemble monté à l’étape 1 à l’aide de (2) 

chevilles de métal Ö4 x 30 mm (pièce Y), de (6) boulons M6 x 45 mm (pièce U), de (4) boulons M6 x 55 mm (pièce 

T) et de (4) écrous à portée cylindrique M6x17 mm (pièce X). Serrez à l’aide de la clé hexagonale M4. Utilisez le 

tournevis à tête plate pour maintenir les écrous à portée cylindrique dans l’alignement approprié.

Fije (1) costado izquierdo de la cuna (Pieza H), (1) costado derecho de la cuna (Pieza J), (1) poste posterior 

izquierdo (Pieza D) y (1) poste posterior derecho (Pieza E) al conjunto de piezas del paso 1 utilizando (2) 

pasadores metálicos Φ4 x 30mm (Pieza Y)

, (6) pernos M6 x 45 mm (Pieza U), (4) pernos M6 x 55 mm (Pieza T) y (4) 

tuercas cilíndrica M6x17mm (Pieza X). Apriete todos los pernos utilizando la Llave Allen M4. Utilice el destornillador 

de cabeza plana para sostener la tuerca cilíndrica en la alineación adecuada.

Y. Φ4x30 mm Metal Pin x 2

chevilles de metal Φ4 x 30 mm x 2

Pasador metálico Φ4x30 mm x 2

U. M6 x 45 mm Bolt x 6

Boulon M6 x 45 mm x 6

Perno M6 x 45 mm x 6

T. M6 x 55 mm Bolt x 4

Boulon M6 x 55 mm x 4

Perno M6 x 55 mm x 4

Summary of Contents for Adley 3 in 1 Crib

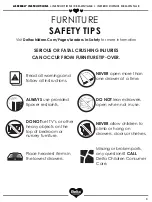
Page 1: ...la Cuna al contactar al centro de atenci n al cliente de Delta mencione la informaci n que aparece en el producto CONSUMER EXPERIENCE CENTER Delta Children s Products Corp 114 West 26th Street New Yo...

Page 2: ...crib Adult beds are not safe for babies NEVER co sleep NEVER place the crib near a window or any wall hangings The safest place for your baby to sleep is in a JPMA Certified crib Missing or broken par...

Page 3: ...r shelves Place heaviest items in the lowest drawers NEVER open more than one drawer at a time DO NOT leave drawers open when not in use Missing or broken parts any questions CALL Delta Children Consu...

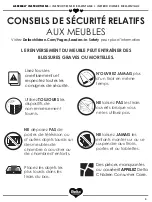
Page 4: ...lit de b b Les lits d adultes ne sont pas un lieu s r pour les b b s NE dormez JAMAIS ensemble NE placez JAMAIS le Lit de B b proximit d une fen tre ou de tentures L endroit le plus s r pour faire do...

Page 5: ...bjets les plus lourds dans les tiroirs du bas N OUVREZ JAMAIS plus d un tiroir en m me temps NE laissez PAS les tiroirs ouverts lorsque vous ne les utilisez pas Visitez Deltachildren Com Pages Leaders...

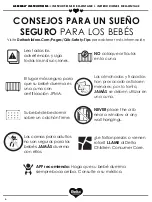
Page 6: ...seguras para los beb s JAM S duerma con ellos NEVER place the crib near a window or any wall hangings El lugar m s seguro para que su beb duerma es una cuna con certificaci n JPMA Le faltan piezas o v...

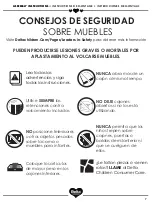
Page 7: ...oloque los art culos de mayor peso en los cajones inferiores NUNCA abra m s de un caj n al mismo tiempo NO DEJE cajones abiertos si no los est utilizando Visite Deltachildren Com Pages Leaders In Safe...

Page 8: ...impressed with the directions and organization of the hardware package He easily assembled this crib in an hour without any help It s very sturdy and we like that it has adjustable levels for the mat...

Page 9: ...e Exclusions Apply Des exclusions s appliquent Sujet changement Aqu Est Nuestro Regalo Para Usted FAMILIA DELTA Bienvenido a la Su Pr xima Compra En DeltaChildren com DELTA10 UTILISEZ LE CODE UTILICE...

Page 10: ...r arri re x 1 Barandilla superior posterior x 1 D Left Back Post x 1 Montant arri re gauche x 1 Poste posterior izquierdo x 1 40095 E Right Back Post x 1 Montant arri re droit x 1 Poste posterior dere...

Page 11: ...nneau arri re inf rieure x 1 Barandilla posterior inferior x 1 40094 M Left Side Cap Rail x 1 Barre sup rieure sur le c t gauche x 1 Barra superior del lado izquerido x 1 40099 N Right Side Cap Rail x...

Page 12: ...TRUCTIONS INSTRUCTIONS DE MONTAGE INSTRUCCIONES DE MONTAJE M4 Allen Wrench Supplied cl hexagonale M4 Fournie Llave Allen M4 se Incluye 1177 W M6 x 18 mm Bolt x 8 Boulon M6x18 mm x 8 Perno M6x18mm x 8...

Page 13: ......
Page 14: ...ce K l aide de 4 chevilles de m tal 4 x 30 mm pi ce Y de 4 boulons M6 x 45 mm pi ce U de 4 boulons M6 x 85 mm pi ce S et de 4 crous port e cylindrique M6x17 mm pi ce X Serrez l aide de la cl hexagona...

Page 15: ...SEMBLY INSTRUCTIONS INSTRUCTIONS DE MONTAGE INSTRUCCIONES DE MONTAJE ASSEMBLY INSTRUCTIONS INSTRUCTIONS DE MONTAGE INSTRUCCIONES DE MONTAJE S G K S P C Y Y X S X INSIDE INT RIEUR DENTRO F S Y Y U U U...

Page 16: ...ts Part T and 4 M6x17mm Barrel Nuts Part X Tighten with the M4 Allen Wrench Use the Flat Head Screwdriver to hold the Barrel Nut in the proper alignment Fixez 1 c t gauche du lit de b b pi ce H de 1 c...

Page 17: ...EMBLY INSTRUCTIONS INSTRUCTIONS DE MONTAGE INSTRUCCIONES DE MONTAJE PRODUCT LABEL TIQUETTE DU PRODUIT R TULO DEL PRODUCTO LEFT INSIDE BOTTOM LABEL TIQUETTE PARTIE INF RIEURE INT RIEURE GAUCHE R TULO D...

Page 18: ...e highest only for newborns move the mattress down as the child grows Fixer le support du matelas Pi ce L dans tous les coins l aide d 1 boulon M6 x 18 mm Pi ce W dans chaque coin Serrez l aide de la...

Page 19: ...e las almohadillas de protecci n juguetes grandes y otros objetos que puedan servir como escalones WARNINGS ON POUCH MUST FACE UP LES AVERTISSEMENTS INSCRITS SUR LA POCHETTE DOIVENT TRE TOURN S VERS L...

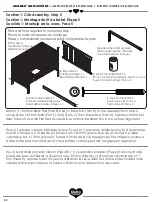
Page 20: ...th the M4 Allen Wrench Fixez 1 barre sup rieure sur le c t gauche pi ce M et de 1 barre sup rieure sur le c t droit pi ce N l ensemble mont l tape 3 l aide de 4 chevilles de m tal 4 x 30 mm pi ce Y et...

Page 21: ...21 ASSEMBLY INSTRUCTIONS INSTRUCTIONS DE MONTAGE INSTRUCCIONES DE MONTAJE ASSEMBLY INSTRUCTIONS INSTRUCTIONS DE MONTAGE INSTRUCCIONES DE MONTAJE V V M Y Y V N V Y Y...

Page 22: ...wdriver to hold the Barrel Nut in the proper alignment Fixez 1 panneau arri re inf rieure pi ce R et de 1 panneau arri re pi ce B l ensemble mont l tape 4 l aide de 2 boulons M6 x 85 mm pi ce S et de...

Page 23: ...S DE MONTAGE INSTRUCCIONES DE MONTAJE ASSEMBLY INSTRUCTIONS INSTRUCTIONS DE MONTAGE INSTRUCCIONES DE MONTAJE R B S X S X PULL GENTLY TIRER DOUCEMENT SAQUE CON CUIDADO PULL GENTLY TIRER DOUCEMENT SAQUE...

Page 24: ...4 boulons M6 x 85 mm pi ce S et de 4 crous port e cylindrique M6 x 17mm pi ce X Serrez l aide de la cl hexagonale M4 Utilisez le tournevis t te plate pour maintenir les crous port e cylindrique dans...

Page 25: ...25 ASSEMBLY INSTRUCTIONS INSTRUCTIONS DE MONTAGE INSTRUCCIONES DE MONTAJE ASSEMBLY INSTRUCTIONS INSTRUCTIONS DE MONTAGE INSTRUCCIONES DE MONTAJE S S A X X S S X...

Page 26: ...je mantenga fuera del alcance de los ni os hasta que complete el ensamblaje NEED EXTRA HELP We make assembly easy with our tips tricks video https www deltachildren com pages instructions BESOIN D AID...

Page 27: ...ress support and the mattress to the next highest position Fall Hazard Stop using crib when child begins to climb out or reaches a height of 35in 89cm whichever occurs first The child should be placed...

Page 28: ...pas le cas abaisser le support du matelas et le matelas d un cran Danger de chute Cesser d utiliser le lit lorsque l enfant est capable d en sortir ou qu il atteint la taille de 89 cm 35 pouces L enf...

Page 29: ...de utilizar la cuna cuando el ni o comience a trepar o alcance una altura de 35 pulgadas 89 cm lo que ocurra primero Deber a colocarse al ni o en una cama normal o juvenil Compruebe que este producto...

Page 30: ...ons Guardrails Deltachildren com Collections Full Size Bed Rails SAVE 10 WHEN YOU PURCHASE YOUR CONVERSION KITS NOW DON T FORGET TO BUY YOUR TODDLER GUARDRAIL AND BEDRAIL TO CONVERT YOUR CRIB TO A TOD...

Page 31: ...O COMPRE SU KIT DE CONVERSI N AHORA GRANDISSEZ AVEC NOUS CRECE CON NOSOTROS N OUBLIEZ PAS D ACHETER VOTRE BARRI RE DE S CURIT ENFANT ET BARRI RES DE LIT POUR CONVERTIR VOTRE LIT DE B B EN UN LIT D ENF...

Page 32: ...amientas necesarias para completar este paso M4 Allen Wrench Supplied cl hexagonale M4 Fournie Llave Allen M4 se Incluye Completed Crib Lit de b b mont Cuna Terminada Remove the Front Top Rail Front R...

Page 33: ...INSTRUCTIONS DE MONTAGE INSTRUCCIONES DE MONTAJE ASSEMBLY INSTRUCTIONS INSTRUCTIONS DE MONTAGE INSTRUCCIONES DE MONTAJE K S C PULL GENTLY TIRER DOUCEMENT SAQUE CON CUIDADO PULL GENTLY TIRER DOUCEMENT...

Page 34: ...nment Fixez 1 barre stabilisatrice pi ce K l ensemble mont l tape 1 de la section 2 l aide de 2 chevilles de m tal 4 x 30 mm pi ce Y de 2 boulons M6 x 85 mm pi ce S et de 2 crous port e cylindrique M6...

Page 35: ...INSTRUCCIONES DE MONTAJE ASSEMBLY INSTRUCTIONS INSTRUCTIONS DE MONTAGE INSTRUCCIONES DE MONTAJE PULL GENTLY TIRER DOUCEMENT SAQUE CON CUIDADO PULL GENTLY TIRER DOUCEMENT SAQUE CON CUIDADO K Both Ends...

Page 36: ...s basse Entreposez tout le mat riel en lieu s r Lisez toutes les mises en garde de la page 39 A utiliser comme un lit de jour ou comme un canap Ne pas utiliser sans que la Traverse de Conversion soit...

Page 37: ...il Une barri re de s curit pour lit d appoint existe pour cette couchette Veuillez consulter votre d taillant ou le site web www DeltaChildren com ou communiquer avec le service la client le de delta...

Page 38: ...chemicals Do not spray cleaners directly onto furniture Lift slightly when moving on carpeting to prevent leg breakage Use of a vaporizer near furniture will cause wood to swell and finish to peel NOT...

Page 39: ...alite du meuble Lors d un deplacement sur une moquette ou tapis soulevez legerement le meuble pour eviter de casser les pieds L utilisation d un vaporisateur pres du meuble causera le gonflement du bo...

Page 40: ...idad que recubre su producto se recomienda que coloque un pa o o una almohadilla de fieltro debajo de cualquier objeto que coloque sobre el acabado L mpielo con un trapo h medo y luego con uno seco pa...

Page 41: ...JPMA certified to meet or exceed all safety standards set by the CPSC ASTM Mattress Support Test simulates a baby jumping up and down in the crib Delta Standard 3 000 impacts Federal Standard 750 imp...

Page 42: ...formes avec tous les standards de s curit fix s par la CPSC et m me au del Le test du support du matelas simule un b b en train de sauter dans le lit Standard Delta 3000 impacts Standard F d ral 750 i...

Page 43: ...ra cumplir o superar todos los est ndares de seguridad establecidos por la CPSC y ASTM La prueba de soporte del colch n simula a un beb saltando de arriba a abajo en la cuna Est ndar Delta 3 000 impac...

Page 44: ...e inverse pour d monter le lit de b b 2 Le pied de lit correspond au montage du panneau avant r alis lors des tapes 1 de la section 1 3 Pour cr er la t te de lit fixez le Montant arri re gauche Pi ce...

Page 45: ...IONS DE MONTAGE INSTRUCCIONES DE MONTAJE ASSEMBLY INSTRUCTIONS INSTRUCTIONS DE MONTAGE INSTRUCCIONES DE MONTAJE A E D S G K S P C Y Y X S X INSIDE INT RIEUR DENTRO F S Y Y U U U U X R B BACK ARRI RE P...

Page 46: ...iler Contact Delta Children s Products for information or with questions Fixez les panneaux de lit la t te de lit mont l tape 1 de la section 3 et au pied de lit mont l tape 1 de la section 3 l aide d...

Page 47: ...d REMARQUE IL VOUS EST PR SENT UNE GRANDE T TE ET UN GRAND PIED DE LIT TOUS LES SYST MES DE PANNEAUX DE LIT NE PERMETTENT PAS L UTILISATION D UN PIED DE LIT Alternativement cet article peut tre mont a...

Page 48: ...os por un per odo de 1 a o a partir de su adquisici n bajo uso normal Esta garant a se otorga nicamente al comprador original y es v lida solamente cuando se proporciona una prueba de compra o si el p...

Page 49: ...ion Visita Deltachildren Com Pages Our Story para m s informaci n DELTA DONNE 10 de nos revenus sont d di s l am lioration de la vie des enfants DELTA PREND SOIN Nous testons la conformit au del des s...

Page 50: ...S COUFFINS MOIS S STROLLERS QUIPEMENT POUR B B COSAS PARA BEB BABY GEAR POUSSETTES CARRIOLAS TWIN BEDS LITS UNE PLACE CAMA SENCILLA BINS ORGANIZERS PANIERS CONTENEDORES MATTRESES MATELAS COLCH N PLAYR...

Reviews: