background image

11

C

H

N

N

G

G

H

N

N

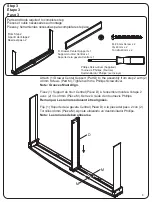
Step 6

Étape 6

Paso 6

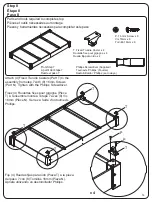
Parts and tools required to complete step

Pièces et outils nécessaires au montage

Piezas y herramientas necesarias para completar este paso

C. Drawer Long Side x 1

Côté Long d'Tiroir x 1

Lado Largo de la Gaveta x 1

Phillips Screwdriver (Supplied)

Tournevis ’Phillips’ (Fournie)

Destornillardor ’Phillips’ (se Incluye)

G. Drawer Left Back Post x 1

Montant arrière gauche d'tiroir x 1

Poste posterior izquierdo de la gaveta x 1

H. Drawer Right Back Post x 1

Montant arrière droit d'tiroir x 1

Poste posterior derecho de la gaveta x 1

N. 25 mm Screw x 4

Vis 25mm x 4

Tornillo 25mm x 4

Attach (1) Drawer Left Back Post (Part G) and (1) Drawer Right Back Post 

(Part H) to (1) Drawer Long Side (Part C) with (4) 25mm Screws (Part N). 

Tighten with the Phillips Screwdriver.

Fixez (1) Montant arrière gauche d'tiroir (Pièce G) et (1) Montant arrière droit 

d'tiroir (Pièce H) au le côté long d'tiroir  (Pièce C) avec (4) Vis 25mm (Pièce 

N). Serrez à l’aide d’un tournevis Phillips.

Fije (1) Poste posterior izquierdo de la Gaveta (Pieza G) y (1) Poste 

posterior derecho de la Gaveta (Pieza H) al Lado largo de la Gaveta (Pieza 

C) con (4) Tornillos 25mm (Pieza N). Apriete utilizando un destornillador 

Phillips.

INSIDE

INTÉRIEUR.

DENTRO

BOTTOM

INFÉRIEURE

INFERIOR

Summary of Contents for Arch Trundle

Page 1: ...cting Delta Consumer Care please ensure that the information above matches the information found on the label on the product please reference the information found on the product when contacting Delta...

Page 2: ...verifiez chaque piece en placant le vis boulon sur le diagramme de la piece concernee qui est dessine en taille et forme reelle Assurez vous d utiliser la taille et la forme exacte comme il est specif...

Page 3: ...tre en su cuarto NOTAS SOBRE SU CUIDADO Y MANTENIMIENTO No ara e ni desconche el acabado Inspeccione el producto con regularidad p ngase en contacto con Delta Children s Products para el recambio de p...

Page 4: ...ont Post x 1 Montant avant droit d tiroir x 1 Poste frontal derecho de la gaveta x 1 26156 G Drawer Left Back Post x 1 Montant arri re gauche d tiroir x 1 Poste posterior izquierdo de la gaveta x 1 26...

Page 5: ...river Supplied Tournevis Phillips Fournie Destornillardor Phillips se Incluye 5600 M 40 mm Screw x 6 Vis 40mm x 6 Tornillo 40mm x 6 5209 N 25 mm Screw x 14 Vis 25mm x 14 Tornillo 25mm x 14 5495 P 16 m...

Page 6: ...evilles en bois 6x30 mm Pi ce S et 4 Vis 55mm Pi ce L Serrez l aide d un tournevis Phillips Fije 1 Poste frontal izquierdo de la Gaveta Pieza E y 1 Poste frontal derecho de la Gaveta Pieza F a la Part...

Page 7: ...o Corto de la Gaveta x 2 N 25 mm Screw x 4 Vis 25mm x 4 Tornillo 25mm x 4 Attach 2 Drawer Short Sides Part B to the assembly from step 1 with 4 25mm Screws Part N Tighten with the Phillips Screw drive...

Page 8: ...Support x 1 Support du tiroir Central x 1 Soporte de la gaveta Central x 1 Attach 1 Drawer Center Support Part D to the assembly from step 2 with 2 40mm Screws Part M Tighten with the Phillips Screwdr...

Page 9: ...Drawer Short Side and Drawer Center Support into the groove on the Drawer Front Repeat on the other Drawer Bottom Panel Faites coulisser le fond du tiroir Pi ce J dans les rainures situ es sur le c t...

Page 10: ...cesarias para completar este paso K Drawer Support Rail x 2 Support du tiroir x 2 Soporte de la gaveta x 2 Attach 2 Drawer Support Rails Part K to 1 Drawer Front Part A with 4 6x30mm Wood Dowels Part...

Page 11: ...r x 1 Poste posterior derecho de la gaveta x 1 N 25 mm Screw x 4 Vis 25mm x 4 Tornillo 25mm x 4 Attach 1 Drawer Left Back Post Part G and 1 Drawer Right Back Post Part H to 1 Drawer Long Side Part C w...

Page 12: ...4 Vis 25mm x 4 Tornillo 25mm x 4 Attach the assembly from step 6 to the assembly from step 5 with 4 25mm Screws Part N 4 40mm Screws Part M and 4 Plastic Barrel Nuts Part R Tighten with the Phillips S...

Page 13: ...M M 13 R N N N N M R M R R...

Page 14: ...ixed Trundle Caster x 4 Roulette fixe pour gigogne x 4 Rueda fija para nido x 4 P 16 mm Screw x 8 Vis 16mm x 8 Tornillo 16mm x 8 Attach 4 Fixed Trundle Casters Part T to the assembly from step 7 with...

Page 15: ...t sous condition d une utilisation normale Cette garantie concerne seulement l acheteur d origine et est valide uniquement sur pr sentation de la preuve d achat ou si re u en cadeau lorsque l enregist...

Reviews: