background image

5

Customer Service 

Tel. (800) 377-3777 

www.DeltaChildren.com

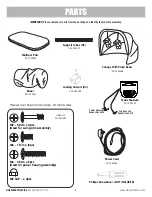
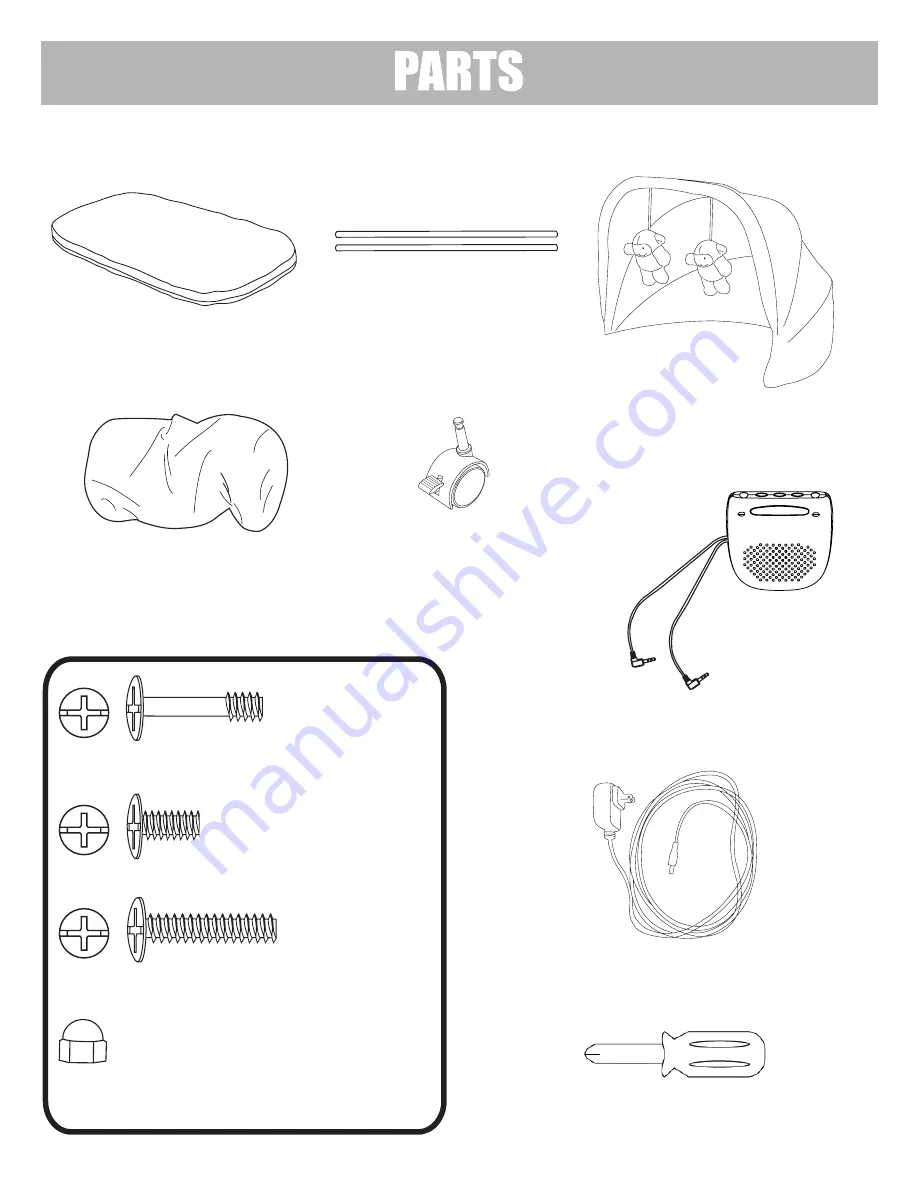
Music Module

Locking Casters (X4)

Power Cord 

Top Base Leg 

Connection Cord

Power Housing  

Connection Cord 

Phillips Screwdriver  (NOT INCLUDED)

*Screws are shown in actual size - 18 total screws


Part # 50400

Part # 50398

Part # 50366

Part # 50363

M6 - 3.5cm x 2pcs

(Used for power housing assembly)

M6 - 1.7cm x 12pcs

M5 - 3.2cm x 4pcs

(Used for swing arm assembly)

M5 CAP - x 4pcs

Mattress Pad 

Sheet

Part # 50361

Part # 50359

Support Tubes (X2)

Part # 50357

Canopy With Plush Bears

Hardware

Part #50392

IMPORTANT!


Please remove all parts from the package and identify them before assembly. 

Summary of Contents for Beautyrest 37202 Series

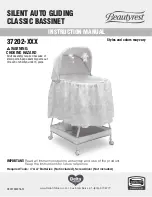
Page 1: ...s may vary 37202 XXX www DeltaChildren com I Customer Service 1 800 377 3777 IMPORTANT Read all instructions before assembly and use of the product Keep the instructions for future reference INSTRUCTION MANUAL WARNING Adult assembly required because of small parts Keep assembly parts out of reach of children under 3 years CHOKING HAZARD ...

Page 2: ...placement parts repair or instructions DO NOT leave child unattended in the bassinet when it is in the rocking gliding mode Always make sure the wheels or stands are in the locked down position Remove any tools or excess parts including plastic packaging from bassinet vicinity after assembly STRANGULATION HAZARD Children have STRANGLED in cords Keep the cord out of reach of children Strings can ca...

Page 3: ...tional Information Simply visit our Website register your product and add the Extended Warranty https www deltachildren com pages product registration Extended Warranty only available in the following States Arkansas Colorado Delaware District of Columbia Georgia Idaho Illinois Indiana Iowa Kansas Kentucky Louisiana Maryland Michigan Mississippi Missouri Nebraska Nevada New Hampshire New York Nort...

Page 4: ... package and identify them before assembly Fabric Storage Liner Front Base Leg with Wire Connection X1 Back Base Leg Power Housing X1 Needs 2 M6 3 5cm screws to attach to front base leg with wire connection Fabric Liner B A Part 50397 Part 50399 Part 50360 Part 50394 Part 50396 Part 50395 Part 50393 Part 50354 For power housing and power cord attachment ...

Page 5: ...re shown in actual size 18 total screws Part 50400 Part 50398 Part 50366 Part 50363 M6 3 5cm x 2pcs Used for power housing assembly M6 1 7cm x 12pcs M5 3 2cm x 4pcs Used for swing arm assembly M5 CAP x 4pcs Mattress Pad Sheet Part 50361 Part 50359 Support Tubes X2 Part 50357 Canopy With Plush Bears Hardware Part 50392 IMPORTANT Please remove all parts from the package and identify them before asse...

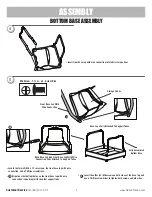
Page 6: ...orage liner Fabric Storage Liner Slide Support Tube Into Fabric Storage Liner Fabric Storage Liner Facing Upward Support Tube 3 M6 Screw 1 7cm x2 Actual Size Back BaseLeg Locate the two x2 M6 x 1 7cm screws the back base leg and a Phillips screwdriver Align the bottom holes of the back base leg with the support tubes Insert the x2 M6 screws on both sides of the back base leg and use a Phillips scr...

Page 7: ...t Tubes Back Base Leg And Front Base Leg With Wire Connection Fully Attached To Support Tubes 4 3 Insert the other x2 M6 screws on both sides of the base leg and use a Phillips screwdriver to tighten both screws on both sides 3 4 Locate the two x2 M6 x 1 7cm screws the front base leg with wire connection and a Phillips screwdriver Align the other bottom holes on the front base leg with wire connec...

Page 8: ...e a Phillips screwdriver to tighten x2 M6 screws on the opposite sides of the magnet nub Pull outward on the power housing to make sure it is securely attached M6 Screw 3 5cm x2 Actual Size Power Housing Nub M6 Screw insert Front Base Leg With Wire Connection Magnet Power Housing Nub Clicked into Base Leg With Wire Connection Power Housing Fully Attached To Front Base Leg With Wire Connection Atta...

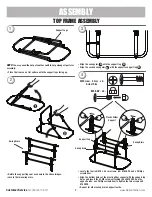
Page 9: ...he support leg Align the second swing arm with the opposite support leg B A A B B A A B ASSEMBLY Locate the four x4 M5 x 3 2cm screws x4 M5 CAPS and a Phillips screwdriver Align the bottom holes of the plastic glider support with the support leg holes and insert the x2 M5 screws attaching the x2 M5 CAPS on the opposite side use Phillips screwdriver to tighten the two screws and M5 CAPS Repeat for ...

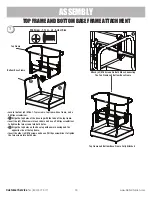
Page 10: ...r to tighten the two screws into both holes Align the top holes on the base leg with power housing and the opposite side of the top frame Insert the other x2 M6 screws and use a Phillips screwdriver to tighten the two screws into both holes M6 Screw 1 7cm x4 Actual Size 1 Top Frame and Bottom Base Frame Fully Attached Top Frame Bottom Base Frame Attach x2 M6 Screws On Both Sides Connecting The Top...

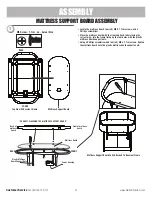
Page 11: ...Frame FRONT BACK TOP FRONT FRONT Mattress Support Board Fully Attached To Bassinet Frame Locate the mattress board four x4 M6 X 1 7cm screws and a Phillips screwdriver Place the mattress board with the front and back labels facing the correct way into the frame lining up the four holes with the plastic mattress board support nuts Using a Phillips screwdriver and four x4 M6 x 1 7cm screws tighten t...

Page 12: ...ase legs Push down until you hear the caster CLICK into place Pull upward on the caster to assure it is properly attached to bassinet 1 2 3 Complete Frame Assembly Turn the assembly upright Check to be sure the legs are secure While gently holding the base down pull up on the top rail The complete frame assembly should remain intact FRONT BACK ASSEMBLY LOCKING CASTER ASSEMBLY ...

Page 13: ...nd can radiate radio frequency energy and if not installed and used in accordance with the instructions may cause harmful interference to radio communications However there is no guarantee that interference will not occur in a particular installation If this equipment does cause harmful interference to radio or television reception which can be determined by tuning the equipment off and on the use...

Page 14: ...attery compartment Remove batteries during long periods of non use Always remove exhausted batteries from the product Dispose batteries safely Do not dispose of product in a fire The batteries inside may explode or leak Never short circuit the battery terminals Use only batteries of the same or equivalent type as recommended Do not charge non rechargeable batteries Remove rechargeable batteries fr...

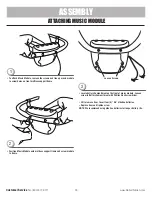
Page 15: ... remove door Insert four 4 AA alkaline batteries Replace door and tighten screw NOTE We recommend using alkaline batteries for longer battery life To attach Music Module remove the screws and line up music module to screw holes on front mattress support frame Position Music Module onto mattress support frame and screw module to frame Loosen Screws AUTO GLIDE 2 ASSEMBLY ATTACHING MUSIC MODULE ...

Page 16: ... the top of the music module NOTE Light will stay on in 10 minute cycles unless button is pressed before 10 minutes are up Press MUSIC button on top of the music module to activate MUSIC Press button multiple times to cycle through three 3 music melodies Volume can be adjusted with UP DOWN buttons on the top of the music module Auto Glide Light Volume UP Volume DOWN AUTO GLIDE Music ASSEMBLY MUSIC...

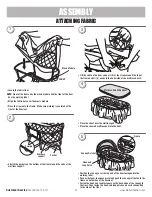
Page 17: ...ttress support 2 Lift the skirt on the liner snap all 8 of the straps around the top of the frame and all 4 snaps to the underside of the mattress board FRONT 4 Place the sheet over the mattress pad Place the covered mattress pad into the liner Mattress Pad With Sheet 5 Position the canopy over the top end of the bassinet opposite the warning label Push aside foam to expose metal and push the cano...

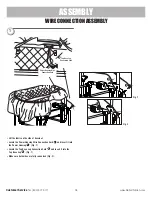
Page 18: ... 1 Fig 2 1 2 1 2 1 1 2 2 Power Housing Wire Connection Cord 2 Lift the fabric on the side of bassinet Locate the Power Housing Wire Connection Cord and insert it into the Power Housing Fig 1 Locate the Top Base Leg Connection Cord and insert it into the Top Base Leg Fig 1 Make sure both wires are fully connected Fig 2 ASSEMBLY WIRE CONNECTION ASSEMBLY ...

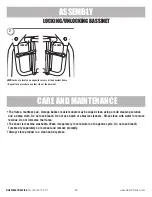
Page 19: ...cated On The Inside Of Base Leg Power Cord Fig 3 ASSEMBLY WIRE CONNECTION ASSEMBLY LOCKING UNLOCKING BASSINET 1 3 To lock the gliding mechanism rotate the red lock arm clock wise and snap the lock arm onto the lock peg NOTE There is a lock on both sides of the bassinet To unlock the gliding mechanism rotate the red lock arm counter clock wise and off the lock peg NOTE Remember to unlock both sides...

Page 20: ...ss pad storage basket music module may be wiped clean using a mild cleaning solution and a damp cloth Do not use bleach Do not use harsh or abrasive cleaners Rinse clean with water to remove residue Do not immerse the frame The sheet is machine washable Wash it separately in cold water on the gentle cycle Do not use bleach Tumble dry separately on low heat and remove promptly Always store product ...

Page 21: ......

Page 22: ...Delta Children 114 West 26th Street New York NY 10001 1 800 377 3777 www DeltaChildren com ...

Reviews: