background image

7

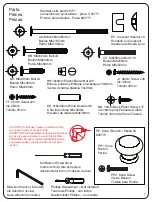
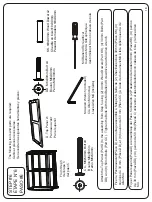
EE. Crescent Washer x8

Rondelle en Croissant

Arandela de Media Luna

Parts:

Pièces:

Piezas:

Hardware kits part# 25771

L'ensemble de quincaillerie - pièce n°25771

El kit de herramientas - Pieza #25771

AA. M6x105mm Bolt x1

Boulon M6x105mm

Perno M6x105mm

BB. M6x60mm Bolt x9

Boulon M6x60mm

Perno M6x60mm

DD. M6x30mm Bolt x4

Boulon M6x30mm

Perno M6x30mm

CC. M6x50mm Bolt x10

Boulon M6x50mm

Perno M6x50mm

M4 Allen Wrench (included)

Clé Allen M4 (inclus)

Llave Allen M4 (incluido)

Phillips Screwdriver – Not included

Tournevis Phillips - non inclus

Destornillidor Phillips – no incluido

CAUTION: Do Not use a power screwdriver they 

can cause screws to break or strip.

ATTENTION: Ne Pas utiliser un tournevis électrique 

car les vis peuvent casser ou perdre leurs filets.

ATENCIÓN: No use un destornillador eléctrico ya 

que puede causar que los tornillos se rompan o 

rueden.  

JJ. 40mm Screw x30 

Vis 

40mm

Tornillo 

40mm

FF. 25mm Screw x24 

Vis 

25mm

Tornillo 

25mm

HH.10x9mm Plastic Barrel Nut x30 

Écrou à portée cylindrique en plastique 10x9mm

Tuerca cilíndrica plástica 10x9mm

KK. Φ

8x30mm Wood Dowel x46

Cheville en bois 

Φ

8x30mm

Pasador de madera 

Φ

8x30mm

NN. 16mm Back Panel Screw x17

Vis 16mm pour Panneau Arrière

Tornillo 16mm de Panel Trasero 

PP1. Knob

Bouton

Perilla

 PP. Knob / Bouton / Perilla x6

 #25773

PP2. Knob Screw

Vis de Bouton

Tornillo para Perilla

M4 Ballend Screwdriver

tournevis M4 à tête sphérique

destornillador M4 con cabeza de bola

Summary of Contents for Dresser Commode

Page 1: ...sumer Care please ensure that the information above matches the information found on the label on the Back Panel please reference the information found on the product when contacting Delta Consumer Ca...

Page 2: ...liminar el riesgo de vuelco Vigile siempre la actividad de su hijo cuando se encuentre en su cuarto No permita que nadie se ponga de pie en los cajones No permita que nadie se ponga de pie encima de e...

Page 3: ...el mueble El velo ligeramente cuando lo mueva sobre alfombras o moqueta para evitar que se rompan las patas El uso de vaporizadores cerca de muebles puede provocar que la madera se hinche y acabe des...

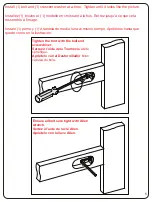
Page 4: ...2 pouces expos s 2 Inserte el perno en la ranura G relo en el sentido de las agujas del reloj con los dedos o con el destornillador con cabeza de bola NO lo apriete del todo deje 1 2 12 mm fuera 3 Sl...

Page 5: ...mble l image Instale 1 perno y 1 Arandela de media luna al mismo tiempo Apri telos hasta que quede como en la ilustraci n Ensure all bolts are tight with Allen wrench Serrez l aide de la cl Allen Apri...

Page 6: ...Panel x1 Panneau avant Panel superior 25764 H Top Front Rail x1 Rail avant sup rieur Riel frontal superior 25759 F Bottom Front Rail x1 Rail avant inf rieur Riel frontal inferior 25762 E Top Back Rail...

Page 7: ...they can cause screws to break or strip ATTENTION Ne Pas utiliser un tournevis lectrique car les vis peuvent casser ou perdre leurs filets ATENCI N No use un destornillador el ctrico ya que puede cau...

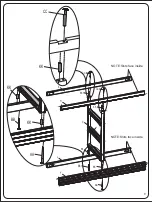
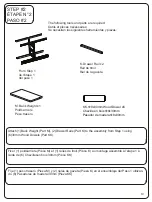
Page 8: ...ntas y piezas Attach Top Front Rail Part H Bottom Front Rail Part F Top Back Rail Part E Bottom Back Rail Part J to Divide Frame Part C using 4 dowels Part KK 1 105mm Bolt Part AA 2 50mm Bolt Part CC...

Page 9: ...9 KK H E F J C CC KK KK AA KK BB CC NOTE Slots face inside NOTE Slots face inside KK CC KK AA KK BB...

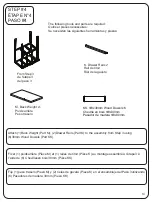
Page 10: ...es Se necesitan las siguientes herramientas y piezas Attach 1 Back Weight Part M 2 Drawer Rails Part K to the assembly from Step 1 using 6 30mm Wood Dowels Part KK Fixer 1 poidsarri re Pi ce M et 1 ra...

Page 11: ...11 KK KK KK...

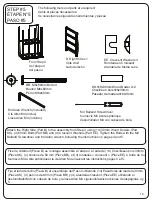
Page 12: ...rom Step 2 using 14 30mm Wood Dowels Part KK 4 60mm Bolt Part BB and 4 Crescent Washer Part EE Tighten the Bolts with the M4 Ballend Screwdriver and M4 Allen wrench following theinstructions on pages...

Page 13: ...13 KK KK EE BB KK KK...

Page 14: ...s Se necesitan las siguientes herramientas y piezas Attach 1 Back Weight Part M 2 Drawer Rails Part K to the assembly from Step 3 using 6 30mm Wood Dowels Part KK Fixer 1 poidsarri re Pi ce M et 1 rai...

Page 15: ...KK KK KK 15...

Page 16: ...om Step 4 using 14 30mm Wood Dowels Part KK 4 60mm Bolts Part BB and 4 Crescent Washers Part EE Tighten the Bolts with the M4 Ballend Screwdriver and M4 Allen wrench following the instructions on page...

Page 17: ...17 KK EE BB B KK KK...

Page 18: ...amientas y piezas Attach the Top Panel Part D to the assembly from Step 5 using 2 30mm Wood Dowels Part KK 4 30mm Bolts Part DD and 8 50mm Bolts Part CC Tighten the Bolts with the M4 Ballend Screwdriv...

Page 19: ...19 KK CC CC CC CC CC CC CC CC DD DD KK...

Page 20: ...neles traseros Parte L con ayuda de 17 Tornillos Parte NN Apriete con un destor nillador de cruz Phillips Screwdriver Not included Tournevis Phillips non inclus Destornillidor Phillips no incluido NN...

Reviews: