background image

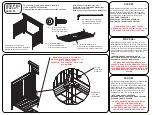
STEP #3

ÉTAPE N°3

PASO #3

4 CORNERS

4 COINS

4 ESQUINAS

WARNINGS ON POUCH - THIS SIDE UP

MISES EN GARDE SUR LA POCHETTE – CE 

CÔTÉ-CI VERS LE HAUT

ADVERTENCIA EN LA BOLSA – ESTE LADO 

HACIA ARRIBA

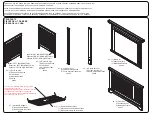
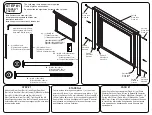
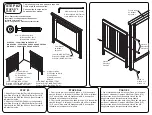
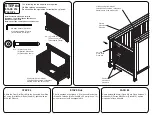
STEP #3

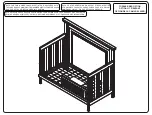
Attach Mattress Support (Part #7) to the crib from step

#2. Use (4) Bolts (Part #11) with M4 Hex Wrench.

Tighten all bolts completely. Note: There are three

positions for the Mattress support. From newborn to

a child that is 35 inches tall. See warnings note

**USE CARE TO PREVENT 

SCRATCHING THE CRIB POSTS WHEN 

POSITIONING THE MATTRESS SUPPORT

WARNINGS ON POUCH MUST FACE UP.

BE SURE MATTRESS SUPPORT IS LEVEL.  USE 

THE SAME POSITION AT ALL LOCATIONS.

ÉTAPE No3

Fixer le Support de Matelas (Pièce No 7) au Lit de 

Bébé Assemblé à l’Étape 2 au moyen de (4) Boulons 

(Pièce No 11) à l’aide de la clé à six pans M4 fournie. 

S’assurer de bien serrer tous les boulons. Remarque: 

trois positions sont prévues pour le support de materla 

(de nouveau-né à enfant de 35 po – voir mise en 

garde)

**PROCÉDER AVEC PRÉCAUTION AFIN 

D’ÉVITER DE RAYER LES POTEAUX DU LIT EN 

PLAÇANT LE SUPPORT DU MATELAS.

PASO #3

Fije el Soporte del Colchón (Pieza #7) al Ensamblado 

de la Cuna del Paso #2 utilizando (4) Pernosn 

(Pieza #11) utilice la llave hexadecimal M4 incluida. 

Asegúrese de apretar completamente todos los 

pernos. Nota: Hay 3 posiciones para el soporte del 

colchón (desde recién nacido hasta un niño de 35 

pulgadas de altura – lea la nota de Advertencia).

**SEA CUIDADOSO Y PREVENGA 

RAYONES EN LOS POSTES CUANDO COLOQUE 

EL SOPORTE DEL COLCHÓN.

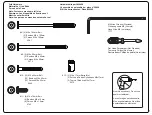
The following tools and parts are required:

Outils et pièces nécessaires:

Se necesitan las siguientes herramientas y piezas:

Note: Fasteners are shown full size

Remarque: Les dispositifs de fixation sont

Montrés en taille réelle

Nota: Los pernos se muestran en tamaño real

#11 - (4) M6 x 18mm Bolt

(4) Boulons M6 x18mm

(4) Pernos M6 x 18mm

#7 - (1) Mattress Support 

(1) Support de Matelas

(1) Soporte para el Colchón

#13 - (1) Instruction Sheet Pouch

(1) Pochette du Feuillet D’instructions

(1) Bolsa para la Hoja de Instrucción

Crib Assembly from Step #2

Lit De Bébé Assemblé à L’étape No2

Montaje de la Cuna del Paso #2

Part #11

Pièce No11

Pieza #11

M4 Allen Wrench (Provided)

Clé hexagonale M4 (Fournie)

Llave Allen M4 (se Incluye)

LES MISES EN GARDE IMPRIMÉES SUR LA 

POCHETTE DOIVENT ÊTRE ORIENTÉES VERS LE 

HAUT. VÉRIFIER QUE LE SUPPORT DU MATELAS 

EST BIEN DE NIVEAU EN S’ASSURANT QU’IL EST 

À LA MÊME HAUTEUR À TOUS LES POINTS DE 

SOUTIEN.    

LA LISTA DE ADVERTENCIAS EN LA BOLSA 

TIENE QUE ESTAR HACIA ARRIBA.  

ASEGÚRESE DE QUE EL SOPORTE DEL 

COLCHÓN ESTÉ NIVELADO USANDO LA MISMA 

POSICIÓN EN TODAS LAS UBICACIONES.   

Summary of Contents for Simmons Juvenile Crib 'N' More

Page 1: ...aux informations indiqu es sur l tiquette qui se trouve sur Panneau Arri re veuillez faire r f rence aux informations indiqu es sur le produit lorsque vous contactez le Service client Al contactar al...

Page 2: ...broken parts any questions CALL Simmons Kids Consumer Care NEVER place the crib near a window or any wall hangings Your baby should sleep on a firm mattress DO NOT place any items in the crib AAP Reco...

Page 3: ...ximit d une fen tre ou de tentures Votre b b doit dormir sur un matelas ferme Conseils de l AAP Placez toujours votre b b sur le dos pour dormir Consultez votre m decin Lisez tous les avertissements e...

Page 4: ...los beb s JAM S duerma con ellos JAM S coloque la cuna cerca de una ventana o elementos colgados en las paredes Su beb debe dormir sobre un colch n firme APP recomienda Haga que su beb duerma siempre...

Page 5: ...ed tipover restraints NEVER allow children to climb or hang on drawers doors or shelves Place heaviest items in the lowest drawers NEVER open more than one drawer at a time DO NOT leave drawers open w...

Page 6: ...nis NE laissez JAMAIS les enfants monter sur ou se suspendre aux tiroirs portes et ou tablettes Placez les objets les plus lourds dans les tiroirs du bas N OUVREZ JAMAIS plus d un tiroir en m me temps...

Page 7: ...UNCA permita que los ni os trepen sobre cajones puertas o baldas de estanter a ni que se cuelguen de ellos Coloque los art culos de mayor peso en los cajones inferiores NUNCA abra m s de un caj n al m...

Page 8: ...TES DE ENCENDER A LA ASAMBLEA SI ALGUNAS PIEZAS SON QUE FALTA O DA ADAS CRIB PARTS PI CES DE LIT DE B B PIEZAS DE LA CUNA 4 1 Left Crib Side 1 Panneau de Gauche du Lit de B b 1 Montaje del Lado Izquie...

Page 9: ...mm 11 8 M6 x 18mm Bolt 8 Boulons M6 x 18mm 8 Pernos M6 x 18mm 5475 5466 5763 1177 12 2 M6 x 17mm Barrel Nut 5479 2 crous Port e Cylindrique M6x17mm 2 Tuerca Cil ndrica M6x17mm 8 2 M6 x 105mm Bolt 2 Bo...

Page 10: ...M6x17mm 2 Tuerca Cil ndrica M6x17mm Part 12 Pi ce No12 Pieza 12 Attach Left Rear Post Part 1 and Right Rear Post Part 2 to Back Rail Part 3 using 2 M6x90mm Bolts Part 9 2 M6x105mm Bolts Part 8 and 2 M...

Page 11: ...the Assembly from Step 1 using 3 M6x45mm Bolts Part 10 Tighten with the M4 Allen Wrench Be sure label is towards the inside 2 Attach Left Crib Side Part 4 to the Assembly from Step 1 using 3 M6x45mm...

Page 12: ...hexadecimal M4 incluida Aseg rese de apretar completamente todos los pernos Nota Hay 3 posiciones para el soporte del colch n desde reci n nacido hasta un ni o de 35 pulgadas de altura lea la nota de...

Page 13: ...y from Step 3 Lit De B b Assembl L tape No3 Montaje de la Cuna del Paso 3 Part 6 Pi ce No6 Pieza 6 M4 Allen Wrench Provided Cl hexagonale M4 Fournie Llave Allen M4 se Incluye 6 1 Front Rail 1 Panneau...

Page 14: ...tress support and the mattress to the next highest position Fall Hazard Stop using crib when child begins to climb out or reaches a height of 35in 89cm whichever occurs first The child should be place...

Page 15: ...st pas le cas abaisser le support du matelas et le matelas d un cran Danger de chute Cesser d utiliser le lit lorsque l enfant est capable d en sortir ou qu il atteint la taille de 89 cm 35 pouces L e...

Page 16: ...de utilizar la cuna cuando el ni o comience a trepar o alcance una altura de 35 pulgadas 89 cm lo que ocurra primero Deber a colocarse al ni o en una cama normal o juvenil Compruebe que este producto...

Page 17: ...emicals Do not spray cleaners directly onto furniture Lift slightly when moving on carpeting to prevent leg breakage Use of a vaporizer near furniture will cause wood to swell and finish to peel NOTES...

Page 18: ...iez avoir besoin de le placer sur le cote lateral et sur le cote frontal Il est fortement recommand de faire l assemblage sur une surface lisse non abrasive comme le film mousse de l emballage pour ev...

Page 19: ...solicite que coloque la unidad de lado y de cara Se reco mienda encarecidamente que realice el montaje sobre una superficie no abrasiva Como la envoltura de embalaje de espuma para evitar da ar el aca...

Page 20: ...CRIB N MORE PEUT TRE CONVERTI EN LIT D ENFANT L ACHAT DU GARDE CORPS POUR LIT D ENFANT SIMMONS No 328725 PLUS DE D TAILS EN MAGASIN NOTA ESTA CUNA SE PUEDE CONVERTIR EN UNA CAMA DEL NI O CON LA COMPR...

Page 21: ...immons Kids Furniture for more information Attach Bed Rails to the Back Rail Part 3 and Front Rail Part 6 using 8 M6 x18mm Bolts Part 11 Follow all instructions supplied with the Bed Rails Ce lit de b...

Page 22: ......

Reviews: