background image


9

 -


VGA 

pin 

definition 

pin 

definition 

Red 

Green 

Blue 

N.C. 

GND 

Detect 

GND 

GND 

+5V 

10 

GND 

11 

NC 

12 

DDCDATA 

13 

HSYNC 

14 

VSYNC 

4.5 Standard HDMI A Type   


HDMI 

pin 

definition 

pin 

definition 

DATA2+ 

DATA2 shield 

DATA2- 

DATA1+ 

DATA1 shield 

DATA1- 

DATA0+ 

DATA0 shield   

DATA0- 

10 

11 

DATA1_CK 

shield 

12 

DATA1_CK- 

13 

CEC 

14 

Reserved 

15 

SCL

DDC 

clock


16 

SDA

DDC data


17 

DCC/CEC GND 

18 

+5V 

19 

Hot swap test 


4.6 Power 

This product support DC+12 V power in, together with power adapter, and 

following is the power pin definition: 


DC12V input 


pin 

definition 

+12V 

GND 


Summary of Contents for IPC-B200-J923E1C00

Page 1: ...Industrial PC IPC B200 J923E1C00 User manual version Ver A01...

Page 2: ...tion or use Or inability to use the product or documentation Guarantee Clause The warranty on the product lasts for 18 months if the user has additional requirements the contract sighed between the tw...

Page 3: ...ore installation please make sure the device is placed on a solid surface accidental drop or tipping may cause malfunction or damage to the device Before you connect or unplug any signal cable make su...

Page 4: ...Packing List A fanless industrial Computer 1 AC 100V 240V to DC 12V 5A power adapter 1 AC220V power cable 2 Mounting Bracket 4 Screw 1 Driver CD manual 1 Certification 1 packing list...

Page 5: ...roduct outline 6 3 2 Product assembly 6 4 Interface Definition 7 4 1 USB port 7 4 2 Ethernet 8 4 3 Standard DB9 8 4 4 Standard VGA 8 4 5 Standard HDMI A Type 9 4 6 Power 9 5 Appendix 10 5 1 Host BIOS...

Page 6: ...5 2 3 On board sound card driver installation 16 5 2 4 On board network card driver installation 16 5 3 Trouble Trouble shooting 17...

Page 7: ...s design supporting Windows 7 8 1 10 Linux and so on This product can be used in the field of mechanical equipment intelligent transportation industrial automation control and other different embedded...

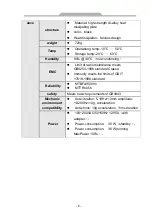
Page 8: ...sturbance meets GB9254 1998 standard Class A Immunity meets the limits of GB T 17618 1998 standard Reliability MTBF 25000h MTTR 0 5h safety Meets basic requirements of GB4943 Mechanic environment comp...

Page 9: ...3 1 3 I O Picture 1 1...

Page 10: ...products and strong mechanical vibration shock and strong magnetic field interference The package box should be at least 10cm above ground and 50cm away from wall thermal source window and air inlet C...

Page 11: ...is obviously damaged during the transportation Please check whether the delivered parcel includes the whole equipment and the accessories you ordered separately If there is any discrepancy or damaged...

Page 12: ...instructions 3 1 Product outline Picture 3 1 3 2 Product assembly Picture 3 2 1 on off 2 front panel 3 motherboard 4 radiator 5 baseboard 6 installation support 7 harddisk support 8 COM 9 backplate 10...

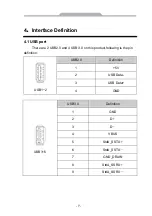
Page 13: ...re are 2 USB2 0 and 4 USB 3 0 on this product following is the pin definition USB1 2 USB2 0 Definition 1 5V 2 USB Data 3 USB Data 4 GND USB3 6 USB3 0 Definition 1 GND 2 D 3 D 4 VBUS 5 StdA_SSTX 6 StdA...

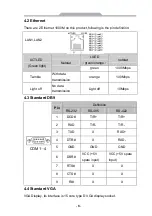
Page 14: ...winkle With data transmission orange 100Mbps Light off No data transmission Light off 10Mbps 4 3 Standard DB9 COM1 4 Pin Definition RS 232 RS 485 RS 422 1 DCD T R T R 2 RXD T R T R 3 TXD X RXD 4 DTR X...

Page 15: ...inition 1 DATA2 2 DATA2 shield 3 DATA2 4 DATA1 5 DATA1 shield 6 DATA1 7 DATA0 8 DATA0 shield 9 DATA0 10 DATA1_CK 11 DATA1_CK shield 12 DATA1_CK 13 CEC 14 Reserved 15 SCL DDC clock 16 SDA DDC data 17 D...

Page 16: ...1 Host BIOS settings 5 1 1 Main Press F2 to boot go into BIOS CMOS setting date and time as shown in picture 5 1 Picture 5 1 5 1 2 CSTIPC Enter page of picture5 2 choose LCD setting to page of pictur...

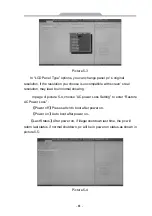
Page 17: ...ay lead to unnormal showing In page of picture 5 4 choose AC power Loss Setting to enter Restore AC Power Loss Power off Press switch to boot after power on Power on Auto boot after power on Last Stat...

Page 18: ...icture 5 5 5 1 3 Advanced Picture 5 6 ACPI Settings CPU Configuration SATA Configuration SATA Intel R Anti Theft Technology Configuration USB Configuration SMART Settings Super IO Configuration H W Mo...

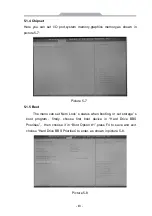
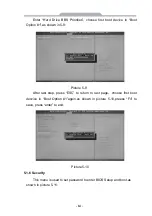
Page 19: ...Picture 5 7 5 1 5 Boot The menu can set Num Lock s status when booting or set storage s boot program firstly choose first boot device in Hard Drive BBS Priorities then choose it in Boot Option 1 press...

Page 20: ...9 Picture 5 9 After last step press ESC to return to last page choose first boot decvice in Boot Option 1 again as shown in picture 5 10 preess F4 to save press enter to exit Picture 5 10 5 1 6 Secur...

Page 21: ...15 Picture 5 11 5 1 7 Save Exit Enter CMOS page choose Save Exit as shown in picture 5 12 Picture 5 12 Press F3 to recover factory reset press F4 to save...

Page 22: ...on choose Yes and finish in restart the driver software would auto load after restart 5 2 3 On board sound card driver installation 1 Enter driver CD Driver Audio Choose related OS files double click...

Page 23: ...trol Please refer to the instructions of the display for detailed information Power cable or display cable is not connected 1 Please check whether the power cable display cable is correctly connected...

Page 24: ...r the power cable and the data cable of the hard disk the hard disk shall be installed with operating system and is bootable are well connected System files on the hard disk are damaged Enter the syst...

Page 25: ...diate radio frequency energy and if not installed and used in accordance with the instructions may cause harmful interference to radio communications However there is no guarantee that interference wi...

Reviews: