background image


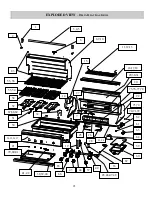
REPLACEMENT PARTS LIST


– 

D

ELTA 

H

EAT 

G

AS 

G

RILL


Note: * = Optional 

Item 

No. 

TE Part No. 

Description 

DHBQ 

26G-BN 

DHBQ 

26G-BL 

DHBQ 

32G-BN 

DHBQ 

32G-BL 

DHBQ 
32R/S-

BN 

DHBQ 
32R/S-

BL 

DHBQ 
38R/S-

BN 

DHBQ 
38R/S-

BL 

S13113 

Handle Bracket 

S13134 

Handle Bracket Insulator 

S12351 

Tube Handle 24.6” S/S Handle 


S12352 

Tube Handle 30.6” S/S Handle 


S12353 

Tube Handle 36.6”  S/S Handle 


S15343 

Hood Thermometer / Bezel / Nut 

S22141 

Bracket, Mount Igniter, IR 


S23231-26Y 

26” Hood Assembly 


S23231-32Y 

32” Hood Assembly 


10 

S23231-38Y 

38” Hood Assembly 


11 

S13841 

26” Warming Rack 


12 

S13842 

32” Warming Rack 


13 

S13889 

38” Warming Rack 


14 

S21813 

Motor Bracket 

1* 

1* 

1* 

1* 

15 

S16340 

Rotisserie Motor 

1* 

1* 

1* 

1* 

16 

S23227-26 

Top, Rear Hood Cover, 26” 


17 

S23227-32 

Top, Rear Hood Cover, 32” 


18 

S23227-38 

Top, Rear Hood Cover, 38” 


19 

S23216 

Bracket, Ignition Module 

20 

S16270 

Halogen Light 

21 

S16318 

Led, Red 

22 

S13330 

Infrared Rotisserie Burner 


23 

S13883 

Stainless Steel Spit Rod 
(26”/32”) 

1* 

1* 

1* 

1* 


24 

S13890 

Stainless Steel Spit Rod (38”) 


25 

S16303 

Safety Thermocouple 


26 

S16268 

I.R Igniter 


27 

S22083 

Cover, IR Igniter 


28 

S13865 

Stainless Steel Meat Forks 

1* 

1* 

1* 

1* 

29 

S23220-26 

Bottom, Rear Hood Cover, 26” 


30 

S23220-32 

Bottom, Rear Hood Cover, 32” 


31 

S23220-38 

Bottom, Rear Hood Cover, 38” 


32 

S23206 

Baffle, Air Stop 

33 

S16272 

Battery Pack 

34 

S23202-26GY1 

Front Panel , DHBQ26G 


35 

S23202-32GY1 

Front Panel, DHBQ32G 


36 

S23202-32RY1 

Front Panel, DHBQ32R 


37 

S23202-38RY1 

Front Panel, DHBQ38R 


38 

S23203-26 

26” Drip Pan Handle 


39 

S23203-32 

32” Drip Pan  Handle 


40 

S23203-38 

38” Drip Pan  Handle 


41 

S13163 

Delta Heat Logo 

42 

S14232 

Logo Clip 

43 

S13162-02 

Delta Heat Knob 

44a 

S13191 

Knob Bezel (No Graphics) 

44b 

S13165 

Knob, Bezel, (With Graphics) 

45 

S12751YN 

Manifold Assembly (26”) NG 


S12751YL 

Manifold Assembly (26”) LP 


46 

S12752GYN 

Manifold Assembly (32G”) NG 


S12752GYL 

Manifold Assembly (32G”) LP 


47 

S12752RYN 

Manifold Assembly (32R”) NG 


S12752RYL 

Manifold Assembly (32R”) LP 


48 

S12753YN 

Manifold Assembly (38”) NG 


S12753YL 

Manifold Assembly (38”) LP 


49 

S16273 

Light Switch 

50 

S23229 

Spacer, Briquette Tray 

51 

S16274 

Spark Igniter (U-Burner) 

52 

S13365 

Stainless Steel U-Burner 

53 

S23218-38Y 

Briquette Tray Assembly, 26, 38 


3 / 2 

3 / 2 

54 

S23218-32Y 

Briquette Tray Assembly, 32 


3 / 2 

3 / 2 


22 

Summary of Contents for DHBQ26G-B

Page 1: ...P N 18617N 01 14 Models DHBQ26G B DHBQ32G B DHBQ32R S B DHBQ38R S B DELTA HEAT GAS GRILL INSTALLATION USE CARE MANUAL...

Page 2: ...and welcome Delta Heat _____________________________________________________________________ FOR YOUR RECORDS Please record the following information and refer to them when contacting the company or...

Page 3: ...be stored in the vicinity of this or any other appliance A V E R T I S S E M E N T 1 Ne pas entreposer ni utiliser de l essence ni d autres vapeurs ou liquides inflammables dans le voisinage de l appa...

Page 4: ...pliance Keep the ventilation openings of the cylinder enclosure free and clear from debris 8 Check all gas connections for leaks with soapy water solution and brush Never use an open flame Reference p...

Page 5: ...RACK 13 o ROTISSERIE 14 o BATTERY LOCATION 14 OPERATING INSTRUCTIONS o BEFORE LIGHTING THE GRILL 15 o TO LIGHT THE GRILL BURNER 15 o MATCH LIGHTING INSTRUCTIONS 16 o USING THE GRILL 16 o INTERIOR LIG...

Page 6: ...isted below are included Grill Accessories DHBQ 26G B DHBQ 32G B DHBQ 32R S B DHBQ 38R S B Grate Stainless Steel 2 3 3 3 Briquette Tray Assy Standard Grill 2 3 3 2 3 2 Rotisserie Motor with bracket s...

Page 7: ...d on the left side Standard on RS Models and Optional on R G Models Infrared Rotisserie Burner located on the rear panel above the grates 32R S 38R S Models Only Grill Burner Grill Burner Sear Zone Op...

Page 8: ...PETROLEUM PROPANE If your grill is factory built for L P the regulator supplied is set for 11 water column and is for use with L P gas only The factory supplied regulator and hose must be used with a...

Page 9: ...n or b For an enclosure having four sides a top and a bottom 1 At least two ventilation openings at cylinder valve level shall be provided in the sidewall equally sized spaced at 180 degrees 3 14 rad...

Page 10: ...age 8 THE LP PRESSURE REGULATOR AND HOSE SUPPLIED WITH THIS UNIT MUST BE USED WITHOUT ALTERATION ALWAYS USE THE TANK SECURING DEVICE SUPPLIED WITH GRILL BASE 1 To install the gas cylinder place the cy...

Page 11: ...pplication Do not use with a 20 lb LP cylinder Make sure that the regulator is set for the correct gas type To check remove the brass hex cap You will find the conversion plastic pin attached to the c...

Page 12: ...t the safety before each use Only the factory supplied hose and regulator must be used Use only replacement regulator and hose assemblies specified by DELTA HEAT LEAK TEST 1 Prepare a leak testing sol...

Page 13: ...the transformer s power cord to the properly grounded GFCI 120V outlet e A side burner plug to provide electrical power for side burner is located at the right rear of the front panel Fig 3 AVERTISSEM...

Page 14: ...WIRING DIAGRAM DELTA HEAT GAS GRILL DHBQ32G B DHBQ32R S B DHBQ38R S B 10 DHBQ26G B...

Page 15: ...stance minimum de 3 po 7 62 cm de l arri re du gril au dessus de toute surface de cuisson la construction incombustible est prescrite pour permettre la hotte d ouvrir compl tement Une distance minimum...

Page 16: ...GRILL CUT OUT DIMENSIONS DELTA HEAT GAS GRILL 12 SEE DETAIL TYPICAL TO ALL TOP UNITS DETAIL 19 3 4 WIDTH OF UNIT 26 32 38 AS SHOWN DHBQ32R S B DHBQ32G B DHBQ38R S B DHBQ26G B...

Page 17: ...ve been removed prior to grill operation TO INSTALL BRIQUETTES TRAYS 1 Put briquette trays into the grill above the burner as shown by lining up the tab with the channel of the briquette tray 2 Then p...

Page 18: ...e 3 Remove the stainless steel grates 4 Place a basting pan on top of the briquette trays to catch the drippings basting pan not supplied For Smaller Loads 1 Install the rotisserie motor horizontally...

Page 19: ...procedure Always keep your face and body as far away as possible when lighting Refer to spiders and insects warning and procedure under the cleaning and maintenance page of this manual TO LIGHT THE G...

Page 20: ...of the cross tube of the burner Once you see or hear a flame you can release the knob Important If burner fails to light within 4 seconds turn off gas and wait 5 minutes before repeating the process W...

Page 21: ...e in about 1 minute CAUTION If ignition does not take place within 4 seconds turn knob to the OFF position wait for five minutes and repeat step 5 NOTE Once the burner reached cooking temperature adju...

Page 22: ...lves clean during the next cooking operation Periodically the briquette trays need to be cleaned Remove them from the grill shake free loose of the debris and wipe the trays clean Do not handle a hot...

Page 23: ...ossibility of a grease fire DO NOT use the grill without the drip pan pushed all the way to the back of the grill unit BURNERS Burners are made of heavy gauge stainless steel and can be soaked in wate...

Page 24: ...o only one burner If it appears so clean the orifice and burner clearing ports of any obstruction 2 Check for any bent or kinked fuel hose 3 Check if the air shutter is properly adjusted 4 Check for p...

Page 25: ...1 12 13 3 4 5 1 2 6 8 9 10 15 14 16 17 18 70 71 72 62 63 64 61 22 20 59 60 82 27 23 24 28 26 25 33 57 43 44 38 39 40 19 21 41 42 65 66 45 46 47 48 34 35 36 37 29 30 31 83 55 56 53 54 58 52 51 67 68 69...

Page 26: ...68 I R Igniter 1 1 1 1 27 S22083 Cover IR Igniter 1 1 1 1 28 S13865 Stainless Steel Meat Forks 1 1 1 1 1 1 1 1 29 S23220 26 Bottom Rear Hood Cover 26 1 1 30 S23220 32 Bottom Rear Hood Cover 32 1 1 1 1...

Page 27: ...2 73 S23222 L Rear Hood Side Left DHBQ 1 1 1 1 1 1 1 1 74 S23222 R Rear Hood Side Right DHBQ 1 1 1 1 1 1 1 1 75 S23221 26G Rear Hood Liner DHBQ26G 1 1 76 S23221 32G Rear Hood Liner DHBQ32G 1 1 77 S232...

Page 28: ...andling charges This warranty excludes all commercial locations such as restaurants and food service locations WARRANTY LIMITATIONS EXCLUSIONS This warranty shall apply only to the products purchased...

Page 29: ...anty This information is for our internal use only Cut Here Or you may register online at http www deltaheat com HOW TO OBTAIN SERVICE For service please contact your DELTA HEAT dealer or call DELTA H...

Page 30: ...Customer Service ATTN Warranty Department 13231 166th Street Cerritos CA 90703 Place Postage Here Cut Here...

Reviews: